background image

120Hz Double Frame Rate Technique 

1.


The 120Hz Double Frame Rate Technique Introduction 


The 120Hz Double Frame Rate Technique speeds up the image refresh rate from 50/60Hz up to 100/120Hz 
by a Motion Estimation and Motion Compensation (MEMC) control circuit to compensate an inter-frame 
through the storage and operation method to insert back into its original frame stream for playing. This 
technique improves the image dragging and image flickering that occurred from playing motion frames, and 
provides viewers smoother motion images. 


Operating modes of 120Hz Double Frame Rate Technique 

The L2461x Wide Display provides three operating modes: 

(1) 120Hz 

On:  Recommended for playing video files at full screen. 

(2)  120Hz Off:  Recommended for normal PC operating; such as Web browsing or words processing. 

(3)  120Hz Split:  Recommended for playing video files at full screen. You can clearly see the superiority of 

the 120Hz technique. 

2.


The 120Hz Double Frame Rate Configuration 
2.1  Check the film property to see if it is made of 50Hz or 60Hz standard. 


Check the film message. Check the disk standard. Is it NTSC(60Hz) or PAL(50Hz)? 
NTSC Standard: USA, Canada, Japan, South Korea, and Taiwan, etc. 
PAL Standard: UK, Europe, China, Australia, Singapore, and Hong Kong, etc. 

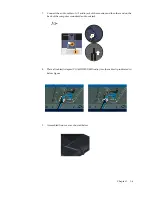
2.2  Using DVD player device 


In order to reach a smooth film-playing effect, please check the film standard or vsync is in accordance 
with the DVD player output before playing film. According to the disk property to select NTSC(60Hz) or 
PAL(50Hz) refresh rate for the DVD player. 

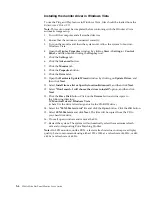
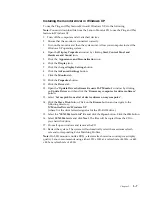
2.3  Using PC media player 


Setting the monitor to recommend resolution 1920x1080. In order to reach a smooth film-playing effect, 
please check the film standard or vsync is in accordance with the graphics card output before playing 
film. According to the disk property to select NTSC(60Hz) or PAL(50Hz) refresh rate for the display. 


For detailed configuration, please refer to the displayÊs instruction manual on page

 37 

regarding 

„Configuring the 120Hz Double Frame Rate.‰ 

3.


Q & A 

Q:  Why the effect of 120Hz Double Frame Rate technique is not obvious? 

A:  Please check the film standard to see if it is in accordance with the output frequency. Please refer to the 

previous paragraph on „Configuring the 120Hz Double Frame Rate.‰ 

Q:  Is it possible to adjust the displayÊs refresh rate up to higher than 60Hz? 

A:  No. Due to the adoption of 120Hz Double Frame Rate technique, the highest refresh rate can only be adjusted 

up to 60Hz. 

Q:  Why the image flickering occurs occasionally when moving mouse pointer or windows on PC? 

A:  As the main function of the 120Hz Double Frame Rate technique is to optimize the motion images, and so the 

act of moving mouse pointer or windows will be treated and processed as a motion image. That is why the 
flickering occurs occasionally. We suggest users to turn on the 120Hz function when watching film, but turn 
it off when in regular operation. 


2-

4

L2

461x

 Wide Flat Panel Monitor User’s Guide 

Summary of Contents for 2467-HB1

Page 1: ...L2461x Wide Flat Panel Monitor User s Guide ...

Page 2: ...ense and are sold to governmental entities as commercial items as defined by 48 C F R 2 101 with limited and restricted rights to use reproduction and disclosure LIMITED AND RESTRICTED RIGHTS NOTICE If products data computer software or services are delivered pursuant a General Services Administration GSA contract use reproduction or disclosure is subject to restrictions set forth in Contract No G...

Page 3: ...controls 2 Selecting a supported display mode 2 Understanding power management 2 Caring for your monitor 2 VESA mount using guide 2 Chapter 3 Reference information 3 1 Monitor specifications 3 1 Troubleshooting 3 2 Manual image setup 3 4 Manually installing the monitor driver 3 5 Installing the monitor driver in Windows 7 3 5 Appendix A Service and Support A 1 Telephone technical support A 1 Appen...

Page 4: ...d plug must be connected to a properly wired and grounded power outlet Any equipment to which this product will be attached must also be connected to properly wired and grounded power outlets To isolate the monitor from the electrical supply you must remove the plug from the power outlet The power outlet should be easily accessible Handling If your monitor weighs more than 18 kg 39 68 lb it is rec...

Page 5: ...rd Audio Cable USB Cable Adapter Analog Interface Cable Attached to monitor Notice for use To set up your monitor please see the illustrations below Note Do not touch the monitor within the screen area The screen area is glass and can be damaged by rough handling or excessive pressure 1 Carefully lay the monitor on a flat surface 2 Revolve the stand from top to bottom Note To attach a VESA mount p...

Page 6: ...e monitor For more information see Positioning your monitor on page 2 1 1 2 L2461x Wide Flat Panel Monitor User s Guide Monitor controls Your monitor has controls on the front which are used to adjust the display For information on how to use these controls please see Adjusting your monitor image on page 2 3 Windows shortcut control button Light bar control button Speaker control button OSD contro...

Page 7: ...k slot Your monitor is equipped with a cable lock slot located on the rear of your monitor in the lower position Please see the instructions that come with the cable lock to learn how to attach it Chapter 1 1 3 ...

Page 8: ...o read the Safety information located on page iii before carrying out this procedure 1 Power off your computer and all attached devices and unplug the computer power cord 2 After monitor laid on a flat table remove the line corer from here 1 4 L2461x Wide Flat Panel Monitor User s Guide 3 Connect the cables according to below icon indication ...

Page 9: ... upstream USB port of the back of the monitor and the other end to an appropriate USB port on your computer Integrated Multi touch camera and microphone and Window shortcut keys work via the USB cable Chapter 1 1 5 4 Connect the analog signal cable to the video port on the back of the computer Note One end of the signal cable is already pre attached to your monitor ...

Page 10: ...ow 9 Chapter 1 1 6 7 Connect the audio cable to A I audio jack of the monitor and the other end on the back of the computer soundcard audio out jack Place all cables Adapter VGA HDMI USB Audio into the cable clip indicated in below figure ...

Page 11: ...ated in below figure Note A certified power supply cord has to be used with this equipment The relevant national installation and or equipment regulations shall be considered A certified power supply cord not lighter than ordinary polyvinyl chloride flexible cord according to IEC 60227 designation H05VV F 3G 0 75mm2 or H05VVH2 F2 3G0 75mm2 shall be used Alternative a flexible cord be of synthetic ...

Page 12: ...tomatic image setup requires that the monitor is warmed up for at least 15 minutes This is not required for normal operation Note If automatic image setup does not establish the image that you prefer perform manual image setup See Manual image setup on page 3 4 Chapter 1 1 7 15 If you want to use Multi touch Camera and Mic or Windows shortcut control function please install the driver and software...

Page 13: ...g by considering the following items Viewing distance Optimal viewing distances for monitors range from approximately 510mm to 760mm 20 in to 30 in and can vary depending on ambient light and time of day You can achieve different viewing distances by repositioning your monitor or by modifying your posture or chair position Use a viewing distance that is most comfortable for you Monitor height Posi...

Page 14: ...ranging your work area on page 2 1 so you can maintain a comfortable and productive posture Also be sure to use the adjustment capabilities of your computer components and office furniture to best suit your preferences now and as your preferences change over time Minor changes in posture can help avoid discomfort The longer you sit and work with your computer the more important it is to observe yo...

Page 15: ...OFF Enable the Light bar when touch the button Auto color Light bar ON OFF Autocolor Light Bar when touch the button Volume Decrease the volume of speaker and audio out Volume Increase the volume of speaker and audio out Audio ON OFF ON OFF the volume of speaker and audio out 120Hz ON OFF Split Input Change Switches the video input source DDC CI Exit Exit from menu Image Setup Activates automatic ...

Page 16: ...s in accordance with the DVD player output before playing film According to the disk property to select NTSC 60Hz or PAL 50Hz refresh rate for the DVD player 2 3 Using PC media player Setting the monitor to recommend resolution 1920x1080 In order to reach a smooth film playing effect please check the film standard or vsync is in accordance with the graphics card output before playing film Accordin...

Page 17: ...or then press to select that function Use or to make adjustments Press to save to move backwards through the sub menus and exit from the OSD 3 Press 4 Press and hold for 10 seconds to lock the OSD This will prevent accidental adjustments to the OSD Press and hold for 10 seconds to unlock the OSD and allow adjustments to the OSD 5 Enables DDC CI by default Use OSD Exit Key Press and hold the button...

Page 18: ...timizes image See Manual image setup on page 3 4 Clock Phase Save Image Properties Color Reddish Adjusts intensity of red green and blue Preset mode Neutral sRGB Bluish Custom Red Increases or decreases the saturation of red in the image Green Increases or decreases the saturation of green in the image Blue Increases or decreases the saturation of blue in the image Save Saves the custom color choi...

Page 19: ...e OSD It has no effect on any software running on the computer Menu Position Adjusts menu location Default Default returns the menu position to the default settings Custom Horizontal Changes the horizontal position of the OSD Vertical Changes the vertical position of the OSD Same as Analog factory default Cancel Reset Reset monitor to the original settings Accessibility Changes button repeat rate ...

Page 20: ...currently configured to a display mode outside the range of this monitor you may need to re attach the CRT monitor temporarily until you have re configured the system preferably to 1920 x 1080 at 60 Hz which is the Native Resolution Display mode The display modes shown below have been optimized at the factory Table 2 3 Factory set display modes Addressability Refresh rate NTSC 60 Hz PAL 50 Hz 640 ...

Page 21: ...ay or whenever you expect to leave it unused for long periods during the day Table 2 4 Power indicator State Power Indicator Screen Restoring Operation Compliance On Steady white Normal Standby Suspend Amber Blank Press a key or move the mouse There may be a slight delay before the image reappears Note Standby also occurs if there is no image output to the monitor ENERGY STAR Off Off Blank Press t...

Page 22: ...he screen Remove grease or finger marks with a damp cloth and a little mild detergent Wall mounting optional Refer to the instructions that come with the base mounting kit To convert your LCD display from a desk mounted to a wall mounted display do the following Step 1 Verify that the Power button is turned Off then disconnect the power cord Step 2 Lay the LCD display face down on a towel or blank...

Page 23: ... downside when using VESA mount setup Image Viewable image size Maximum height Maximum width Pixel pitch 598 1 mm 23 6 in 297 2 mm 11 7 in 525 2 mm 20 7 in 0 2715 mm 0 01 in V Power input Supply voltage Max supply current Power consumption Note Power consumption figures are for the monitor and the power supply combined Normal operation Standby Suspend Off Note without audio input USB upstream inpu...

Page 24: ...tions VESA DDC CI Supported Display Modes VESA Standard modes between noted ranges Horizontal frequency Vertical frequency 30 kHz 83 kHz 50 Hz 75 Hz Native Resolution 1920 x 1080 at 60 Hz Temperature Operating Storage Shipping 0 to 40 C 32 to 104 F 20 to 60 C 4 to 140 F 20 to 60 C 4 to 140 F Humidity Operating Storage Shipping 8 to 80 non condensing 5 to 95 non condensing 5 to 95 non condensing 3 ...

Page 25: ...cted with the monitor or system completely Be sure the signal cable is firmly plugged into the system and monitor Connecting and turning on your monitor on page 1 4 The color settings may be incorrect Select another color setting from the OSD menu Adjusting your monitor image on page 2 3 The automatic image setup function was not performed Perform automatic image setup Adjusting your monitor image...

Page 26: ...ines through the image have not been optimized Perform automatic image setup If automatic image setup does not help perform manual image setup Selecting a supported display mode on page 2 7 When working in the native resolution you may find additional improvements by adjusting the Dots Per Inch DPI setting on your system See the Advanced section of your system s display properties Manual image set...

Page 27: ... the Advanced Settings button 8 Click the Monitor tab 9 Click the Properties button 10 Click the Driver tab 11 Open the Update Driver Software Generic PnP Monitor window by clicking on Update Driver and then click the Browse my computer for driver software button 12 Select Let me pick from a list of device drivers on my computer 13 Click the Have Disk button Click on the Browse button and navigate...

Page 28: ...nd then click Next 11 Select Install from a list or Specific location Advanced and then click Next 12 Select Don t search I will choose the driver to install option and then click Next 13 Click the Have Disk button Click on the Browse button and navigate to the following directory X Monitor Drivers Windows Vista where X is the drive letter designator for the CD ROM drive 14 Select the LEN L2461xwA...

Page 29: ...he Update Driver Software Generic PnP Monitor window by clicking on Update Driver and then click the Browse my computer for driver software button 13 Select Let me pick from a list of device drivers on my computer 14 Click the Have Disk button Click on the Browse button and navigate to the following directory X Monitor Drivers Windows XP where X is the drive letter designator for the CD ROM drive ...

Page 30: ... be available until 90 days after the option has been withdrawn from marketing After that time the support is cancelled or made available for a fee at Lenovo s discretion Additional support is also available for a nominal fee Before contacting a Lenovo technical support representative please have the following information available option name and number proof of purchase computer manufacturer mod...

Page 31: ...e publication Lenovo may make improvements and or changes in the product s and or the program s described in this publication at any time without notice The products described in this document are not intended for use in implantation or other life support applications where malfunction may result in injury or death to persons The information contained in this document does not affect or change Len...

Page 32: ...f disused computers and monitors For details visit the Lenovo Web site at www ibm com jp pc service recycle pcrecycle Pursuant to the Law for Promotion of Effective Utilization of Resources the collecting and recycling of home used computers and monitors by the manufacturer was begun on October 1 2003 This service is provided free of charge for home used computers sold after October 1 2003 For det...

Page 33: ...mage Flexible to change the size of preview window Auto detect outdoor light environment System Request CPU Pentium 41 8G or above Momory 512M or above OS Windows XP SP1 or above Windows VISTA Windows 7 USB 2 0 interface USB1 1 compatible Certification Compliance USB 2 0 logo USB Specification rev 2 0 plus associated current ECNs Operation Temperature 0 C 40 C Power Consumption 150mA 5 Work 0 5mA ...

Page 34: ...ide of your monitor Note This monitor supports High Speed Certified USB 2 0 interface Transfer speed Data Rate Power Consumption High speed 480 Mbps 2 5 Max each port W Full speed 12 Mbps 2 5 Max each port W Low speed 1 5 Mbps 2 5 Max each port W USB Upstream Connector USB Downstream Connector Copyright Lenovo 2009 D 1 ...

Page 35: ...t position 1 m above the display 30 forward of the display plane 50 60 Hz elimination enabled Sensor response time Less than 20 ms for two touches Static touch height 1 to 2 mm Capabilities Point and click signature capture sketching painting and gestures where enabled in Windows 7 Touch durability Unlimited Scratch resistance Touch operation is not affected by scratches Touch activation force Opt...

Page 36: ... Film judder cancellation z Motion blur removal System Vertical NTSC 60 Hz PAL 50 Hz Note Purpose to smooth the video with fluency Make sure the PC output timing frequency 50Hz 60Hz setting must match video output of TV system NTSC or PAL from device Appendix F 120Hz description ...

Page 37: ...F 2 How to setting PC 50Hz and 60Hz setting Windows 7 System 1 Clicking the mouse right button to select Personalize 2 Click the Advanced settings icon 3 Appendix 2 F F 120Hz Description ...

Page 38: ...3 Click Monitor icon 4 Remove the mark showed before Hide modes that this monitor cannot display Copyright Lenovo 2009 F 3 ...

Page 39: ...4 Click Screen refresh rate to select 50Hz or 60Hz 3 Appendix F F 120Hz Description 4 ...

Page 40: ... Copyright Lenovo 2009 F 5 ...

Page 41: ...Windows Vista System 1 Clicking the mouse right button to select Personalize 2 Click the Display settings icon 3 Appendix F F 120Hz Description 6 ...

Page 42: ...3 Click the Advanced Settings icon 4 Open the Advance settings and click the Monitor icon Copyright Lenovo 2009 F 7 ...

Page 43: ...5 Remove the mark showed before Hide modes that this monitor cannot display 3 Appendix F F 120Hz Description 8 ...

Page 44: ...6 Click Screen refresh rate to select 50Hz or 60Hz Copyright Lenovo 2009 F 9 ...

Page 45: ...Windows XP system 1 Clicking the mouse right button to select Properties 2 Open Properties and Click the Settings icon 3 Appendix F F 120Hz Description 10 ...

Page 46: ...3 Click the Monitor icon Copyright Lenovo 2009 F 11 ...

Page 47: ...4 Remove the mark showed before Hide modes that this monitor cannot display 3 Appendix F F 120Hz Description 12 ...

Page 48: ...5 Click Screen refresh rate to select 50Hz or 60Hz Copyright Lenovo 2009 1 F 3 ...

Reviews: