8.
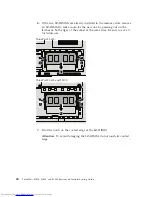
With the notched end of the SO-DIMM toward the contact edge side of
the socket, insert the SO-DIMM into the socket at an angle of about 20
degrees
1
; then press it firmly
2
.
ThinkPad SL 300:
2
1
ThinkPad SL 400 and SL500:
20
1
2
1
2
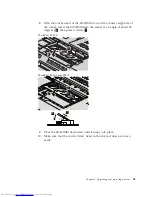
9.
Pivot the SO-DIMM downward until it snaps into place.
10.
Make sure that the card is firmly fixed in the slot and does not move
easily.
Chapter 5. Upgrading and replacing devices
41
Summary of Contents for 2746AD4 - ThinkPad SL500 2746
Page 1: ...ThinkPad SL300 SL400 and SL500 Service and Troubleshooting Guide ...
Page 2: ......
Page 3: ...ThinkPad SL300 SL400 and SL500 Service and Troubleshooting Guide ...
Page 36: ...28 ThinkPad SL300 SL400 and SL500 Service and Troubleshooting Guide ...
Page 40: ...32 ThinkPad SL300 SL400 and SL500 Service and Troubleshooting Guide ...
Page 47: ...ThinkPad SL 500 2 1 Chapter 5 Upgrading and replacing devices 39 ...
Page 52: ...44 ThinkPad SL300 SL400 and SL500 Service and Troubleshooting Guide ...
Page 60: ...52 ThinkPad SL300 SL400 and SL500 Service and Troubleshooting Guide ...
Page 68: ...60 ThinkPad SL300 SL400 and SL500 Service and Troubleshooting Guide ...
Page 78: ...70 ThinkPad SL300 SL400 and SL500 Service and Troubleshooting Guide ...
Page 81: ......
Page 82: ...Part Number 43Y6727 Printed in China 1P P N 43Y6727 ...


