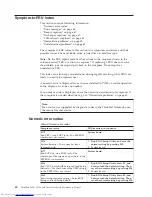
Symptom-to-FRU index
This section contains following information:
v
“Numeric error codes”
v
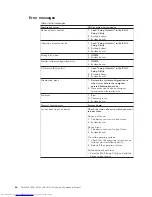
“Error messages” on page 66
v
“Beep symptoms” on page 67
v
“No-beep symptoms” on page 67
v
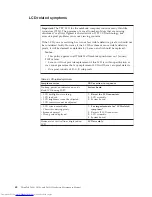
“LCD-related symptoms” on page 68
v
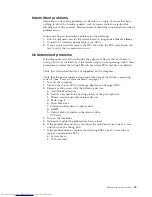
“Intermittent problems” on page 69
v
“Undetermined problems” on page 69
The symptom-to-FRU index in this section lists symptoms and errors and their
possible causes. The most likely cause is listed first, in boldface type.
Note:
Do the FRU replacement or other actions in the sequence shown in the
column headed “FRU or action, in sequence.” If replacing a FRU does not solve
the problem, put the original part back in the computer. Do not replace a
nondefective FRU.
This index can also help you determine, during regular servicing, what FRUs are
likely to need to be replaced next.
A numeric error is displayed for each error detected in POST or system operation.
In the displays,
n
can be any number.
If no numeric code is displayed, check the narrative descriptions of symptoms. If
the symptom is not described there, go to “Intermittent problems” on page 69.
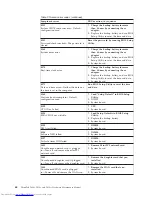
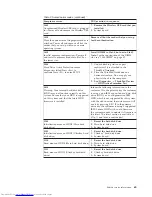
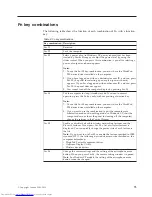
Numeric error codes
Table 2. Numeric error codes
Symptom or error
FRU or action, in sequence
0175
Bad CRC1, stop POST task—The EEPROM
checksum is not correct.
System board.
0176
System Security—The system has been
tampered with.
1.
Run BIOS Setup Utility, and save the
current setting by pressing F10.
2.
System board.
0177
Bad SVP data, stop POST task—The
checksum of the supervisor password in the
EEPROM is not correct.
System board.
0182
Bad CRC2. Enter BIOS Setup and load Setup
defaults.—The checksum of the CRS2 setting
in the EEPROM is not correct.
1.
Run BIOS Setup Utility. Press F9, and
Enter to load the default setting. Then
save the current setting by pressing F10.
2.
System board.
0185
Bad startup sequence settings. Enter BIOS
Setup and load Setup defaults.
1.
Run BIOS Setup Utility. Press F9, and
Enter to load the default setting. Then
save the current setting by pressing F10.
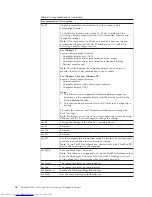
Note:
For a device not supported by diagnostic codes in the ThinkPad Notebooks, see
the manual for that device.
62
ThinkPad T400s, T410s, and T410si Hardware Maintenance Manual
Summary of Contents for 2901A3U
Page 1: ...ThinkPad T400s T410s and T410si Hardware Maintenance Manual ...
Page 2: ......
Page 3: ...ThinkPad T400s T410s and T410si Hardware Maintenance Manual ...
Page 8: ...vi ThinkPad T400s T410s and T410si Hardware Maintenance Manual ...
Page 18: ...10 ThinkPad T400s T410s and T410si Hardware Maintenance Manual ...
Page 19: ...Safety information 11 ...
Page 26: ...18 ThinkPad T400s T410s and T410si Hardware Maintenance Manual ...
Page 27: ...Safety information 19 ...
Page 28: ...20 ThinkPad T400s T410s and T410si Hardware Maintenance Manual ...
Page 29: ...Safety information 21 ...
Page 30: ...22 ThinkPad T400s T410s and T410si Hardware Maintenance Manual ...
Page 31: ...Safety information 23 ...
Page 34: ...26 ThinkPad T400s T410s and T410si Hardware Maintenance Manual ...
Page 35: ...Safety information 27 ...
Page 37: ...Safety information 29 ...
Page 41: ...Safety information 33 ...
Page 42: ...34 ThinkPad T400s T410s and T410si Hardware Maintenance Manual ...
Page 43: ...Safety information 35 ...
Page 45: ...Safety information 37 ...
Page 46: ...38 ThinkPad T400s T410s and T410si Hardware Maintenance Manual ...
Page 62: ...54 ThinkPad T400s T410s and T410si Hardware Maintenance Manual ...
Page 78: ...70 ThinkPad T400s T410s and T410si Hardware Maintenance Manual ...
Page 82: ...74 ThinkPad T400s T410s and T410si Hardware Maintenance Manual ...
Page 86: ...78 ThinkPad T400s T410s and T410si Hardware Maintenance Manual ...
Page 90: ...82 ThinkPad T400s T410s and T410si Hardware Maintenance Manual ...
Page 127: ...Table 24 Removal steps of LCD unit continued 7 7 Removing and replacing a FRU 119 ...
Page 158: ...150 ThinkPad T400s T410s and T410si Hardware Maintenance Manual ...
Page 226: ...218 ThinkPad T400s T410s and T410si Hardware Maintenance Manual ...
Page 229: ......

