1010 Battery pack
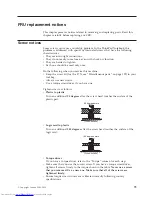
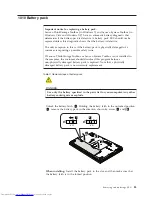
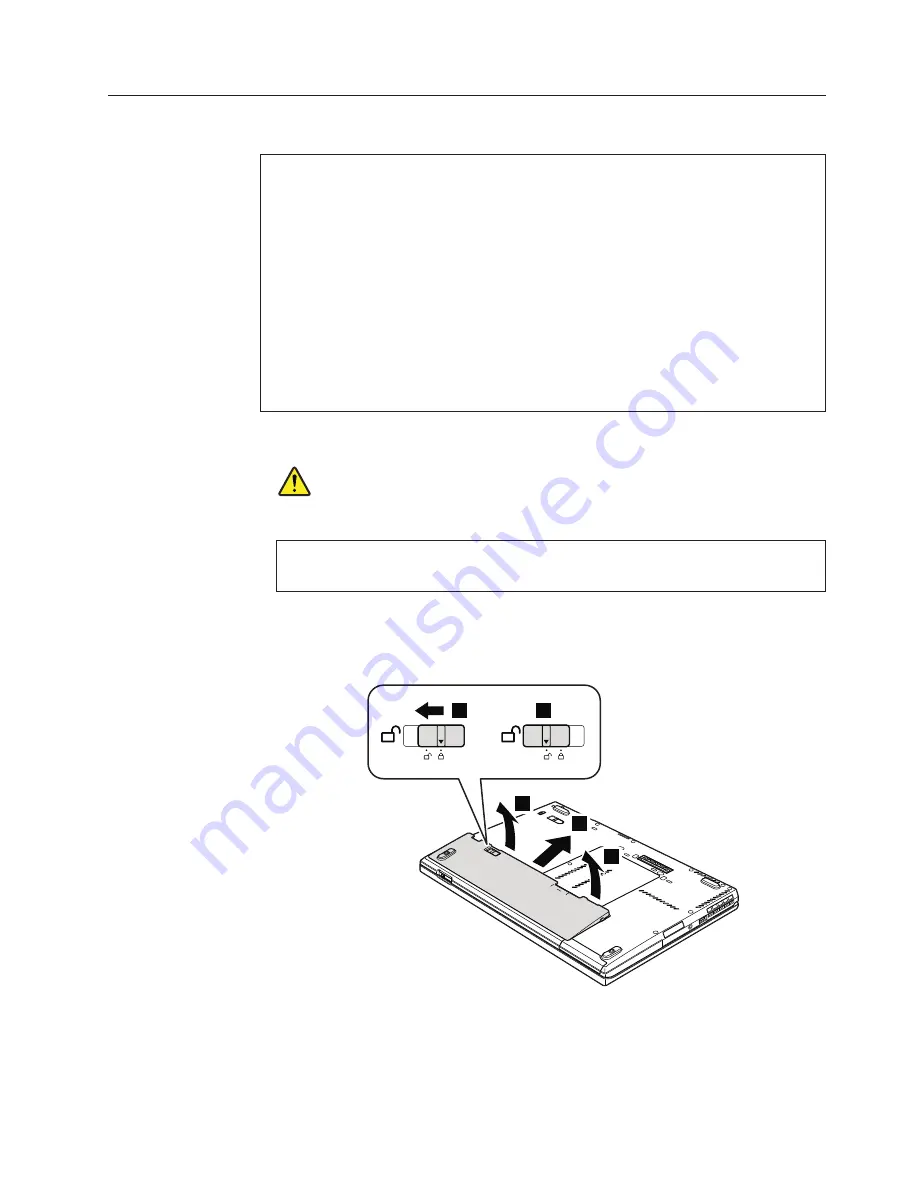
Table 9. Removal steps of battery pack
DANGER
Use only the battery specified in the parts list for your computer. Any other
battery could ignite or explode.
Unlock the battery latch
1
. Holding the battery latch in the unlocked position
2
, remove the battery pack in the direction shown by arrow
3
and
4
.
3
3
4
1
2
When installing:
Install the battery pack in the slot, and then make sure that
the battery latch is in the locked position.
Important notice for replacing a battery pack:
Lenovo ThinkVantage Toolbox (in Windows 7) and Lenovo System Toolbox (in
Windows Vista and Windows XP) have an automatic battery diagnostic that
determines if the battery pack is defective. A battery pack FRU should not be
replaced unless this diagnostic shows that the battery is defective.
The only exception to this is if the battery pack is physically damaged or a
customer is reporting a possible safety issue.
If Lenovo ThinkVantage Toolbox or Lenovo System Toolbox is not installed in
the computer, the customer should download this program before a
non-physically damaged battery pack is replaced. Note that a physically
damaged battery pack is non-warranty replacement.
Removing and replacing a FRU
85
Summary of Contents for 2901A3U
Page 1: ...ThinkPad T400s T410s and T410si Hardware Maintenance Manual ...
Page 2: ......
Page 3: ...ThinkPad T400s T410s and T410si Hardware Maintenance Manual ...
Page 8: ...vi ThinkPad T400s T410s and T410si Hardware Maintenance Manual ...
Page 18: ...10 ThinkPad T400s T410s and T410si Hardware Maintenance Manual ...
Page 19: ...Safety information 11 ...
Page 26: ...18 ThinkPad T400s T410s and T410si Hardware Maintenance Manual ...
Page 27: ...Safety information 19 ...
Page 28: ...20 ThinkPad T400s T410s and T410si Hardware Maintenance Manual ...
Page 29: ...Safety information 21 ...
Page 30: ...22 ThinkPad T400s T410s and T410si Hardware Maintenance Manual ...
Page 31: ...Safety information 23 ...
Page 34: ...26 ThinkPad T400s T410s and T410si Hardware Maintenance Manual ...
Page 35: ...Safety information 27 ...
Page 37: ...Safety information 29 ...
Page 41: ...Safety information 33 ...
Page 42: ...34 ThinkPad T400s T410s and T410si Hardware Maintenance Manual ...
Page 43: ...Safety information 35 ...
Page 45: ...Safety information 37 ...
Page 46: ...38 ThinkPad T400s T410s and T410si Hardware Maintenance Manual ...
Page 62: ...54 ThinkPad T400s T410s and T410si Hardware Maintenance Manual ...
Page 78: ...70 ThinkPad T400s T410s and T410si Hardware Maintenance Manual ...
Page 82: ...74 ThinkPad T400s T410s and T410si Hardware Maintenance Manual ...
Page 86: ...78 ThinkPad T400s T410s and T410si Hardware Maintenance Manual ...
Page 90: ...82 ThinkPad T400s T410s and T410si Hardware Maintenance Manual ...
Page 127: ...Table 24 Removal steps of LCD unit continued 7 7 Removing and replacing a FRU 119 ...
Page 158: ...150 ThinkPad T400s T410s and T410si Hardware Maintenance Manual ...
Page 226: ...218 ThinkPad T400s T410s and T410si Hardware Maintenance Manual ...
Page 229: ......


