background image

User Guide

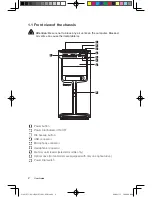
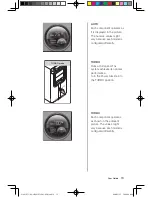
WiFi antenna connector (This connector only equipped on the model with 
WiFi card. For more information about this connector, see WM600-B-LO 
Wireless 802. 11b/g Wireless PCI-E Adapter Card User Manual.)
TV-Tuner (selected models only)

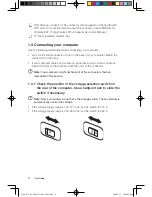
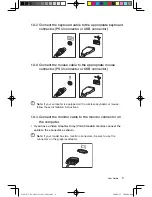
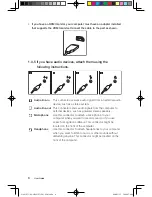
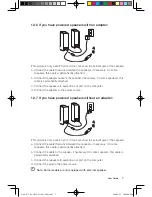
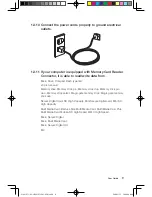
1.3 Connecting your computer 

Use the following information when connecting your computer.
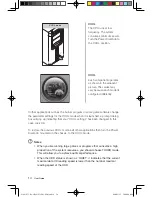
•  Look for the small connector icons on the back of your computer. Match the 

connectors to the icons.

•  If your computer cables and connector panel have color-coded connectors, 

match the color of the cable end with the color of the connector. 


Note: 

Your computer might not have all of the connectors that are 

described in this section. 


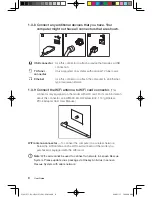
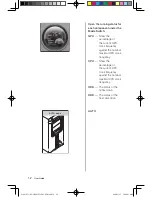
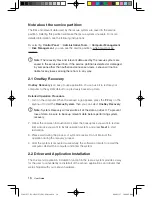
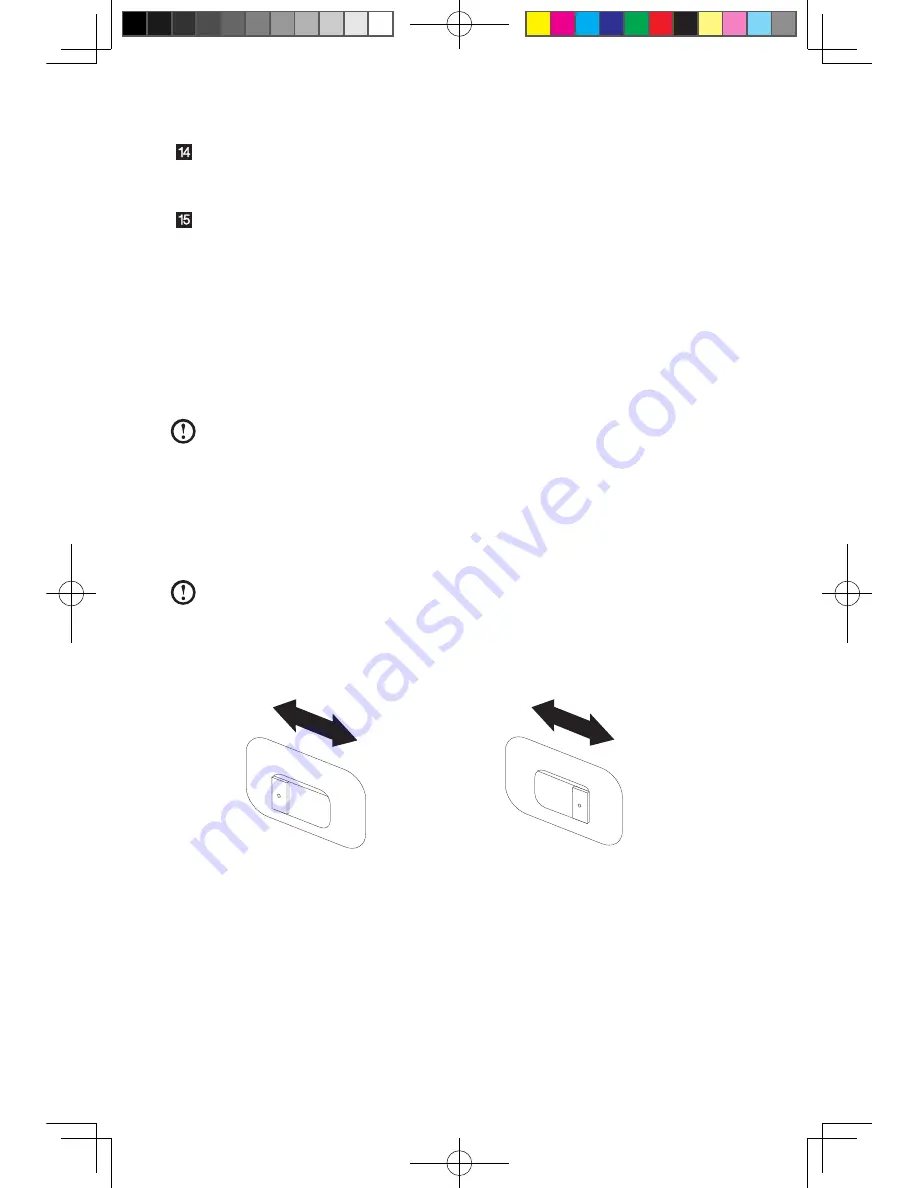
1.3.1 Check the position of the voltage-selection switch on 

the rear of the computer. Use a ballpoint pen to slide the 
switch if necessary.


Note: 

Some computers do not have the voltage switch. These computers 

automatically control the voltage.

•  If the voltage supply range is 100-127 V ac, set the switch to 115 V.
•  If the voltage supply range is 200-240 V ac, set the switch to 230 V.


115


23

0

31041577_K3_UG(H57)_EN_V3.0.indd4   4

2009.11.17   10:56:25 AM

Summary of Contents for 30192MU

Page 1: ...Version 3 0 2009 11 User Guide IdeaCentre K3 Series 31041577 31041577_K3_UG H57 _FM_EN_V3 0 i1 1 2009 11 17 10 52 14 AM ...

Page 2: ...his product for the latest safety information Reading and understanding this safety information reduces the risk of personal injury or damage to your product Danger Be aware of extremely hazardous or lethal situations Attention Be aware of possible damage to programs devices or data Note Pay attention to this important information Copyright Lenovo 2007 2009 31041577_K3_UG H57 _EN_V3 0 indd1 1 2009...

Page 3: ...31041577_K3_UG H57 _EN_V3 0 indd2 2 2009 11 17 10 56 19 AM ...

Page 4: ...on 16 2 3 System Setup 17 2 4 System Backup 18 2 5 System Recovery 18 2 6 Create Recovery Disc 18 Chapter 3 Using the Computer Software 19 3 1 Power2Go Burning Discs 20 3 2 WinDVD 21 3 3 Lenovo Healthcare Software 22 3 4 McAfee Security Center 25 3 5 BackOn Track 26 Chapter 4 System Maintenance and Recovery 29 4 1 Restoring the System 30 4 2 Backup and Restore 30 4 3 Cleaning Up the Disk 30 4 4 Ch...

Page 5: ...firming Setup 33 5 1 Troubleshooting Display Problems 34 5 2 Troubleshooting Audio Problems 35 5 3 Troubleshooting Software Problems 35 5 4 Troubleshooting Problems with Optical Drives and Hard Disks 36 5 5 Special considerations for troubleshooting Windows 37 31041577_K3_UG H57 _EN_V3 0 indd2 2 2009 11 17 10 56 19 AM ...

Page 6: ...hardware introduction ÿ Information on computer connections Note The descriptions in this chapter might vary from your computer depending on computer models and configurations User Guide Using the Computer Hardware 31041577_K3_UG H57 _EN_V3 0 indd1 1 2009 11 17 10 56 21 AM ...

Page 7: ...thermal problems 9 8 3 1 2 4 5 6 7 Power button Power Dial indicator ON OFF File backup button USB connector Microphone connector Headphone connector Memory card reader selected models only Optical drive Some models are equipped with only one optical drive Power Dial switch 31041577_K3_UG H57 _EN_V3 0 indd2 2 2009 11 17 10 56 22 AM ...

Page 8: ...r selected models only HDMI port USB connectors 6 Ethernet connector SPDIF port Audio line out sockets 2 Audio line in sockets 2 Microphone connector PCI Express x16 graphics adapter connector Some models are equipped with this connector For more information about the graphics adapter see the description below 31041577_K3_UG H57 _EN_V3 0 indd3 3 2009 11 17 10 56 24 AM ...

Page 9: ...es and connector panel have color coded connectors match the color of the cable end with the color of the connector Note Your computer might not have all of the connectors that are described in this section 1 3 1 Check the position of the voltage selection switch on the rear of the computer Use a ballpoint pen to slide the switch if necessary Note Some computers do not have the voltage switch Thes...

Page 10: ... computer is equipped with a wireless keyboard or mouse follow those installation instructions 1 3 4 Connect the monitor cable to the monitor connector on the computer If you have a Video Graphics Array VGA Standard monitor connect the cable to the connector as shown Note If your model has two monitor connectors be sure to use the connector on the graphics adapter 31041577_K3_UG H57 _EN_V3 0 indd5...

Page 11: ...nnector sends audio signals from the computer to external devices such as powered stereo speakers Microphone Use this connector to attach a microphone to your computer when you want to record sound or if you use speech recognition software This connector might be located on the front of the computer Headphone Use this connector to attach headphones to your computer when you want to listen to music...

Page 12: ...he computer d Connect the adapter to the power source 1 3 7 If you have powered speakers without an adapter This picture is only a sketch print it does not show the actual figure of the speaker a Connect the cable that runs between the speakers if necessary On some speakers this cable is permanently attached b Connect the cable to the speaker if necessary On some speakers this cable is permanently...

Page 13: ... to WiFi card connector This connector only equipped on the model with WiFi card For more information about this connector see WM600 B LO Wireless 802 11b g Wireless PCI E Adapter Card User Manual WiFi antenna connector To connect the computer to a wireless network Screw the WiFi antenna on the WiFi card connector if the model you purchased is equipped with the WiFi card Note Wifi card cannot be u...

Page 14: ...ry stick pro Memory stick duo Memory stick pro duo Memory stick select Magic gate memory stick Magic gate memory stick duo Secure Digital Card SD High Capacity Mini Secure Digital card Mini SD High Capacity Multi Media Card Reduce Size Multi Media Card Multi Media Card Plus Multi Media Card Mobile SD High Speed MMC High Speed Micro Secure Digital Micro Multi Media Card Micro Secure Digital HC M2 3...

Page 15: ...s own functions the LVT program will allow you to start other Windows compatible software specially configured to run on this model of computer F2 Your computer has the Lenovo Rescue System installed To learn more about this program turn on the computer and when the Lenovo logo appears press the F2 key and the Lenovo Rescue System will open 31041577_K3_UG H57 _EN_V3 0 indd10 10 2009 11 17 10 56 29...

Page 16: ... Operation of the Power Dial The Power Dial function supports three operating modes the AUTO mode the TURBO mode and the COOL mode System resources are optimized by toggling among those three different modes Different modes are used for different applications Display the main screen of software Double click the Power Dial icon in the Quick Launch bar 31041577_K3_UG H57 _EN_V3 0 indd11 11 2009 11 1...

Page 17: ...lock frequency against the nominal maximal GPU clock frequency CPU Show the percentage of the current CPU clock frequency against the nominal maximal CPU clock frequency ODD The status of the optical drive HDD The status of the hard disk drive AUTO AUTO mode AUTO 31041577_K3_UG H57 _EN_V3 0 indd12 12 2009 11 17 10 56 31 AM ...

Page 18: ...rently AUTO Each component operates as it is displayed in the picture The numeric values might vary because each model is configured differently TURBO TURBO mode TURBO Runs at full speed The system achieves its optimal performance Turn the Power Dial knob to the TURBO position 31041577_K3_UG H57 _EN_V3 0 indd13 13 2009 11 17 10 56 32 AM ...

Page 19: ...s or programs that consume a high proportion of the system resources you should choose TURBO mode This will allow you to achieve optimal performance When the ODD status is shown as QUIET it indicates that the current maximal data CD reading speed is lower than the nominal maximal reading speed of the ODD CO O L COOL mode COOL The CPU runs at low frequency The system consumes minimum power Turn the...

Page 20: ...t settings or to the last system backup status using OneKey Recovery With this operation all of the existing data on drive C will be lost whereas the content and format of the other partitions of the hard disk drive will remain unchanged If you want to install an operating system and back it up with OneKey Recovery you must format the C partition in NTFS format and install the operating system on ...

Page 21: ...peration Procedure 1 Turn on the computer When the Lenovo logo appears press the F2 key on the keyboard to start the Rescue System then you can select OneKey Recovery Note System Recovery will overwrite all of the data on drive C To prevent loss of data be sure to back up relevant data before performing system recovery 2 Follow the onscreen instructions to select the backup task you want to restor...

Page 22: ... Notes 1 It is recommended not to install the software which is already on the computer 2 Before accessing the operating system make sure that the Drivers and Application installation has been installed automatically After that the manual installation function can be used 2 3 System Setup System Setup configures the network configuration for the Lenovo Rescue System to ensure your Rescue System ca...

Page 23: ...All Programs Lenovo Lenovo Rescue System After starting the procedure click System Backup to back up your system partition according to the prompts 2 5 System Recovery Reboot your computer into the system recovery environment You can choose to restore to a system backup point or the initial state 2 6 Create Recovery Disc Create a bootable recovery disc from current system These recovery discs are ...

Page 24: ...llowing topics ÿ Computer software instructions Note The interface and function of each of these features are subject to the actual software that was shipped with the computer model that you purchased User Guide 19 31041577_K3_UG H57 _EN_V3 0 indd19 19 2009 11 17 10 56 37 AM ...

Page 25: ...nu to launch the burner program 2 The shortcut to launch the burner software is the block icon on the desktop To use the burner program just drag and drop the files to be recorded onto their appropriate data music or video icon 3 1 2 Starting the burner software 1 Choose All Programs Lenovo Power2Go Power2Go from the Start menu to launch the burner program 2 Choose a task for the burner from the t...

Page 26: ...eo WinDVD from the Start menu to launch the player Click the icon to obtain more information about WinDVD WinDVD Blu ray Disc BD is the software for playing discs It can play DVD standard format discs and Blu ray format discs with the optical drive The WinDVD player includes the following basic buttons Play Move backward within the current track Pause Move forward within the current track Track li...

Page 27: ...f childrens spines and vision Lenovo PC Bright Eye camera is required in order to use these functions 3 3 1 Eyesight Protection Setting 1 The Lenovo PC Bright Eye camera and Lenovo Healthcare Software work together to maintain proper distance between the computer operator and the computer display It also automatically adjusts the display brightness to a comfortable level thereby protecting the ope...

Page 28: ...B 2 0 UVC PC Camera has been checked If there are other devices in this option do not check them Only choose the Vimicro USB2 0 UVC PC Camera device and the window should display the camera image An image which is caught by Lenovo PC Bright Eye camera will be displayed in the video capture window Adjust the position and pitch angle of the camera to ensure the whole face is displayed in the video c...

Page 29: ...n you use the computer for the first time you should set the proper display brightness according to each level of ambient brightness 4 For each level of the ambient brightness the recommended display brightness is selected by default Please adjust your display brightness to a comfortable level 5 After the brightness setting is completed the display brightness will be automatically changed accordin...

Page 30: ...oftware Or Double click the McAfee Security Center on the desktop to launch the antivirus software 3 4 2 Scanning for Viruses Click Scan on the Security Center home page Select a task on the Scan Options pane Click Start to launch the scan program Upon completion the software will pop up a system scanning report which lists all virus files detected and you can then quarantine or delete them as req...

Page 31: ...ect to run on a regular basis or begin backing up right away 3 5 3 My Project My projects is used to manage your saved backup projects Any backup projects that you have saved will be listed under My Projects 3 5 4 Restore Files The Restore Files project restores individual files and folders that you have protected using the Back Up Files project With Restore Files you select a backup search for th...

Page 32: ...27 User Guide 31041577_K3_UG H57 _EN_V3 0 indd27 27 2009 11 17 10 56 39 AM ...

Page 33: ...28 User Guide 31041577_K3_UG H57 _EN_V3 0 indd28 28 2009 11 17 10 56 39 AM ...

Page 34: ...3 4 5 Chapter System Maintenance and Recovery This chapter contains the following topics ÿ Daily Maintenance and Tools Instructions User Guide 29 31041577_K3_UG H57 _EN_V3 0 indd29 29 2009 11 17 10 56 40 AM ...

Page 35: ...ate when the system was running properly Click Next to continue 3 The system will start restoration When all processes run to completion the system displays a message informing you that the restore operation has completed successfully 4 2 Backup and Restore For security purposes you can back up the system status before you install additional software or otherwise modify system settings To back up ...

Page 36: ...ou want to reorganize then select Properties from the pop up menu 2 Go to the Tools tab from disk Properties and select Defragment Now 3 Select the time and scheme to be used by the defragging program then start the defragmenting program Depending on the amount of defragmentation on the hard disk drive this procedure can take a long time sometimes more than one hour 4 6 Performing Daily Maintenanc...

Page 37: ... and the mouse You can use a vacuum cleaner to clean in otherwise inaccessible corners To clean the keyboard thoroughly shut down the computer and scrub it gently with a wet cloth Do not use the keyboard until it is dry Do not do any of the following Allow water to enter the computer Use a heavily dampened cloth Spray water directly onto the surface of the monitor or inside of computer Daily atten...

Page 38: ...ÿ Troubleshooting and Problem Resolution Note The description of the TV Tuner card in this manual is only used for the machines which have the TV Tuner card It does not apply to those machines that do not have a TV Tuner card User Guide 33 31041577_K3_UG H57 _EN_V3 0 indd33 33 2009 11 17 10 56 43 AM ...

Page 39: ...creen or no image is displayed on the monitor Troubleshooting and problem resolution 1 Check that the monitor has been turned on if not press the Power button 2 Check to see if the monitor power cord is loose if so securely plug the power cord to the monitor 3 Check that the signal cable to the monitor is securely connected to the connector on the computer graphics card if not shut down the comput...

Page 40: ...tortion Reinstall the audio driver Disconnect headphones from the headphone connector Sound from the speakers is automatically disabled when headphones are connected to the computer s side panel headphone connector Problem No sound from headphones Troubleshooting and problem resolution Check the headphone cable connection Ensure that the headphone cable is securely inserted into the headphone conn...

Page 41: ...alog box and then select Uninstall Modify 6 Perform the instructions displayed to uninstall the software 5 4 Troubleshooting Problems with Optical Drives and Hard Disks Problem The Optical drive is unable to read a CD DVD Troubleshooting and problem resolution 1 Check to determine if there is an optical drive icon in the resource manager of the operating system If not restart your computer If ther...

Page 42: ...sk shown in the system can be obtained The capacity of the hard disk as calculated using this method may be slightly different from the actual capacity due to the rounding of totals 5 5 Special considerations for troubleshooting Windows Record the following information that may later be useful in troubleshooting system problems 1 The serial number of the software The serial number was shipped with...

Page 43: ...38 User Guide Before you can watch teletext programming you must set the TV tuner input signal to analog 31041577_K3_UG H57 _EN_V3 0 indd38 38 2009 11 17 10 56 43 AM ...

Reviews: