


Setting, changing, or deleting a password
To set, change, or delete a password, do the following:
1. Start the Setup Utility program.
2. Select
Security
.
3. Depending on the password type, select
Set Power-On Password
,
Set Administrator Password
, or
Hard Disk Password
and press Enter.
4. Follow the instructions on the right side of the screen to set, change, or delete a password.
Note:
A password can be any combination of up to 64 alphabetic and numeric characters.
5. To save settings and exit the Setup Utility program, press F10 or Fn+F10 (depending on the keyboard
settings). Then, select
Yes
in the window displayed, and press Enter.
Erasing lost or forgotten passwords (clearing CMOS)
This section provides instructions on how to erase lost or forgotten passwords, such as a user password.
Note:
The instructions in this section do not apply to the hard disk password.
To erase a lost or forgotten password, do the following:
1. Remove any media from the drives and turn off all connected devices and the computer. Then,
disconnect all power cords from electrical outlets and disconnect all cables that are connected to the
computer.
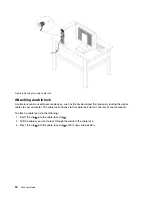
2. Remove the computer cover.
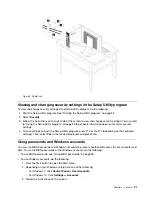
3. Locate the Clear Complementary Metal Oxide Semiconductor (CMOS) /Recovery jumper on the system
board.
4. Move the jumper from the standard position (pin 1 and pin 2) to the maintenance position (pin 2 and pin
3).
5. Reinstall the computer cover and connect the power cord.
6. Turn on the computer and leave it on for approximately 10 seconds. Then, turn off the computer by
holding the power button for approximately five seconds.
7. Repeat step 1 and step 2.
8. Move the Clear CMOS /Recovery jumper back to the standard position (pin 1 and pin 2).
9. Reinstall the computer cover and connect the power cord.
Selecting a startup device
If your computer does not start up from the expected device, you can either change the startup device
sequence or select a temporary startup device.
Changing the startup device sequence permanently
To change the startup device sequence permanently, do the following:
1. Depending on the type of the storage device, do one of the following:
• If the storage device is internal, go to step 2.
• If the storage device is a disc, ensure that your computer is turned on. Then, insert the disc into the
optical drive.
• If the storage device is an external device other than a disc, connect the storage device to the
computer.
2. Start the Setup Utility program.
39
Summary of Contents for 30BG
Page 1: ...P320 User Guide Machine Types 30BJ 30BK and 30BS ...
Page 12: ...x P320 User Guide ...
Page 28: ...16 P320 User Guide ...
Page 40: ...28 P320 User Guide ...
Page 46: ...34 P320 User Guide ...
Page 56: ...44 P320 User Guide ...
Page 120: ...108 P320 User Guide ...
Page 124: ...112 P320 User Guide ...
Page 126: ...114 P320 User Guide ...
Page 128: ...116 P320 User Guide ...
Page 136: ...124 P320 User Guide ...
Page 140: ...4 Follow the instructions on the screen 128 P320 User Guide ...
Page 142: ...130 P320 User Guide ...
Page 144: ...132 P320 User Guide ...
Page 145: ......
Page 146: ......


