
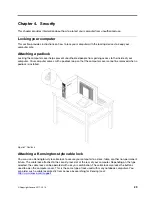
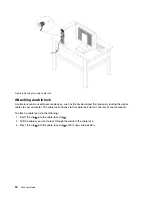
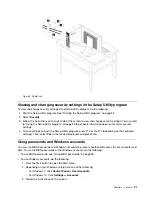


To enable SATA RAID functionality, do the following:
1. Start the Setup Utility program. See “Starting the Setup Utility program” on page 35.
2. Select
Devices
➙
ATA Drive Setup
.
3. Select
Configure SATA as
and press Enter.
4. Select
RAID
and press Enter.
5. Press F10 or Fn+F10 (depending on the keyboard) to save the new settings and exit the Setup Utility
program.
Creating RAID volumes
To create RAID volumes, do the following:
1. Press Ctrl+I when prompted to enter the Intel Matrix Storage Manager option ROM configuration utility
during the computer startup.
2. Use the up and down arrow keys to select
Create RAID Volume
and press Enter.
3. Type a proper RAID Volume name in the
Name
field and press Tab.
4. Use the arrow keys to select a RAID level in the
RAID Level
field and press Tab.
5. If appropriate, use the arrow keys to select a Stripe Size in the
Stripe Size
field and press Tab.
6. Type a volume size in the
Capacity
field and press Tab.
7. Press Enter to initiate volume creation.
8. When prompted, press Y to accept the warning message and create the volume.
9. Return to step 2 to create additional RAID volumes, or select
Exit
and press Enter.
10. Press Y when prompted to confirm the exit.
Deleting RAID volumes
To delete RAID volumes, do the following:
1. Press Ctrl+I when prompted to enter the Intel Matrix Storage Manager option ROM configuration utility
during the computer startup.
2. Use the up and down arrow keys to select
Delete RAID Volume
and press Enter.
3. Use the arrow keys to select the RAID volume to be deleted and press Delete.
4. When prompted, press Y to confirm the deletion of the selected RAID volume. Deleting a RAID volume
will reset the hard disk drives to non-RAID.
5. After deleting a RAID volume, you can:
• Return to step 2 to delete additional RAID volumes.
• See “Creating RAID volumes” on page 42 for RAID volume creation.
• Use the up and down arrow keys to select
Exit
and press Enter.
Resetting disks to non-RAID
To reset your hard disk drives to non-RAID, do the following:
1. Press Ctrl+I when prompted to enter the Intel Matrix Storage Manager option ROM configuration utility
during the computer startup.
2. Use the up and down arrow keys to select
Reset Disks to Non-RAID
and press Enter.
3. Use the arrow keys and the space key to mark individual physical hard disk drives to be reset, and then
press Enter to complete the selection.
42
P320 User Guide
Summary of Contents for 30BG
Page 1: ...P320 User Guide Machine Types 30BJ 30BK and 30BS ...
Page 12: ...x P320 User Guide ...
Page 28: ...16 P320 User Guide ...
Page 40: ...28 P320 User Guide ...
Page 46: ...34 P320 User Guide ...
Page 56: ...44 P320 User Guide ...
Page 120: ...108 P320 User Guide ...
Page 124: ...112 P320 User Guide ...
Page 126: ...114 P320 User Guide ...
Page 128: ...116 P320 User Guide ...
Page 136: ...124 P320 User Guide ...
Page 140: ...4 Follow the instructions on the screen 128 P320 User Guide ...
Page 142: ...130 P320 User Guide ...
Page 144: ...132 P320 User Guide ...
Page 145: ......
Page 146: ......


