• “Installation Guidelines” on page 30
2. Turn off the corresponding DWC tray that you are going to perform the task on.
3. Remove the tray (see “Install a DWC tray in the enclosure” on page 63).
4. Remove the tray cover (see “Remove the tray cover” on page 34).
Complete the following steps to remove an adapter.
Watch the procedure
. A video of the installation process is available:
• Youtube:
https://www.youtube.com/playlist?list=PLYV5R7hVcs-BHNs9o9uS9u93aeU5BCI8I
• Youku:
http://list.youku.com/albumlist/show/id_51372950.html
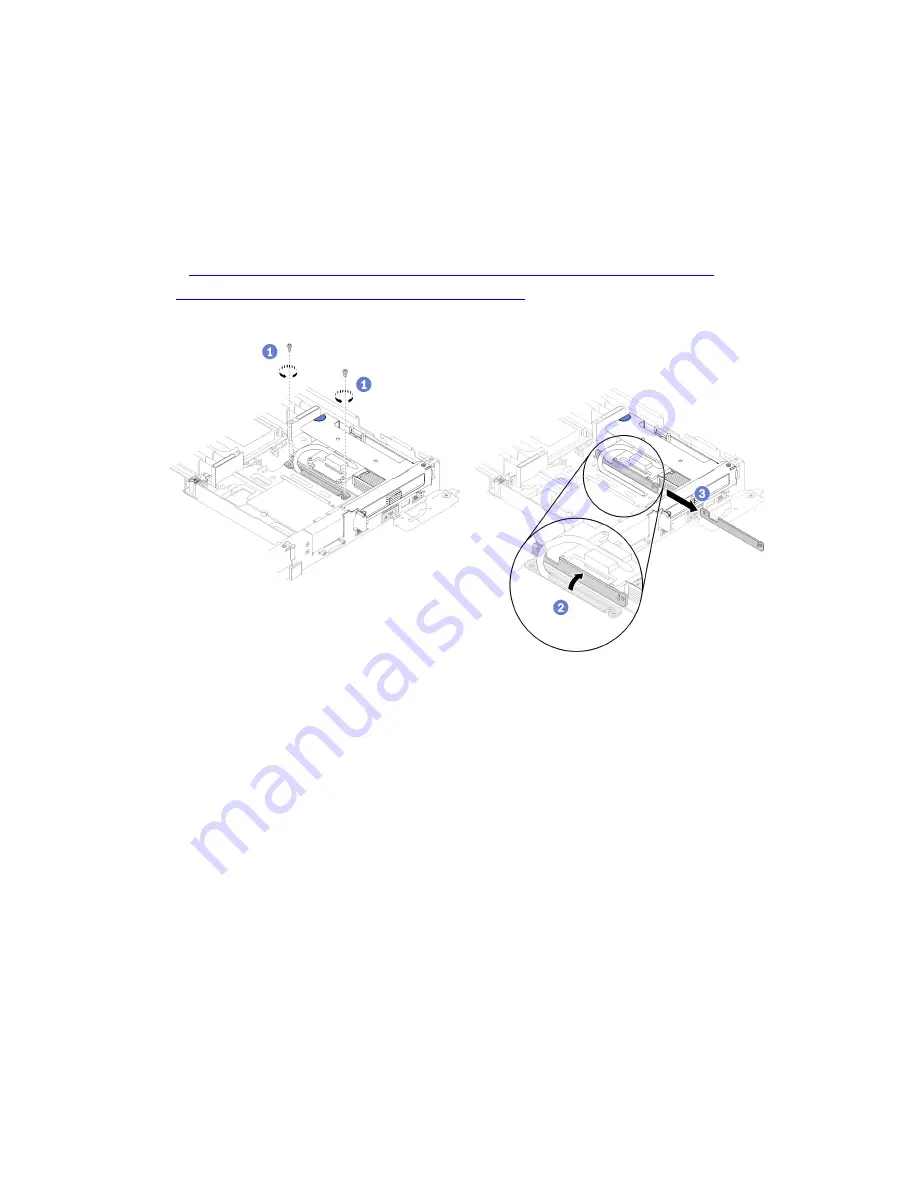
Step 1. Remove two silver Torx T10 screws; then, remove the retaining clamp.
Figure 26. Screws and retaining clamp removal
Step 2. Carefully grasp the PCIe riser-cage assembly by its edges and remove it out of the node.
Chapter 3
.
Solution hardware setup
41
Summary of Contents for 5468
Page 4: ...ii ThinkSystem SD650 Dual Node DWC Tray and NeXtScale n1200 DWC Enclosure Setup Guide ...
Page 18: ...14 ThinkSystem SD650 Dual Node DWC Tray and NeXtScale n1200 DWC Enclosure Setup Guide ...
Page 32: ...28 ThinkSystem SD650 Dual Node DWC Tray and NeXtScale n1200 DWC Enclosure Setup Guide ...
Page 70: ...66 ThinkSystem SD650 Dual Node DWC Tray and NeXtScale n1200 DWC Enclosure Setup Guide ...
Page 78: ...74 ThinkSystem SD650 Dual Node DWC Tray and NeXtScale n1200 DWC Enclosure Setup Guide ...
Page 82: ...78 ThinkSystem SD650 Dual Node DWC Tray and NeXtScale n1200 DWC Enclosure Setup Guide ...
Page 86: ...82 ThinkSystem SD650 Dual Node DWC Tray and NeXtScale n1200 DWC Enclosure Setup Guide ...
Page 89: ......
Page 90: ...Part Number SP47A36229 Printed in China 1P P N SP47A36229 1PSP47A36229 ...


