


Chapter 2.
2-6
Selecting a supported display mode
The display mode the monitor uses is controlled by the computer. Therefore, refer to your
computer documentation for details on how to change display modes.
The image size, position and shape might change when the display mode changes. This is
normal and the image can be readjusted using automatic image setup and the image controls.
Unlike CRT monitors, which require a high refresh rate to minimize flicker, LCD or Flat Panel
technology is inherently flicker-free.
Note:
If your system has previously been used with a CRT monitor and is currently configured
to a display mode outside the range of this monitor, you may need to reattach the CRT monitor
temporarily until you have re-configured the system; preferably to 1920 x 1080 at 60 Hz, which
is the Native Resolution Display mode.
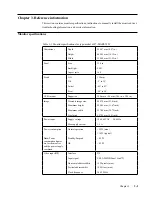
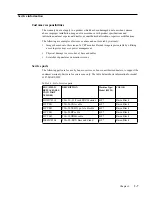
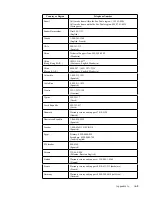
The display modes shown below have been optimized at the factory.
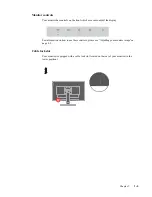
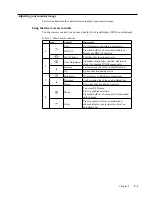
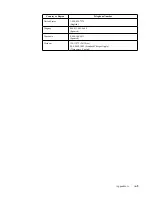
Table 2-3
. Factory set display modes
Timing
Refresh rate(Hz)
640x480
60 Hz
640x480
72 Hz
640x480
75 Hz
720x400
70 Hz
800x600
56 Hz
800x600
60 Hz
800x600
72 Hz
800x600
75 Hz
832x624
75 Hz
1024x768
60 Hz
1024x768
70 Hz
1024x768
75 Hz
1152x864
75 Hz
1280x1024
60 Hz
1280x1024
70 Hz
1280x1024
75 Hz
1440x900
60 Hz
1600x900
60 Hz
1600x900
75 Hz
1680x1050
60 Hz
1920x1080
60 Hz
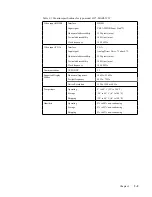
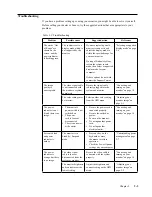
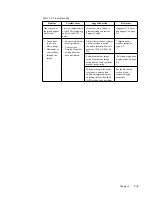
Table
2-2. OSD functions


