v
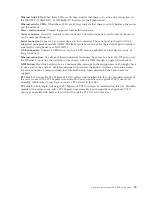
Ethernet link LEDs:
When these LEDs are lit, they indicate that there is an active link connection on
the 10BASE-T, 100BASE-TX, or 1000BASE-TX interface for the Ethernet port.
v
Ethernet activity LEDs:
When these LEDs are lit, they indicate that there is activity between the server
and the network.
v
Power cord connector:
Connect the power cord to this connector.
v
Video connector:
Connect a monitor to this connector. The video connectors on the rear of the server
can be used simultaneously.
v
Serial connector:
Connect a 9-pin serial device to this connector. The serial port is shared with the
integrated management module (IMM). The IMM can take control of the shared serial port to redirect
serial traffic, using Serial over LAN (SOL).
v
USB connectors:
Connect a USB device, such as a USB mouse, keyboard, or other device to any of
these connectors.
v
Ethernet connectors:
Use either of these connectors to connect the server to a network. When you use
the Ethernet 1 connector, the network can be shared with the IMM through a single network cable.
v
NMI button:
Press this button to force a nonmaskable interrupt to the microprocessor. You might have
to use a pen or the end of a straightened paper clip to press the button. It allows you to blue screen
the server and take a memory dump (use this button only when directed by the Lenovo service
support).
v
PCI slot 1:
A low-profile PCI Express or PCI-X card can be installed into this slot. Standard models of
the server come with a PCI Express riser assembly. You can purchase an optional PCI-X riser-card
assembly with bracket if you want to install a PCI-X card in this slot.
v
PCI slot 2:
A half-length, full-height PCI Express or PCI-X card can be installed into this slot. Standard
models of the server come with a PCI Express riser assembly. You can purchase an optional PCI-X
riser-card assembly with bracket if you want to install a PCI-X card in this slot.
Chapter 4. Server controls, LEDs, and power
15
Summary of Contents for 653417U
Page 1: ...Installation and User Guide ThinkServer RS210 Machine Types 6531 6532 6533 and 6534 ...
Page 2: ......
Page 3: ...ThinkServer RS210 Types 6531 6532 6533 and 6534 Installation and User Guide ...
Page 8: ...vi ThinkServer RS210 Types 6531 6532 6533 and 6534 Installation and User Guide ...
Page 16: ...xiv ThinkServer RS210 Types 6531 6532 6533 and 6534 Installation and User Guide ...
Page 20: ...4 ThinkServer RS210 Types 6531 6532 6533 and 6534 Installation and User Guide ...
Page 22: ...6 ThinkServer RS210 Types 6531 6532 6533 and 6534 Installation and User Guide ...
Page 40: ...24 ThinkServer RS210 Types 6531 6532 6533 and 6534 Installation and User Guide ...
Page 66: ...50 ThinkServer RS210 Types 6531 6532 6533 and 6534 Installation and User Guide ...
Page 128: ...112 ThinkServer RS210 Types 6531 6532 6533 and 6534 Installation and User Guide ...
Page 160: ...144 ThinkServer RS210 Types 6531 6532 6533 and 6534 Installation and User Guide ...
Page 164: ...148 ThinkServer RS210 Types 6531 6532 6533 and 6534 Installation and User Guide ...
Page 173: ...Chinese Class A warning statement Korean Class A warning statement Appendix B Notices 157 ...
Page 174: ...158 ThinkServer RS210 Types 6531 6532 6533 and 6534 Installation and User Guide ...
Page 179: ......
Page 180: ...Printed in USA ...

