


Chapter 5. CRU replacement
Customer Replaceable Units (CRUs) are parts that can be upgraded or replaced by the customer. Lenovo
computers contain the following types of CRUs:
•
Self-service CRUs:
Refer to parts that can be installed or replaced easily by customer themselves or by
trained service technicians at an additional cost.
•
Optional-service CRUs:
Refer to parts that can be installed or replaced by customers with a greater skill
level. Trained service technicians can also provide service to install or replace the parts under the type of
warranty designated for the customer’s machine.
If you intend on installing the CRU, Lenovo will ship the CRU to you. CRU information and replacement
instructions are shipped with your product and are available from Lenovo at any time upon request. You
might be required to return the defective part that is replaced by the CRU. When return is required: (1) return
instructions, a prepaid shipping label, and a container will be included with the replacement CRU; and (2) you
might be charged for the replacement CRU if Lenovo does not receive the defective CRU within thirty (30)
days of your receipt of the replacement CRU. For full details, see the Lenovo Limited Warranty
documentation at:
https://www.lenovo.com/warranty/llw_02
CRU list
The following is the CRU list of your computer.
Self-service CRUs
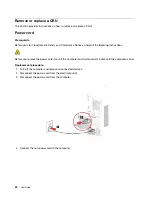
• Power cord
• Keyboard*
• Mouse*
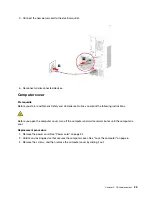
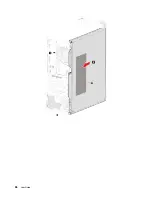
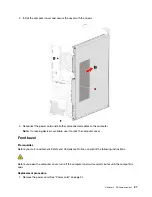
• Computer cover
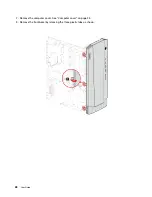
• Front bezel
• Storage drives
• Storage drive bay
• Storage drive rubber
• M.2 solid-state drive
• Memory modules
• Thumbscrew kit
Optional-service CRUs
• Microprocessor heatsink and fan assembly
• Coin-cell battery
• Power supply assembly
• PCI-Express card
• PCI-Express card holder
• PCI-Express card bracket
* for selected models
© Copyright Lenovo 2021
23
Summary of Contents for 90RE
Page 4: ...ii User Guide ...
Page 6: ...iv User Guide ...
Page 14: ...8 User Guide ...
Page 18: ...12 User Guide ...
Page 28: ...22 User Guide ...
Page 32: ...26 User Guide ...
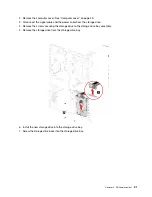
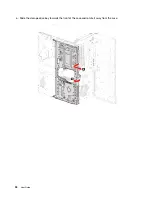
Page 39: ...5 Release the latch on the storage drive bay and pull slightly Chapter 5 CRU replacement 33 ...
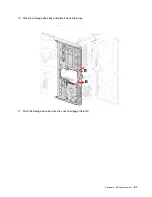
Page 42: ...9 Mount the new storage drive bay on the case 36 User Guide ...
Page 60: ...54 User Guide ...
Page 64: ...58 User Guide ...
Page 72: ...66 User Guide ...
Page 75: ......
Page 76: ......


