background image

Lenovo USB Portable DVD Burner

DB50/DB55

User Guide

• 

Read the User Guide carefully before using.  

Please properly preserve for reading.

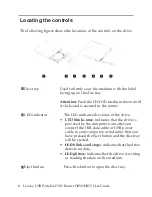
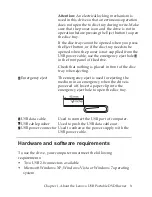
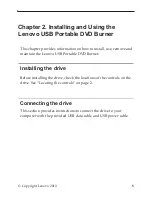
Summary of Contents for DB50

Page 1: ...Lenovo USB Portable DVD Burner DB50 DB55 User Guide Read the User Guide carefully before using Please properly preserve for reading ...

Page 2: ...Note Before using this information and the product it supports read Lenovo Limited Warranty and Notice first First Edition April 2010 Note ...

Page 3: ...Lenovo USB Portable DVD Burner DB50 DB55 User Guide ...

Page 4: ...Lenovo Beijing Ltd will not be responsible for any data loss caused by malfunction of hardware and so ware repair and other situations nor will we be responsible for associated indirect loss Please backup your data properly The content of this Quick Start Guide is protected by the law of copyright Without a wri en authorization from Lenovo Beijing Ltd you cannot copy excerpt transmit through wired o...

Page 5: ...Lenovo USB Portable DVD Burner DB50 DB55 User Guide ...

Page 6: ...for the drive 10 Cleaning the drive 10 Statement iii Chapter 3 Working with the Lenovo USB Portable DVD Burner 11 Before you begin 11 Using the media 12 Handling and caring for the media 12 Using the DVD RAM media 13 Using the CDs and DVDs media 13 Using the CD Rs and CD RWs media 14 Using the DVD Rs DVD Rs DVD RWs and DVD RWs media 14 Chapter 4 Troubleshooting 15 Appendix A Product Specifications...

Page 7: ...vi Lenovo USB Portable DVD Burner DB50 DB55 User Guide ...

Page 8: ...able DVD Burner is a portable DVD and CD recordable drive that easily a aches to the USB 2 0 connectors on your computer through a USB data cable and a USB power cable The drive conforms with industry standard specifications for DVD RAM DVD RW DVD R DVD RW DVD R DVD R dual layer DVD R double layer CD RW CD R and CD ROM media Notice The drive can be powered up directly by USB data cable you may enh...

Page 9: ...links once indicates that the drive is powered by the computer no matter you connect the USB data cable or USB power cable to your computer or indicates that you have pressed the Eject button and the disc tray will be ejected LED blinks and stops indicates that the drive detects no data LED gliĴers indicates that the drive is writing or reading the data on the medium Eject button Press this button...

Page 10: ...ject hole in the front panel of the drive Check that nothing is placed in front of the disc tray when ejecting Emergency eject medium in an emergency when the drive is powered off Insert a paper clip into the emergency eject hole to open the disc tray USB data cable USB cable pusher Hardware and software requirements To use the drive your computer must meet the following requirements Two USB 2 0 co...

Page 11: ...o the media wri en by the drive guarantee a high write quality Note For more information on write and read speeds see Appendix A Product specifications Incorporation of the buffer underrun prevention function The drive incorporates the buffer underrun prevention function which helps to prevent buffer underrun errors that cause a write failure onto the CD and DVD media Tray loading The drive has a tra...

Page 12: ...ll use remove and maintain the Lenovo USB Portable DVD Burner Installing the drive Before installing the drive check the locations of the controls on the drive See Locating the controls on page 2 Connecting the drive This section provides instructions to connect the drive to your computer with the provided USB data cable and USB power cable ...

Page 13: ...ing 1 Turn on your computer 2 3 4 2 1 3 Insert the USB A plug 1 of the USB data cable into the USB connector on your computer connector on your computer Insert the DC connector 3 of the USB power cable into the USB power up connector on the drive Insert the USB A plug 2 of the USB power cable into the USB ...

Page 14: ...y and push the disc tray in until it is completely locked Note Do not use force or insert foreign objects to open the disc tray If the disc tray does not open when you press the Eject button see Manually ejecting the media for more information 4 The LED indicator glitters if the medium is correctly loaded and recognized by the drive Ejecting the media To eject the media from the disc tray of the d...

Page 15: ...the computer 2 Straighten a large paper clip to form a tool as shown in the figure below Note The straightened end must extend at least 45 mm 1 8 inches 3 Insert the extended end into the emergency eject hole on the front panel of the drive 4 Push the paper clip until the disc tray opens 5 Gently pull out the disc tray until you can remove the medium CAUTION Be sure the drive is powered off when us...

Page 16: ...your system by performing the following procedure 1 Exit the program that uses the drive 2 Make sure that the LED indicator of the drive is off 3 Click the Safely Remove Hardware icon on the system tray 4 Select the drive name to remove The Safe to Remove Hardware confirmation window opens Note The confirmation window message indicated above may differ depending on the versions of your operating sys...

Page 17: ...of these conditions High temperature high humidity or direct sunlight Excessive vibration sudden shock or inclined surface Excessive dust Cleaning the drive Wipe off the dust on the drive using a soft cloth If the dust is persistent use a cloth dampened with a diluted neutral detergent after squeezing all the water out If liquid is allowed into the drive it may cause a serious malfunction an electr...

Page 18: ... or writing to a medium as this might cause data errors Also minimize typing while formatting or writing to a medium as this might also cause data errors Keep the host computer and USB drive on a flat surface when writing to a medium Turn the screen saver off Using a screen saver might interrupt the formatting and writing process Do not put your host computer into hibernation or suspend mode while ...

Page 19: ...ckaging Always store media out of direct sunlight Always store media away from direct heat sources Remove media from the computer when not in use Check media for cracks before each use IMPORTANT Do not use media that are cracked Do not force media into the computer or packaging Do not bend or flex media Do not use commercial cleaners to clean media Do not write on the surface of media Handle media...

Page 20: ...the medium from the drive turn it over and re insert it into the drive DVD RAM media must be removed from the cartridge before using this drive Using the CDs and DVDs media To use CDs and DVDs do the following 1 Turn on the computer 2 Press the Eject button on the front panel of the drive 3 Insert a medium in the disc tray with the label facing up 4 Close the drive by gently closing the disc tray ...

Page 21: ...another CD Notes 1 CD R media are playable on audio CD players CD RW media are not playable on most audio CD players 2 Ultra Speed CD RW media writing is supported Using the DVD Rs DVD Rs DVD RWs and DVD RWs media The drive can write to both DVD R and DVD RW media DVD R media cannot be erased but can be used with standard DVD ROM drives and DVD players You can use DVD R media to record audio track...

Page 22: ...riptions that might fit your situation The Lenovo USB Portable DVD Burner is not recognized by the operating system You cannot create a multi session medium Be sure that there is enough space le on the medium for another session Writing a session requires lead in and lead out space about 15 MB in addition to the data that is recorded Ensure that the USB data cable goes from the hostcomputer to the...

Page 23: ...fy that the hard disk has been defragmented 4 Consult the hard disk drive manufacturer or vendor if an older hard disk drive is conducting a thermal recalibration during a write operation 5 Disable the Windows Auto Insert Notify function on your optical CD ROM and CD RW drives You cannot eject a CD or DVD medium To solve the problem ensure that the drive is not in the process of writing to a mediu...

Page 24: ...the volume making it unreadable 2 You might have a damaged CD R CD RW DVD R DVD RAM or DVD RW medium Try a new medium or another brand of CD or DVD medium 3 If you can read from a CD RW DVD RAM or DVD RW medium in the writing drive but not in another Multi Read drive make sure that a correct CD DVD reader program is installed in the computer 4 Avoid writing at the slower 1X speed unless required b...

Page 25: ...18 Lenovo USB Portable DVD Burner DB50 DB55 User Guide ...

Page 26: ... physical specifications1 of the drive are listed in this table Power Requirements This table lists the power specifications for the drive The power specifications are measured at the drive power connector and are nominal values Physical h c n i 71 0 m m 18 t h g i e H s e h c n i 28 5 m m 4 3 1 h t d i W s e h c n i 51 5 m m 0 4 1 h t g n e L d n u o p 71 0 g 0 2 3 t h g i e W Power specification...

Page 27: ...ary based on a variety of factors This product data does not constitute a warranty Data is subject to change without notice Specifications Operational Non operational Temperature 5 C to 40 C 30 C to 60 C Relative humidity 15 to 80 10 to 90 d e e p S m u m i x a M a i d e M V A C x 8 R R D V D DVD RW RW DVD R DL R DL V A C x 8 M O R D V D V A C P x 5 M A R D V D CD R RW ROM d e e p s m u m i x a M ...

Page 28: ...equency energy and if not installed and used in accordance with the instructions may cause harmful interference to radio communications However there is no guarantee that interference will not occur in a particular installation If this equipment does cause harmful interference to radio or television reception which can be determined by turning the equipment off and on the user is encouraged to try ...

Page 29: ...1 this device may not cause harmful interference and 2 this device must accept any interference received including interference that may cause undesired operation Responsible party Lenovo United States Incorporated 1009 Think Place Building One Morrisville NC 27560 Phone Number 919 294 5900 Industry Canada Class B emi ssion compliance statement This Class B digital apparatus complies with Canadian...

Page 30: ...tzanforderungen wenn das Produkt ohne Zustimmung der Lenovo verändert bzw wenn Erweiterungskomponenten von Fremdherstellern ohne Empfehlung der Lenovo gesteckt eingebaut werden Deutschland Einhaltung des Gesetzes über die elektromagnetische Verträglichkeit von BetriebsmiĴeln Dieses Produkt entspricht dem Gesetz über die elektromagnetische Verträglichkeit von Betriebsmitteln EMVG früher Gesetz über...

Page 31: ... Member States relating to electromagnetic compatibility Lenovo cannot accept responsibility for any failure to satisfy the protection requirements resulting from a non recommended modification of the product including the installation of option cards from other manufacturers This product has been tested and found to comply with the limits for Class B Information Technology Equipment according to ...

Page 32: ... producto satisface los requisitos de protección del Consejo de la UE Directiva 2004 108 EC en lo que a la legislatura de los Estados Miembros sobre compatibilidad electromagnética se refiere Lenovo no puede aceptar responsabilidad alguna si este producto deja de satisfacer dichos requisitos de protección como resultado de una modificación no recomendada del producto incluyendo el ajuste de tarjet...

Page 33: ...zione dovuta a modifiche non consigliate al prodotto compresa l installazione di schede e componenti di marca diversa da Lenovo Le prove effettuate sul presente prodotto hanno accertato che esso rientra nei limiti stabiliti per le apparecchiature di informatica Classe B ai sensi del Norma Europea EN 55022 I limiti delle apparecchiature della Classe B sono stati stabiliti al fine di fornire ragionev...

Page 34: ...for products manufactured on or a er March 1 2007 for sale in the People s Republic of China Turkish statement of compliance The Lenovo product meets the requirements of the Republic of Turkey Directive on the Restriction of the Use of Certain Hazardous Substances in Electrical and Electronic Equipment EEE Lenovo ürünü Turkiye cumhuriyeti nin Elektrikli ve elektronik eçyalardaki zararli madde kull...

Page 35: ...Version1 0 Printed in China ...

Reviews: