background image

6

Chapter 1. Getting to know your computer

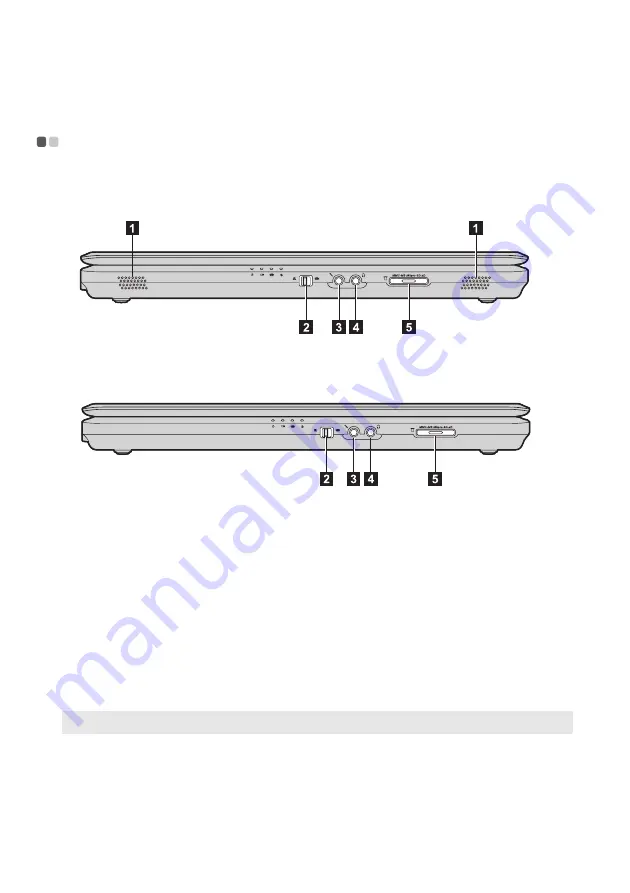
Front view 

 - - - - - - - - - - - - - - - - - - - - - - - - - - - - - - - - - - - - - - - - - - - - - - - - - - - - - - - - - - - - - - - - - - - - - - - - - - - - - - - - - - - - - - - - - - - - - - - - - - - - - - - - - - - - - - - - - - - - - - - - - -

„

Lenovo G555

„

Lenovo G455

Speakers

The stereo speakers provide rich and powerful sound.

Integrated wireless 
device switch

Use this switch to turn on/off the wireless radio of all wireless devices on your 
computer.

Microphone jack

Connects to an external microphone.

Headphone jack

Connects to an external headphone.

Attention:

Listening to music at high volume over extended periods of time may damage your 
hearing.

Memory card slot 
(specific models 
only)

Insert memory cards (not supplied) here.

Note:

For details, see “Using memory cards (not supplied)” on page 18.

a

b

c

d

e

Summary of Contents for G455

Page 1: ...Lenovo G455 G555 User Guide V1 0 Read the safety notices and important tips in the included manuals before using your computer ...

Page 2: ...rive 30 Replacing memory 32 Removing the optical drive 34 Appendix A Getting help and service 36 Getting help on the Web 36 Calling the customer support center 36 Getting help around the world 37 Lenovo warranty service telephone numbers 38 Appendix B Use and care information 39 Caring your computer 39 Accessibility and comfort 42 Maintenance 43 Appendix C Lenovo limited warranty 45 Warranty infor...

Page 3: ... 130 degree When closing the display panel be careful NOT to leave pens or any other objects in between the display panel and the keyboard Otherwise the display panel may be damaged Note The illustrations in this manual may differ from the actual product Please refer to the actual product 1 6 5 2 3 7 8 8 G555 ...

Page 4: ...2 Chapter 1 Getting to know your computer Lenovo G455 G455 6 5 ...

Page 5: ... OneKey Rescue System has been preinstalled when the computer is powered off Note For details see Chapter 4 OneKey Rescue System on page 22 Power button Press this button to turn on the computer Built in microphone The built in microphone with noise reduction can be used for video conferencing voice narration or simple audio recordings Touchpad The touchpad functions as a conventional mouse Note F...

Page 6: ...vers Dissipate internal heat Note Make sure that none of the fan louvers are blocked or else overheating of the computer may occur RJ 45 port Connects to a wired network Note For details see Wired connection on page 20 VGA port Connects to external display devices USB port Connects to USB devices Note For details see Connecting a universal serial bus USB device on page 18 1 2 3 4 5 a b c d e ...

Page 7: ...rt Connects to USB devices Note For details see Connecting a universal serial bus USB device on page 18 Optical drive Reads Burns optical disks AC power adapter jack Connect the AC adapter here Note For details see Using AC adapter and battery on page 11 1 3 2 a b c ...

Page 8: ...he wireless radio of all wireless devices on your computer Microphone jack Connects to an external microphone Headphone jack Connects to an external headphone Attention Listening to music at high volume over extended periods of time may damage your hearing Memory card slot specific models only Insert memory cards not supplied here Note For details see Using memory cards not supplied on page 18 a b...

Page 9: ...Chapter 1 Getting to know your computer 7 Bottom view Lenovo G555 1 2 ...

Page 10: ...al processing unit compartment G555 Houses the computer s main memory and wireless module Hard disk drive HDD compartment Hard disk drive is secured in this compartment Battery latch spring loaded The spring loaded battery latch keeps the battery pack secured in place Memory CPU central processing unit compartment G455 Houses the computer s main memory Wireless module compartment G455 Wireless mod...

Page 11: ...er to the supplied Setup Poster to install the battery pack Connect the computer to an electrical outlet 1 Connect the power cord to the AC adapter 2 Connect the AC adapter to the AC power adapter jack of the computer 3 Plug the power cord into an electrical outlet Turn on the computer Press the power button to turn on the computer Configure the operating system You may need to configure the opera...

Page 12: ...o put the computer into sleep state do one of the following Click and select Sleep from the Start menu Press Fn F1 Attention Wait until the power indicator light starts blinking indicating that the computer is in sleep state before you move your computer Moving your computer while the hard disk is spinning can damage the hard disk causing loss of data To wake the computer do one of the following P...

Page 13: ...tended period of time or if you need to send your computer to Lenovo for service etc remove the battery pack from the computer Before removing the battery pack make sure the computer has been shut down Note As each computer user has different habits and needs it is difficult to predict how long a battery charge will last There are two main factors The amount of energy stored in the battery when yo...

Page 14: ...hort circuit the battery pack Keep the battery pack away from children Do not put the battery pack in trash that is disposed of in landfills When disposing of the battery comply with local ordinances or regulations and your company s safety standards Touchpad To move the cursor on the screen slide your fingertip over the pad in the direction in which you want the cursor to move Left click button T...

Page 15: ...s keys that when enabled work as a 10 key numeric keypad To enable or disable the numeric keypad press Fn Insert G555 The keyboard has a separate numeric keypad To enable or disable the numeric keypad press the Num Lock key Note The indicator will light on if the numeric keypad is enabled ...

Page 16: ...y devices Fn F4 Open the interface for display resolution settings Fn F5 Open the interface for integrated wireless devices settings enable disable Fn F8 Enable Disable the touchpad Fn F9 Start Pause playback of Windows Media Player Fn F10 Stop playback of Windows Media Player Fn F11 Skip to the previous track Fn F12 Skip to the next track Fn Insert G455 Enable Disable the numeric keypad Fn Delete...

Page 17: ...cue System button OneKey Rescue System button When the computer is powered off press this button to enter the OneKey Rescue System if Lenovo OneKey Rescue System has been preinstalled In Windows operating system press this button to start Lenovo OneKey Recovery Note For details see OneKey Rescue System on page 22 G555 a ...

Page 18: ...stem status indicators These indicators inform you of the computer status G555 1 3 2 Caps lock indicator Num lock indicator Power status indicator Battery status indicator Wireless communication indicator Hard disk indicator a b c d e f ...

Page 19: ...ds helps prevent your computer from being used by others Once you set a password and enable it a prompt appears on the screen each time you power on the computer Enter your password at the prompt The computer cannot be used unless you enter the correct password For details about how to set the password see the help to the right of the screen in BIOS setup utility Notes Before purchasing any securi...

Page 20: ...ear a click 2 Gently pull the memory card out of the memory card slot Connecting a universal serial bus USB device Your computer comes with three USB ports compatible with USB devices Notes Insert ONLY one card in the slot at a time This card reader does not support SDIO devices e g SDIO Bluetooth etc Note The dummy card is used for preventing dust and small particles from entering the inside of y...

Page 21: ...e 1 Open Bluetooth File Transfer Wizard from Accessories of All programs in the Start menu 2 Click Send a file select the paired device where you want to save the file and click Next 3 Select the file and send it To receive files from the paired wireless device to the computer Refer to the instructions shipped with the paired devices to send files to the computer The files are saved in Bluetooth E...

Page 22: ...e way to connect the computer to the Internet Generally the following two accessing methods are widely used Hardware connection Cable DSL Software configuration Ask your Internet Service Provider ISP for details on how to configure your computer Cable Cable Internet service uses a cable modem connected to the residential cable TV line DSL DSL is a family of related technologies that bring high spe...

Page 23: ...ice switch to 2 Press Fn F5 to make configuration Hardware connection Software configuration Consult your Internet Service Provider ISP for details on how to configure your computer Wi Fi Wi Fi networks cover a small physical area like a home office or small group of buildings An access point ex wireless router is necessary for the connection WiMAX WiMAX networks connect several Wireless LAN syste...

Page 24: ...ery System Icon on the desktop to launch Lenovo OneKey Recovery Within the program you can back up the system partition on the hard disk drive other storage devices or by creating recovery discs For more instructions see the help file of Lenovo OneKey Recovery Using Lenovo OneKey Rescue System Without Windows operating system In the event that the operating system cannot be loaded follow the steps...

Page 25: ...rade a device or I need to replace one of the following the hard disk drive memory or the keyboard See Appendix D Customer replaceable units CRUs on page 52 of this guide Where are the recovery discs Your computer did not come with a recovery disc For an explanation of the alternative recovery methods offered by Lenovo see Chapter 4 OneKey Rescue System on page 22 How can I contact the customer su...

Page 26: ... the destination media is damaged try to select another path and then try again When do I need to restore the system to the factory status You can use this feature when your system fails or you need to re install your operating system This will restore your computer back to the initial status when you first booted up your computer after receiving it from the store If there is critical data on your...

Page 27: ...nk while the computer is on Your screen saver or power management may be enabled Do one of the following to exit from the screen saver or to resume from sleep or hibernation mode Touch the touchpad Press any key on the keyboard Press the power button A Password problem I forgot my password If you forget your user password you must take your computer to a Lenovo authorized servicer or a marketing r...

Page 28: ...he power button to resume operation Note If the system still does not return from sleep mode your system has stopped responding and you cannot turn off the computer reset the computer Unsaved data may be lost To reset the computer press and hold the power button for 4 seconds or more If the computer is still not reset remove the AC adapter and the battery Computer screen problems The screen is bla...

Page 29: ...or then turn on the computer again The battery does not charge For details see Handling the battery in Chapter 2 A hard disk drive problem The hard disk drive does not work In the Boot menu in BIOS Setup Utility make sure that the hard disk drive is included in the Boot priority order correctly A startup problem The Microsoft Windows operating system does not start Use the OneKey Rescue System to ...

Page 30: ... the Boot priority order in the BIOS Setup Utility is set so that the computer starts from the device you want Also make sure that the device from which the computer starts is enabled In the Boot menu in the BIOS Setup Utility make sure that the device is included in the Boot priority order list The connected external device does not work Do not connect or disconnect any external device cables oth...

Page 31: ...nlocked position remove the battery pack in the direction shown by the arrow 4 Install a fully charged battery 5 Slide the manual battery latch to the locked position 6 Turn the computer over again Connect the AC adapter and the cables to the computer again Notes The illustrations used in this chapter are of the Lenovo G555 unless otherwise stated The following steps about upgrading and replacing ...

Page 32: ...ode To replace the hard disk drive do the following 1 Turn off the computer then disconnect the AC adapter and all cables from the computer 2 Close the computer display and then turn the computer over 3 Remove the battery pack 4 Remove the screws that secure the hard disk drive slot cover 5 Remove the cover Notes Replace the hard disk drive only if you upgrade it or have it repaired The connectors...

Page 33: ...tach the metal frame to a new hard disk drive then tighten the screws 0 Put the hard disk drive gently into the hard disk drive bay with the tab facing upwards and the connectors facing each other then push it firmly into space A Reinstall the cover of the hard disk drive slot B Reinstall the screws C Reinstall the battery pack D Turn the computer over again Connect the AC adapter and the cables t...

Page 34: ...your body which could damage the SO DIMM Do not touch the contact edge of the SO DIMM 2 Turn off the computer Disconnect the AC adapter and all cables from the computer 3 Close the computer display and turn the computer over 4 Remove the battery pack 5 Remove the Memory Wireless module CPU central processing unit compartment cover a Remove the screws that secure the compartment cover b Remove the ...

Page 35: ...ocket at the same time Be sure to save the old SO DIMM for future use 7 Insert the notched end of the DIMM into the socket Press the DIMM firmly and pivot it until it snaps into the place Make sure that it is firmly fixed in the slot and does not move easily 8 Reinstall the compartment cover 9 Reinstall the battery 0 Turn the computer over and reconnect the AC adapter and the cables to the compute...

Page 36: ...al amount of memory installed in your computer Removing the optical drive To remove the optical drive do the following 1 Remove the Memory Wireless module CPU central processing unit compartment cover 2 Remove the screw shown in the figure 3 Gently pull the optical drive out Note If only one DIMM is used on the computer you are servicing the card must be installed in SLOT 0 lower slot but not in S...

Page 37: ...s a list of CRUs Customer Replaceable Units for your computer and tells where to find the replacement instructions Setup Poster User Guide Self service CRUs AC adapter O Power cord for AC adapter O Battery O O Bottom access doors O Hard disk drive O Memory O Optical drive O ...

Page 38: ...2x SODIMM up to 8 GB Max DDR2 800MHz support 2x SODIMM up to 8 GB Max LCD 14 0 HD LED 16 9 LCD 15 6 HD CCFL 16 9 LCD HDD 2 5 SATA HDD 2 5 SATA HDD Keyboard 6 row Lenovo Keyboard 6 row Lenovo Keyboard Integrated Camera specific models only 0 3M 0 3M Battery 53Wh 57Wh 48Wh 6 cell Li ion Battery or 35Wh 4 cell Li ion Battery 53Wh 57Wh 48Wh 6 cell Li ion Battery or 35Wh 4 cell Li ion Battery AC Adapte...

Reviews: