00000000000000000000
00000000000000000000
00000000000000000000
00000000000000000000
00000000000000000000
00000000000000000000
00000000000000000000
00000000000000000000
00000000000000000000
00000000000000000000
00000000000000000000
00000000000000000000
000
000
0000
0000
0000
0000
Latch
Handle
Filler panel
3.5-inch hot-swap
hard disk drive
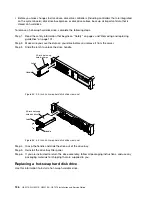
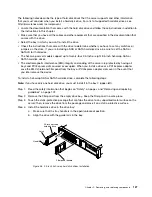
Figure 57. 3.5-inch hot-swap hard disk drives installation
c.
Gently push the drive into the bay until the drive stops.
d.
Rotate the tray handle to the closed (locked) position.
e.
Check the hard disk drive status LED to verify that the hard disk drive is operating correctly. If
the yellow hard disk drive status LED of a drive is lit continuously, that drive is faulty and must
be replaced. If the green hard disk drive activity LED is flashing, the drive is being accessed.
Step 5.
If you are installing additional hot-swap hard disk drives, do so now.
Step 6.
Turn on the peripheral devices and the server.
Removing a memory module
Use this information to remove a memory module.
To remove a dual inline memory module (DIMM), complete the following steps:
Step 1.
Read the safety information that begins on “Safety” on page v and “Removing and replacing
guidelines” on page 101.
Step 2.
Turn off the server and peripheral devices and disconnect all power cords.
Step 3.
Remove the top cover (see “Removing the top cover” on page 116).
Step 4.
Remove the air baffle (see “Removing the air baffle” on page 119).
Step 5.
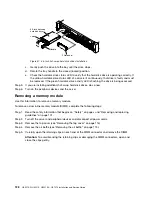
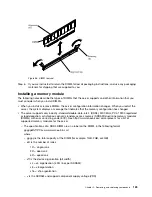
Carefully open the retaining clips on each end of the DIMM connector and remove the DIMM.
Attention:
To avoid breaking the retaining clips or damaging the DIMM connectors, open and
close the clips gently.
128
HX3510-G, HX5510, HX5510-C, HX7510 Installation and Service Guide
Summary of Contents for HX3510-G
Page 1: ...HX3510 G HX5510 HX5510 C HX7510 Installation and Service Guide Machine Type 8695 ...
Page 6: ...iv HX3510 G HX5510 HX5510 C HX7510 Installation and Service Guide ...
Page 62: ...50 HX3510 G HX5510 HX5510 C HX7510 Installation and Service Guide ...
Page 102: ...90 HX3510 G HX5510 HX5510 C HX7510 Installation and Service Guide ...
Page 112: ...100 HX3510 G HX5510 HX5510 C HX7510 Installation and Service Guide ...
Page 1222: ...1210 HX3510 G HX5510 HX5510 C HX7510 Installation and Service Guide ...
Page 1238: ...1226 HX3510 G HX5510 HX5510 C HX7510 Installation and Service Guide ...
Page 1239: ......
Page 1240: ......


