


Use multimedia
Use your computer for business or entertainment with connected devices (such as a camera, a monitor, or
speakers).
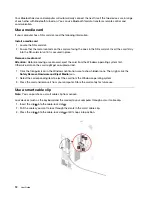
Use audio
To enhance the audio experience, connect speakers, headphones, or a headset to the audio connector.
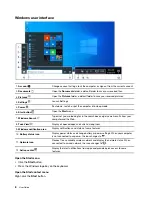
Adjust the volume
1. Click the volume icon in the Windows notification area on the taskbar.
2. Follow the on-screen instructions to adjust the volume. Click the speaker icon to mute the audio.
Change the sound settings
1. Go to
Control Panel
and view by category.
2. Click
Hardware and Sound
➙
Sound
.
3. Change the settings as you prefer.
10
User Guide
Summary of Contents for IdeaCentre C5 14IMB05
Page 1: ...User Guide IdeaCentre Gaming 5 14L 05 IdeaCentre Creator 5 14L 05 ...
Page 4: ...ii User Guide ...
Page 6: ...iv User Guide ...
Page 12: ...6 User Guide ...
Page 30: ...24 User Guide ...
Page 34: ...28 User Guide ...
Page 41: ...5 Release the latch on the storage drive bay and pull slightly Chapter 5 CRU replacement 35 ...
Page 44: ...9 Mount the new storage drive bay on the case 38 User Guide ...
Page 62: ...56 User Guide ...
Page 66: ...60 User Guide ...
Page 80: ...74 User Guide ...
Page 96: ...90 User Guide ...
Page 99: ......
Page 100: ......


