background image

Chapter 

2

Using Advanced Configuration

If you opted to start your initial backup immediately, the Lenovo Online Data Backup Status Window appears after
the backup has completed.

From the Status Window, click Configure to launch the Lenovo Online Data Backup Remote Backup Configuration
Window.

If the Lenovo Online Data Backup Status Window is not displayed, right-click the Lenovo Online Data Backup icon

 in your system tray, then click Configure.

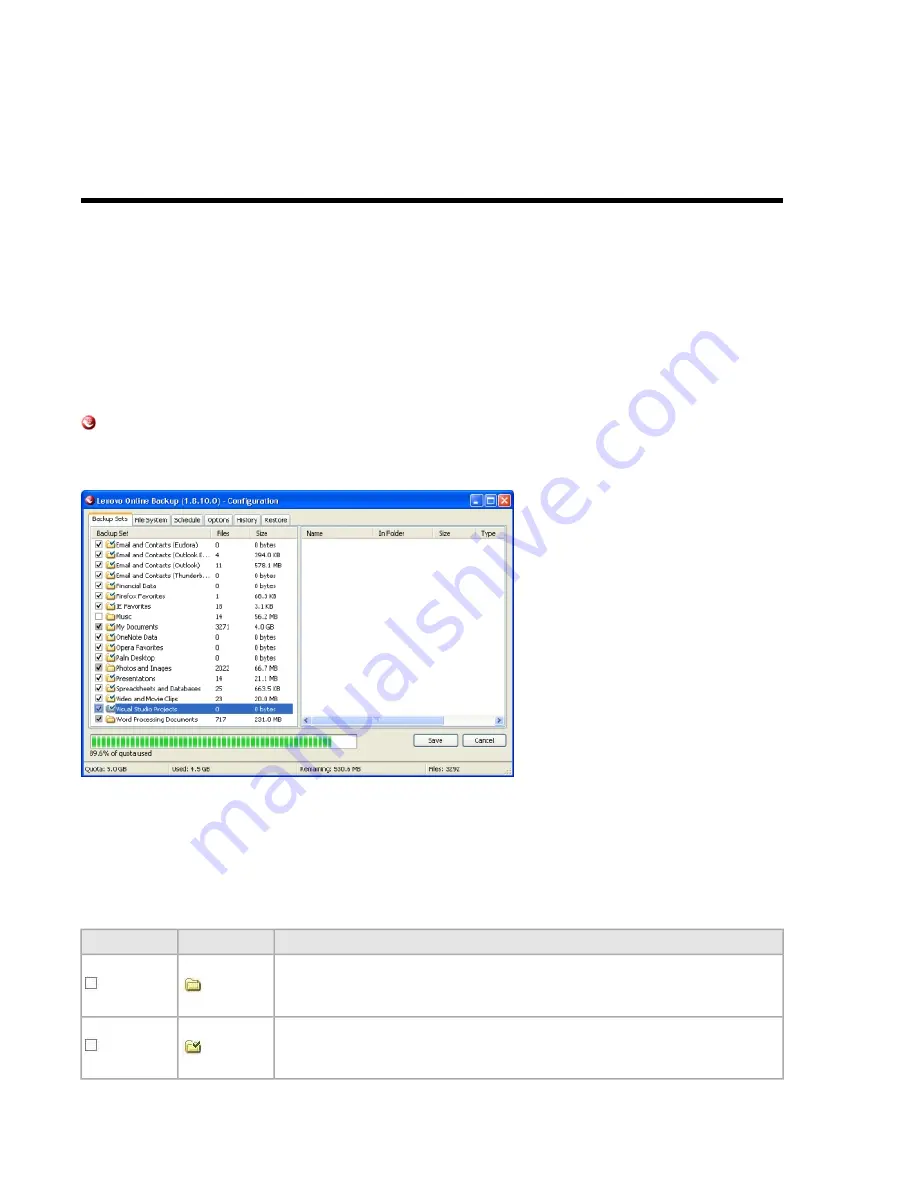
Lenovo Online Data Backup can be configured in each of the six tabs at the top of the Configuration window. This
guide examines each of the tabs in detail, starting with the Backup Sets tab.

Figure 7: Advance Configuration

To understand how the backup sets are organized, it helps to learn about the backup set icons. Using a combination of
check boxes and folders with a green check displayed on them, Lenovo Online Data Backup indicates how it treats
files in a backup set. To see how files are handled, hover your mouse pointer over a backup set and an explanation
appears.

The complete icon list:

Description

Folder Icon

Checkbox

None of the files will be backed up, and new items in this set will not be backed up.

None of these files will be backed up, and new files in this set will be backed up.

13

Summary of Contents for Online Data Backup 1.8.14

Page 1: ...Lenovo Online Data Backup User Guide Version 1 8 14 ...

Page 2: ......

Page 3: ...ed Backup 23 Configuring Options 23 Bandwidth Throttling 25 Backup Speed 26 Proxy Configuration 26 About the History 27 Viewing Backup and Restore History 28 About Restoring Files 28 Changing the Location of Temporary Files 28 Chapter 3 Using the Status Window 31 Using the Status Window 31 Chapter 4 About Restoring Files 33 Performing a Restore Using the Restore Tab 33 Performing VSS Restores 35 R...

Page 4: ...oring Microsoft Exchange Server Data 47 Restoring Active Directory and SYSVOL Data 48 Restoring Microsoft SQL Server Data 49 Restoring COM 49 Restoring the Registry 50 Chapter 6 Uninstalling Lenovo Online Data Backup 51 Lenovo Online Data Backup User Guide iv ...

Page 5: ...e Using Advanced Configuration on page 13 for more information 8 Configuring Lenovo Online Data Backup The following topics are available Topics Downloading the Lenovo Online Data Backup Client Installing the Lenovo Online Data Backup Client Using Basic Configuration Selecting Backup Sets Configuring Bandwidth Selecting Your Backup Speed Downloading the Lenovo Online Data Backup Client 1 From your...

Page 6: ... Data Backup Specify a name for the Lenovo Online Data Backup folder Start Menu folder or click Browse to search for an existing Start Menu folder 7 Click Install to start the installation 8 Perform one of the following options To begin the configuration process select Launch Lenovo Online Data Backup Configuration Wizard then click Finish To finish the installation without starting the Lenovo Onl...

Page 7: ...nd that product key at the bottom of that confirmation email 1 In the Email field type the email address that the product key was sent to 2 In the Product Key field type or copy the product key number that was sent to you 3 Click Next 4 In the Name field type your name 5 In the Password field type a password 6 In the Confirm Password field type your password again 7 Optional Select whether you wan...

Page 8: ... only available if you have already installed and activated the client previously 2 Click Next If you selected Encrypt my data with a randomly generated 256 bit AES key when prompted to save your key click Yes then skip to Selecting Backup Sets on page 9 Caution If you do not save your key at this point you will not be able to do Web restores of your data If you selected Encrypt my data with my ow...

Page 9: ...t if you lose your key neither you nor Lenovo will be able to decrypt your data Selecting Backup Sets Backup sets have been prebuilt for file types that are common to most users By default each of these backup sets that pertain to your files is selected for backup 1 Right click the Mozy icon in the system tray then select Configure 2 Click the checkbox next to the backup set to include it in your ...

Page 10: ... Configuration on page 13 5 Once you have finished selecting your backup sets to include click Next Configuring Bandwidth Lenovo Online Data Backup checks your computer s bandwidth to make sure that it has the required broadband connection for the online backups 1 Click Start Test to initialize the test The progress bar indicates the progress of the bandwidth test Lenovo Online Data Backup User Gu...

Page 11: ...nfiguration If the bandwidth test fails you must verify that you have a fast enough connection to use Lenovo Online Data Backup Lenovo Online Data Backup requires a high speed Internet connection to perform online backups Selecting Your Backup Speed Lenovo Online Data Backup allows you to select the speed of your backups You can select either to have faster backups or better performance for your c...

Page 12: ...ta Backup start the initial backup automatically when my computer is idle I d like to continue configuring my backup in Expert Mode If you select this option see Using Advanced Configuration on page 13 4 After making your selection click Finish to finish the Configuration Wizard If you selected to Start your initial backup immediately the initial backup may take quite a long time depending on the ...

Page 13: ... top of the Configuration window This guide examines each of the tabs in detail starting with the Backup Sets tab Figure 7 Advance Configuration To understand how the backup sets are organized it helps to learn about the backup set icons Using a combination of check boxes and folders with a green check displayed on them Lenovo Online Data Backup indicates how it treats files in a backup set To see...

Page 14: ...kup Content About Deleting Moving and Renaming Files Scheduling Backups Configuring Options About the History About Restoring Files Changing the Location of Temporary Files Selecting Backup Sets The Lenovo Online Data Backup backup sets allow you to customize your backups by file type Each time a new file of a type you have selected for backup is saved to your computer Lenovo Online Data Backup au...

Page 15: ...a Backup allows you to create custom backup sets for your specific needs 1 If the Lenovo Online Data Backup Status Window is not displayed right click the Lenovo Online Data Backup icon in your system tray then click Configure 2 Right click within the left panel of the Backup Sets tab then click Add Backup Set The Backup Sets window appears 3 Specify a name for your new backup set in the Backup Se...

Page 16: ...s on page 16 Including and Excluding Data The first criteria you select is whether to include or exclude the data from the backup set Click the drop down and select either Include to include data Exclude to exclude data Selecting File Attributes Use the second drop down to select a file attribute for the backup set The available options are File Type on page 16 Size on page 17 Last Modified on pag...

Page 17: ...nu Figure 12 Last Modiified Created If you select Created as the second criteria select either before after or between for your option Before and after allow you to select one date for the date field Either enter the date manually or select the date from a calendar that appears when you click the date field drop down menu If you select between two date fields appear so you can set the range Either...

Page 18: ...services are running Microsoft VSS support is only available on Windows 2003 server or later Important This functionality is only available with a Lenovo Online Data Backup server license If these services are running on your machine the Lenovo Online Data Backup client automatically detects the available services and displays them in the Backup Sets tab Figure 16 VSS Backup Sets To back up these ...

Page 19: ...r slowdown of any kind is experienced Editing Backup Sets Editing a backup set takes just moments and is easy to accomplish 1 If the Lenovo Online Data Backup Status Window is not displayed right click the Lenovo Online Data Backup icon in your system tray then click Configure 2 Choose from one of the choices Double click the backup set you want to edit Right click on your target set then click Ed...

Page 20: ...your mouse pointer over the folder in question to reveal a tooltip explanation Adding Files and Folders Through Windows Explorer You can also add files and folders to your backup list by right clicking on the file or folder If you add a file to a folder that has already been added to your backup list the file is automatically backed up in the next scheduled backup Files that are included as part o...

Page 21: ...nchecked Lenovo Online Data Backup immediately releases the quota used by that particular file The most recent version is kept for the amount of time allotted to your account after which the files are irretrievable Previous versions of files do not count against your quota Lenovo Online Data Backup recognizes when you delete move or rename files on your system and updates the copies on the Lenovo ...

Page 22: ... is less busy than that percent b Specify a minutes idle number that limits your backups to when your computer has not been active for more than that number of minutes c Specify a times per day limit for the number of times Lenovo Online Data Backup can run backups 4 Specify the number of days to pass before Lenovo Online Data Backup alerts you that a backup has not occurred 5 Click Save to save y...

Page 23: ... to run You can select to temporarily suspend automatic and scheduled backups To temporarily suspend automatic and scheduled backups select Temporarily suspend automatic and scheduled backups Alternately you can suspend Lenovo Online Data Backup backups from your system tray To activate the feature right click the Lenovo Online Data Backup icon in your system tray then click Suspend Lenovo Online ...

Page 24: ...er It is not selected by default Don t show restore menu in Windows Explorer Hides the icons that displays next to files and folders in Windows Explorer when a file is included in your backup list It is selected by default Disable icon overlays in Windows Explorer Hides the virtual drive when you open My Computer It is not selected by default Don t show virtual drive in My Computer Saves you the t...

Page 25: ...ouse but information for example word processing files images etc is flowing through the lines not power One line is only for uploading to the Internet Lenovo Online Data Backup backups email etc while the other is only for downloads incoming email photos programs etc Your Internet service provider supplies your information lines and determines the size of those lines Only so much data can flow th...

Page 26: ...re Proxy to launch the Proxy Configuration dialog box Figure 23 Proxy Configuration 1 Select Use this proxy server to enable proxy configuration 2 Enter your proxy server in the field provided 3 Choose a proxy configuration option Click Use this computer s default proxy server if you want Lenovo Online Data Backup to defer to your computer s default proxy server Click Automatically detect proxy se...

Page 27: ...k My proxy server authenticates my computer via the domain if your server uses your domain for authentication Click My proxy requires a user name and password if your server requires them then enter your user name password and domain optional in the fields provided 5 Click OK to save your settings or to close the dialog without making any changes About the History The History tab displays all atte...

Page 28: ...e largest single file you are trying to back up For example if the largest file is 1 GB you ll need 1 3 GB of free space on your C drive to encrypt the file You might actually need more space than this because Lenovo Online Data Backup encrypts more than one file at a time If you have another drive or volume that has enough free space to store the temporary files then you can switch the location i...

Page 29: ...elect TMP then click Edit 11 In the Variable Value field type the path of the new temp folder you created For example D temp 12 Click OK then click OK again For the changes to take effect you must restart your computer 29 Using Advanced Configuration ...

Page 30: ......

Page 31: ...downloading and restoring the files You can adjust the speed of the backup by moving the slider to the left faster computer or right quicker backups After a backup or a restore has been attempted the Status window displays whether the backup or restore was successful and when it was completed If an error occurred during the backup or restore the window displays an error code with a brief explanati...

Page 32: ...p Remote Backup Start Backup Launches the Lenovo Online Data Backup Configuration window Configure Launches the History window History Launches your online account with Lenovo Online Data Backup to initiate a file restoration Restore Files Allows you to hide the Status window Hide To hide the Status window after a successful backup deselect Show this box after every successful backup Lenovo Online...

Page 33: ...kup has taken place Alternately you can click Restore Files in the Status window The Restore Files button in the Status window follows a specific hierarchy 1 If available the Restore tab in the Lenovo Online Data Backup Configuration window opens 2 If not the Lenovo Online Data Backup Virtual Drive in My Computer opens 3 If neither of those options is available the Lenovo Online Data Backup Web Re...

Page 34: ...t to restore 4 Click Browse to select the destination folder for your restored files a When the Browse window appears navigate to the desired folder b Alternately create a new folder by clicking Make New Folder then specify the name of the new folder in the appropriate field c Click OK to return to the Configuration window 5 Select whether you want to overwrite existing files or rename files if th...

Page 35: ...ion window appears 6 Click VSS Restore 7 Select the VSS MS Exchange Server backup set Caution Selecting the Authoritative Restore forces the restored directory database to be replicated to other servers on the domain after the backups have been restored 8 Select the method used to access the backup set Download files from Lenovo Online Data Backup Remote Backup Server Use previously downloaded web...

Page 36: ...ts and object trees of objects to all domain controllers in the domain 9 Select the method used to access the backup sets Download files from the Lenovo Online Data Backup Remote Backup Server Use previously downloaded Web restore 10 If you select to use a previously downloaded restore browse to the location where the files are stored 11 Click Next The VSS downloading window appears 12 Once the da...

Page 37: ...ne Data Backup Remote Backup Server Use previously downloaded web restore 5 If you select to use a previously downloaded restore browse to the location where the files are stored 6 Click Next The VSS downloading window appears 7 Once the data has been downloaded the VSS writer automatically copies the files to the correct locations Once you have completed the restore you must restart Windows for t...

Page 38: ...es you require 5 Right click on the folder or file and select Restore from the drop down menu 6 Conditional If in the case of a corrupted file a file by that name exists on your local drive either overwrite or rename the file when prompted by Lenovo Online Data Backup If you know the file is corrupted and would like to overwrite the file click Overwrite If you are unsure click Rename and rename th...

Page 39: ...d Restore to the Restore File As window displays 7 Browse to the location where you want to save the file then in the File name field type a name for the file 8 Click Save Restoring from the Web When you perform a Web restore your restored files are only available to download for 7 days Once those 7 days expire the files are no longer available for download Additionally once you download the files...

Page 40: ...ing upon how many files you have to restore it make take significant amount of time for you to receive the email If you selected Web Restore your email includes a link to use when retrieving your restored information Your files will be available for download for 7 days For information on downloading the restored files see Downloading Restored Files on page 41 Restoring Files from the Web Using Bac...

Page 41: ...ion Your files will be available for download for 7 days For information on downloading the restored files see Downloading Restored Files on page 41 Downloading Restored Files Before you download the restore request it is suggested you use a download manager such as the one included with Firefox if you are downloading a large restore request 1 Click or copy and paste the link from your restore ema...

Page 42: ...tion you will remember later such as your Desktop 3 Click on the Crypto Utility icon to run the program Figure 32 Cypto Utility 4 Select from one of the following key options then click OK Description Option Enter the password phrase you used to create your personal key Enter Key Specify the location of the key you saved locally during the installation Import Key The decryption utility automatical...

Page 43: ... place the decrypted files in to the Destination Folder field The Source and Destination folders cannot be in the same path 7 Click Decrypt to decrypt the files The files are decrypted to the specified destination folder 43 Restoring Files ...

Page 44: ......

Page 45: ... COM data This helps for quick restoration when you have data loss Lenovo makes this process easy for you For Microsoft Exchange Active Directory Microsoft SQL Server SYSVOL registry and COM data Lenovo Online Data Backup uses the native Microsoft VSS writers to back up the data while the services are running Microsoft VSS support is only available on Windows 2003 server or later Important This fu...

Page 46: ...starts When the backup sets appear for Microsoft SQL Server each database displays as a separate backup set After Lenovo Online Data Backup has backed up the file only the changed blocks of the file are transmitted This happens at the block level not the file level so subsequent backups can take minutes instead of hours This style of Exchange and SQL Server backup results in a significantly reduce...

Page 47: ...VOL you can use the VSS Restore to recover this data Important This functionality is only available with a Lenovo Online Data Backup server license The process for restoring VSS data is slightly different depending upon the type of data you are restoring Restoring Microsoft Exchange Server Data Before you restore the Microsoft Exchange data you must dismount all mailbox stores 1 Open the Microsoft...

Page 48: ...boxes for VSS Active Directory and Windows File Replication Service SYSVOL backup sets from the configuration module Restoring Active Directory and SYSVOL Data Before restoring data to Active Directory and SYSVOL you must restart the server in Directory Service Restore mode 1 Reboot the server 2 During the reboot process press and hold the F8 key on the keyboard 3 When the Windows Advanced Options...

Page 49: ...ppears 5 Click VSS Restore 6 Select the VSS MS SQL Server backup sets that need to be restored 7 Select the method used to access the backup set Download files from Lenovo Online Data Backup Remote Backup Server Use previously downloaded a Web restore 8 If you select to use a previously downloaded restore browse to the location where the files are stored 9 Click Next The VSS downloading window app...

Page 50: ...w appears 2 Click Restore Files The Lenovo Online Data Backup Configuration window appears 3 Click VSS Restore 4 Select the VSS Registry backup set Download files from Lenovo Online Data Backup Remote Backup Server Use previously downloaded web restore 5 If you select to use a previously downloaded restore browse to the location where the files are stored 6 Click Next The VSS downloading window ap...

Page 51: ...g Lenovo Online Data Backup 1 Click Start All Programs Lenovo Online Data Backup Uninstall Lenovo Online Data Backup 2 Click Yes to confirm the uninstall of Lenovo Online Data Backup 3 When prompted to restart click Yes 51 ...

Page 52: ......

Reviews: