Procedure
1.
Press the power (
) button on the UPS front panel until the UPS front panel
display illuminates and shows a status of "
UPS starting...
".
The UPS cycles through Standby mode to Battery mode. The
indicator
illuminates solid. The UPS supplies power to your equipment using batteries.
2.
Check the UPS front panel display for active alarms or notices. Resolve any
active alarms before continuing. See the Troubleshooting section.
3.
Check the UPS status from the front panel to view the active alarms. Correct
the alarms and restart if necessary.
Shutting down the UPS
About this task
To shut down the UPS:
Procedure
1.
Press the
button on the UPS front panel. The UPS goes into Standby mode.
2.
If desired, set the upstream circuit breaker (not provided) to the "
O
" (off)
position to switch off the utility power. The UPS turns off.
UPS start-up with HotSwap MBP
About this task
Note:
Verify that the total equipment ratings do not exceed the UPS capacity to
prevent an overload alarm.
Procedure
1.
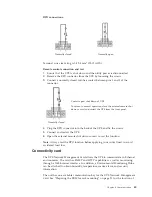
Check that the UPS is correctly connected to the HotSwap MBP (see
“HotSwap MBP connection” on page 30).
2.
Verify that the MBP terminal blocks are connected to the normal AC source
and, if so wired, to the Bypass AC source.
3.
Check that the MBP's manual Bypass switch is set to the
Bypass
position.
4.
Set the upstream circuit breaker (not provided) to the
I
position (on) to switch
on the utility power, and set the Bypass source upstream circuit breaker (not
provided) to the
I
position (on) to switch on the Bypass power.
5.
Verify that the
Bypass mode
red light on the MBP goes on, indicating that the
load is now powered by the normal AC source the or Bypass AC source.
6.
Set the MBP's Normal AC source switch and Bypass AC source switch (if
present) to the
I
position.
7.
Verify that the UPS is correctly powered (the UPS display panel illuminates).
8.
Press the UPS
On
button to start the UPS.
9.
Select
Control
>
Go to Bypass
(Bypass LED should be
On
).
38
Installation and User's Guide
Summary of Contents for RT11.0VA
Page 2: ......
Page 18: ...xvi Installation and User s Guide ...
Page 22: ...4 Installation and User s Guide ...
Page 86: ...68 Installation and User s Guide ...
Page 98: ...80 Installation and User s Guide ...
Page 100: ...82 Installation and User s Guide ...
Page 101: ......
Page 102: ...Part Number 00WA361 Printed in USA 1P P N 00WA361 ...

