background image

installing

77

removing

73

replacing

73

RAID adapter 

installing

82

removing

81

replacing

81

rear view

17

rear view LED

19

removing 

DIMM

35

hot-swap drive

41

hot-swap power supply

47

LOM adapter

59

M.2 backplane and M.2 drive

60

PCIe adapter

67

rack latches

73

RAID adapter

81

security bezel

83

system fan

55

top cover

86

replacement

35

replacing 

DIMM

35

hard disk drive

40

hot-swap drive

40

hot-swap power supply

47

LOM adapter

58

M.2 backplane and M.2 drive

60

PCIe adapter

67

rack latches

73

RAID adapter

81

security bezel

83

solid-state drive

40

system fan

55

top cover

86

retainer on M.2 backplane 

adjusting

63

S

security bezel 

installing

84

removing

83

replacing

83

server components

13

service and support 

before you call

91

hardware

93

software

93

service data

92

software service and support telephone numbers

93

solid-state drive 

replacing

40

static-sensitive devices 

handling

4, 29

support web page, custom

91

system board components

21

system board LED

22

system error LED

14, 22

system fan 

installing

57

removing

55

replacing

55

system ID button

14

system ID LED

14, 22

system power LED

22

system reliability guidelines

3, 28

T

telephone numbers

93

ThinkAgile MX Certified Node 2U

35

top cover 

installing

87

removing

86

replacing

86

trademarks

95

V

VGA connector

13

W

working inside the server 

power on

4, 28

98

User Guide forThinkAgile MX Certified Node 2U

Summary of Contents for ThinkAgile MX Certified Node 2U

Page 1: ...User Guide for ThinkAgile MX Certified Node 2U Machine Type 7Z20 ...

Page 2: ...enovo 2018 2019 LIMITED AND RESTRICTED RIGHTS NOTICE If data or software is delivered pursuant to a General Services Administration GSA contract use reproduction or disclosure is subject to restrictions set forth in Contract No GS 35F 05925 ...

Page 3: ... 33 Chapter 5 Hardware replacement procedures 35 DIMM replacement 35 Remove a DIMM 35 DIMM installation rules 36 Install a DIMM 39 Hot swap drive replacement 40 Remove a hot swap drive 41 Install a hot swap drive 43 Hot swap power supply replacement 47 Remove a hot swap power supply 47 Install a hot swap power supply 51 System fan replacement 55 Remove a system fan 55 Install a system fan 57 LOM a...

Page 4: ...ii User Guide forThinkAgile MX Certified Node 2U ...

Page 5: ...er versions You can order ThinkAgile MX with Windows Server 2016 preloaded ThinkAgile MX certified configurations Lenovo Certified Configurations for Microsoft Storage Spaces Direct provides detailed views of Lenovo certified configurations for building Microsoft Storage Spaces Direct S2D solutions The guide describes the Microsoft Windows Server Software Defined Datacenter program explains system...

Page 6: ...n electrostatic discharge wrist strap or other grounding system Read the safety information and guidelines to ensure that you work safely A complete list of safety information for all products is available at http thinksystem lenovofiles com help index jsp topic 2Fsafety_documentation 2Fpdf_files html The following guidelines are available as well Handling static sensitive devices on page 4 and Wo...

Page 7: ... steps that involve removing or installing a riser card Blue on a component indicates touch points where you can grip to remove a component from or install it in the server open or close a latch and so on Orange on a component or an orange label on or near a component indicates that the component can be hot swapped if the server and operating system support hot swap capability which means that you...

Page 8: ... forearms Button or roll up long sleeves before working inside the server Prevent your necktie scarf badge rope or long hair from dangling into the server Remove jewelry such as bracelets necklaces rings cuff links and wrist watches Remove items from your shirt pocket such as pens and pencils in case they fall into the server as you lean over it Avoid dropping any metallic objects such as paper cl...

Page 9: ...vice carefully hold it by the edges or the frame Do not touch solder joints pins or exposed circuitry Keep the device from others reach to prevent possible damages Chapter 1 Lenovo ThinkAgile MX Certified Nodes overview 5 ...

Page 10: ...w on page 13 Note The Lenovo XClarity Controller USB connector mode must be set to manage the Lenovo XClarity Controller instead of normal USB mode To switch from normal mode to Lenovo XClarity Controller management mode hold the blue ID button on the front panel for at least 3 seconds until its LED flashes slowly once every couple of seconds To connect using the Lenovo XClarity Administrator Mobi...

Page 11: ... the devices to the server Cable identifiers of some cables are printed on the cables that come with the server and optional devices Use these identifiers to connect the cables to the correct connectors Ensure that the cable is not pinched and does not cover any connectors or obstruct any components on the system board Ensure that the relevant cables pass through the cable clips Note Disengage all...

Page 12: ...plete required setup before installing DCPMMs for the first time determine the most suitable configuration and install memory modules accordingly Complete the following steps to finish system setup to support DCPMM and install the memory modules according to the designated combination 1 Update the system firmware to the latest version that supports DCPMM see Update the firmware in Setup Guide 2 Ma...

Page 13: ... Maintenance Manual to determine the new configuration and acquire memory modules accordingly 4 If the DCPMMs are in Memory Mode and will stay in Memory Mode after new units are installed follow the combination in on page to install the new modules in the correct slots Otherwise go to the next step 5 Make sure to back up the stored data 6 If the App Direct capacity is interleaved a Delete all the ...

Page 14: ...10 User Guide forThinkAgile MX Certified Node 2U ...

Page 15: ...on processor model and UEFI Operating Mode selection Single rank dual rank quad rank or octa rank Slots 24 DIMM slots Supports depending on the model 8 GB 16 GB and 32 GB RDIMMs 64 GB LRDIMMs Internal drives For ThinkAgile MX hybrid storage Up to fourteen 3 5 inch hot swap drives For ThinkAgile MX all flash Up to twenty four 2 5 inch hot swap drives Expansion slots One PCIe slot on the system boar...

Page 16: ...oint 21 C 70 F ASHRAE class A3 8 85 maximum dew point 24 C 75 F ASHRAE class A4 8 90 maximum dew point 24 C 75 F Shipping or storage 8 90 Particulate contamination Attention Airborne particulates and reactive gases acting alone or in combination with other environmental factors such as humidity or temperature might pose a risk to the server Note Your server complies with ASHRAE class A2 specificat...

Page 17: ...ive bays Notes Your server might look different from the illustrations in this topic Figure 1 Front view of server models with twelve 3 5 inch drive bays for ThinkAgile MX hybrid storage option Figure 2 Front view of server models with twenty four 2 5 inch drive bays for ThinkAgile MX all flash option Table 2 Components on front of server Callout Callout 1 Pull out information tab 2 Front I O asse...

Page 18: ...bay numbers The EMI integrity and cooling of the server are protected by having all drive bays occupied The vacant drive bays must be occupied by drive bay fillers or drive fillers 6 Drive activity LED 7 Drive status LED Each hot swap drive has two LEDs Drive LED Status Description 6 Drive activity LED Solid green The drive is powered but not active Blinking green The drive is active 7 Drive statu...

Page 19: ... set for XClarity Controller management function you can attach a mobile device installed with the application to run XClarity Controller event logs If the connector is set to have both functions you can press the system ID button for three seconds to switch between the two functions 2 USB 3 0 connector Used to attach a device that requires a USB 2 0 or 3 0 connection such as a keyboard a mouse or...

Page 20: ...his system ID button and the blue system ID LED to visually locate the server A system ID LED is also located on the rear of the server Each time you press the system ID button the state of both the system ID LEDs changes The LEDs can be changed to on blinking or off You can also use the Lenovo XClarity Controller or a remote management program to change the state of the system ID LEDs to assist i...

Page 21: ...o be running at low speed A hot swap fan has been removed The power supply has a critical error The power supply is not connected to the power Check the event log to determine the exact cause of the error Off None The server is off or the server is on and is working correctly None Rear view The rear of the server provides access to several connectors and components Figure 4 Rear view of ThinkAgile...

Page 22: ...rect drive monitor or other devices that use a VGA connector 4 USB 3 0 connectors 2 Used to attach a device that requires a USB 2 0 or 3 0 connection such as a keyboard a mouse or a USB storage device 5 NMI button Press this button to force a nonmaskable interrupt NMI to the processor By this way you can blue screen the server and take a memory dump You might have to use a pen or the end of a stra...

Page 23: ...ocated on the front of the server Each time you press the system ID button the state of both the system ID LEDs changes The LEDs can be changed to on blinking or off You can also use the Lenovo XClarity Controller or a remote management program to change the state of the system ID LEDs to assist in visually locating the server among other servers 2 3 Ethernet status LEDs The XClarity Controller ne...

Page 24: ...power supply is in zero output mode standby When the server power load is low one of the installed power supplies enters into the standby state while the other one delivers entire load When the power load increases the standby power supply will switch to active state to provide sufficient power to the server To disable zero output mode start the Setup utility go to System Settings Power Zero Outpu...

Page 25: ...amming connector 6 Riser 1 slot 7 LOM adapter connector 8 XCC ROM programming connector 9 Front USB connector 10 GPU power connector 2 11 Operator information panel connector 12 TCM1 TPM2 connector for China only 13 Front VGA connector 14 DIMM slots 24 15 Backplane power connector 3 16 System fan 1 connector 17 Processor 1 socket 18 System fan 2 connector 19 System fan 3 connector 20 Backplane pow...

Page 26: ...slot 8 Notes 1 Trusted Cryptography Module 2 Trusted Platform Module System board LEDs The illustration in this section shows the LEDs on the system board Figure 8 System board LEDs Table 7 LEDs on the system board Callout Callout 1 System power LED 2 System ID LED 3 System error LED 4 DIMM error LEDs 24 5 Fan 1 error LED 6 Fan 2 error LED 7 Fan 3 error LED 8 Fan 4 error LED 9 Fan 5 error LED 10 F...

Page 27: ...or a remote management program to change the state of the system ID LEDs to assist in visually locating the server among other servers 3 System error LED When this yellow LED is lit one or more LEDs elsewhere in the server might also be lit to direct you to the source of the error For more information see Front I O assembly on page 14 4 DIMM error LEDs When a DIMM error LED is lit it indicates tha...

Page 28: ...acement of Tier 1 CRUs is your responsibility If Lenovo installs a Tier 1 CRU at your request with no service agreement you will be charged for the installation Tier 2 customer replaceable unit You may install a Tier 2 CRU yourself or request Lenovo to install it at no additional charge under the type of warranty service that is designated for your server Field replaceable unit FRU FRUs must be in...

Page 29: ...affle 16 Serial port module 17 Backplane eight 2 5 inch hot swap drives 18 Backplane twelve 3 5 inch hot swap drives 19 Backplane eight 3 5 inch hot swap drives 20 Right rack latch with front I O assembly 21 Left rack latch with VGA connector 22 Right rack latch without front I O assembly 23 Left rack latch without VGA connector 24 Chassis 25 Security bezel 26 Front I O assembly server models with...

Page 30: ... 5 inch hot swap 30 Filler 2 5 inch drive 31 Storage drive 2 5 inch hot swap 32 Large size air baffle 33 Riser 2 bracket 34 Riser card 35 Riser 1 bracket 36 PCIe adapter 37 Rear hot swap drive assembly 38 Power supply 39 M 2 drive 40 M 2 backplane 41 480 GB M 2 drive air baffle 26 User Guide forThinkAgile MX Certified Node 2U ...

Page 31: ...y that the latest level of code is supported for the cluster solution before you update the code It is good practice to make sure that the server is working correctly before you install an optional component Keep the working area clean and place removed components on a flat and smooth surface that does not shake or tilt Do not attempt to lift an object that might be too heavy for you If you have t...

Page 32: ...server cover before you turn the power on Do not operate the server for more than 30 minutes with the server cover removed for it might damage server components Cabling instructions that come with optional components must be followed A failed fan must be replaced within 48 hours since malfunction A removed hot swap fan must be replaced within 30 seconds after removal A removed hot swap drive must ...

Page 33: ...hen handling devices during cold weather for heating would reduce indoor humidity and increase static electricity Always use an electrostatic discharge wrist strap or other grounding system particularly when working inside the server with the power on While the device is still in its static protective package touch it to an unpainted metal surface on the outside of the server for at least two seco...

Page 34: ...w on page 13 Note The Lenovo XClarity Controller USB connector mode must be set to manage the Lenovo XClarity Controller instead of normal USB mode To switch from normal mode to Lenovo XClarity Controller management mode hold the blue ID button on the front panel for at least 3 seconds until its LED flashes slowly once every couple of seconds To connect using the Lenovo XClarity Administrator Mobi...

Page 35: ... the devices to the server Cable identifiers of some cables are printed on the cables that come with the server and optional devices Use these identifiers to connect the cables to the correct connectors Ensure that the cable is not pinched and does not cover any connectors or obstruct any components on the system board Ensure that the relevant cables pass through the cable clips Note Disengage all...

Page 36: ... setup Follow the instructions in this section to complete required setup before installing DCPMMs for the first time determine the most suitable configuration and install memory modules accordingly Complete the following steps to finish system setup to support DCPMM and install the memory modules according to the designated combination 1 Update the system firmware to the latest version that suppo...

Page 37: ... Memory module installation rules in ThinkSystem SR630 Maintenance Manual to determine the new configuration and acquire memory modules accordingly 4 If the DCPMMs are in Memory Mode and will stay in Memory Mode after new units are installed follow the combination in on page to install the new modules in the correct slots Otherwise go to the next step 5 Make sure to back up the stored data 6 If th...

Page 38: ...34 User Guide forThinkAgile MX Certified Node 2U ...

Page 39: ...M Remove a DIMM Use this information to remove a DIMM Chapter 4 Read the installation Guidelines on page 27 Power off the server for this task on page ATTENTION Static Sensitive Device Ground package before opening on page 29 Attention Disconnect all power cords for this task DIMMs are sensitive to static discharge and require special handling In addition to the standard guidelines for Handling st...

Page 40: ...ion that you implement on your server Your server has 24 DIMM slots and it has the following features Each slot supports 8 GB 16 GB and 32 GB DDR4 RDIMMs with Error Checking and Correcting ECC technology Each slot supports 64 GB DDR4 LRDIMMs with ECC technology Your server supports up to 12 DIMMs when one processor is installed and up to 24 DIMMs when two processors are installed The minimum syste...

Page 41: ...ring mode each DIMM in a pair must be identical in size and architecture The channels are grouped in pairs with each channel receiving the same data One channel is used as a backup of the other which provides redundancy Note All DIMMs to be installed must be the same type with the same capacity frequency voltage and ranks The following table shows the DIMM population sequence for mirroring mode wh...

Page 42: ...15 12 11 10 9 8 7 6 5 4 3 2 1 20 21 24 22 20 18 17 16 15 14 13 12 11 10 9 8 7 6 5 4 3 2 1 21 24 24 23 22 21 20 19 18 17 16 15 14 13 12 11 10 9 8 7 6 5 4 3 2 1 24 Rank sparing mode In rank sparing mode one rank of a DIMM works as the spare rank for the other ranks on the same channel The spare rank is not available as system memory Notes All DIMMs to be installed must be the same type with the same...

Page 43: ...7 16 15 14 13 12 11 10 9 8 7 6 5 4 3 2 1 22 24 24 23 22 21 20 19 18 17 16 15 14 13 12 11 10 9 8 7 6 5 4 3 2 1 24 Install a DIMM Use this information to install a DIMM Chapter 4 Read the installation Guidelines on page 27 Power off the server for this task on page ATTENTION Static Sensitive Device Ground package before opening on page 29 Attention Disconnect all power cords for this task DIMMs are ...

Page 44: ...maging the DIMM slots open and close the clips gently Step 2 Align the DIMM with the slot and firmly press both ends of the DIMM straight down into the slot until the retaining clips snap into the locked position Note If there is a gap between the DIMM and the retaining clips the DIMM has not been correctly inserted open the retaining clips remove the DIMM and then reinsert it After installing a D...

Page 45: ...cover is in place and fully closed whenever you install or remove a drive Remove a hot swap drive Use this information to remove a hot swap drive Chapter 4 Read the installation Guidelines on page 27 ATTENTION Static Sensitive Device Ground package before opening on page 29 Before removing a hot swap drive 1 If one or more NVMe drives are to be removed it is recommended to disable them first in Sa...

Page 46: ...e latch to open the drive tray handle Figure 13 Opening the drive tray handle of a 2 5 inch hot swap drive Figure 14 Opening the drive tray handle of a 3 5 inch hot swap drive 42 User Guide forThinkAgile MX Certified Node 2U ...

Page 47: ...ap drive 1 Install the drive filler or a new drive to cover the drive bay See Install a hot swap drive on page 43 2 If you are instructed to return the old hot swap drive follow all packaging instructions and use any packaging materials that are provided Install a hot swap drive Use this information to install a hot swap drive Chapter 5 Hardware replacement procedures 43 ...

Page 48: ... your server supports the following drive types NVMe SSD SAS SATA SSD SAS SATA HDD The drive bays are numbered to indicate the installation order starting from number 0 Follow the installation order when you install a drive See Front view on page 13 Before installing a hot swap drive 1 If the drive bay has a drive filler installed pinch the two tabs to remove the drive filler Keep the drive filler...

Page 49: ...ch the static protective package that contains the new drive to any unpainted surface on the outside of the server Then take the new drive out of the package and place it on a static protective surface Chapter 5 Hardware replacement procedures 45 ...

Page 50: ...ide the drive into the drive bay until it snaps into position b Close the drive tray handle to lock the drive in place Step 2 Bring the data drive online Step 3 Check the drive status LED to verify that the drive is operating correctly If the yellow drive status LED is lit continuously that drive is faulty and must be replaced If the green drive activity LED is flashing the drive is being accessed...

Page 51: ...or any part that has this label attached Hazardous voltage current and energy levels are present inside any component that has this label attached There are no serviceable parts inside these components If you suspect a problem with one of these parts contact a service technician S002 CAUTION The power control button on the device and the power switch on the power supply do not turn off the electri...

Page 52: ...1 Turn everything OFF 2 First attach all cables to devices 3 Attach signal cables to connectors 4 Attach power cords to outlet 5 Turn device ON 1 Turn everything OFF 2 First remove power cords from outlet 3 Remove signal cables from connectors 4 Remove all cables from devices Figure 21 Hot swap power supply label on the cover Attention This type of power supply is hot swap only when two power supp...

Page 53: ...d Hazardous voltage current and energy levels are present inside any component that has this label attached There are no serviceable parts inside these components If you suspect a problem with one of these parts contact a service technician S019 CAUTION The power control button on the device does not turn off the electrical current supplied to the device The device also might have more than one co...

Page 54: ...uct 3 Attach power cords to the product For ac systems use appliance inlets For dc systems ensure correct polarity of 48 V dc connections RTN is and 48 V dc is Earth ground should use a two hole lug for safety 4 Attach signal cables to other devices 5 Connect power cords to their sources 6 Turn ON all the power sources 1 Turn OFF all power sources and equipment that is to be attached to this produ...

Page 55: ...alled or one has a power supply installed and the other has a power supply filler installed 2 If you are instructed to return the old hot swap power supply follow all packaging instructions and use any packaging materials that are provided Install a hot swap power supply Use this information to install a hot swap power supply Chapter 4 Read the installation Guidelines on page 27 ATTENTION Static S...

Page 56: ...lephone and communication cables is hazardous To avoid a shock hazard Do not connect or disconnect any cables or perform installation maintenance or reconfiguration of this product during an electrical storm Connect all power cords to a properly wired and grounded electrical outlet Connect to properly wired outlets any equipment that will be attached to this product When possible use one hand only...

Page 57: ...的设备故障或损坏 不属于保修范围 NEVER CONNECT AND DISCONNECT THE POWER SUPPLY CABLE AND EQUIPMENT WHILE YOUR EQUIPMENT IS POWERED ON WITH DC SUPPLY hot plugging Otherwise you may damage the equipment and result in data loss the damages and losses result from incorrect operation of the equipment will not be covered by the manufacturers warranty S035 CAUTION Never remove the cover on a power supply or any part tha...

Page 58: ...quipment that is to be attached to this product 2 Attach signal cables to the product 3 Attach power cords to the product For ac systems use appliance inlets For dc systems ensure correct polarity of 48 V dc connections RTN is and 48 V dc is Earth ground should use a two hole lug for safety 4 Attach signal cables to other devices 5 Connect power cords to their sources 6 Turn ON all the power sourc...

Page 59: ...dicating that the power supply is operating properly System fan replacement Use this information to remove and install a system fan Remove a system fan Use this information to remove a system fan You can remove a hot swap fan without powering off the server which helps you avoid significant interruption to the operation of the system Chapter 4 Read the installation Guidelines on page 27 ATTENTION ...

Page 60: ... system fan cage Before removing a system fan 1 Remove the top cover See Remove the top cover on page 86 2 View the fan error LEDs 1 to locate the failing system fan Figure 24 Viewing the fan error LEDs from the top of the system fans To remove a system fan complete the following steps 56 User Guide forThinkAgile MX Certified Node 2U ...

Page 61: ...g materials that are provided Install a system fan Use this information to install a system fan You can install a hot swap fan without powering off the server which helps you avoid significant interruption to the operation of the system Chapter 4 Read the installation Guidelines on page 27 ATTENTION Static Sensitive Device Ground package before opening on page 29 S033 CAUTION Hazardous energy pres...

Page 62: ...em fan out of the package and place it on a static protective surface Step 2 Position the system fan above the system fan cage The system fan connector on the bottom of the system fan should face the rear of the chassis Press the system fan straight down until it is seated into place Figure 26 System fan installation After installing the system fan complete the parts replacement See Complete the p...

Page 63: ...the tab 1 and then lifting the air baffle out of the server Step 2 Loosen the thumbscrew that secures the LOM adapter Step 3 Push the LOM adapter out of the connector on the system board Step 4 Lift the LOM adapter off the server as shown If you are instructed to return the old LOM adapter follow all of the packaging instructions and use any packaging materials that are provided Install the LOM ad...

Page 64: ...he LOM adapter as shown to insert it into the connector on the system board Step 4 Tighten the thumbscrew to secure the LOM adapter Step 5 Align the mounting stud on the chassis with the hole in the LOM adapter air baffle Then pinch the tab 1 and lower the LOM adapter air baffle onto the LOM adapter After installing the LOM adapter complete the parts replacement See Complete the parts replacement ...

Page 65: ...2 For easier operation remove the riser 2 assembly See on page 3 If your server has a M 2 drive air baffle installed remove the M 2 drive air baffle first Figure 29 M 2 drive air baffle removal To remove the M 2 backplane and M 2 drive complete the following steps Chapter 5 Hardware replacement procedures 61 ...

Page 66: ...Step 1 Grasp the M 2 backplane at both ends and pull it straight up to remove it from the system board Figure 30 M 2 backplane removal 62 User Guide forThinkAgile MX Certified Node 2U ...

Page 67: ...backplane or M 2 drive follow all of the packaging instructions and use any packaging materials that are provided Adjust the retainer on the M 2 backplane Use this information to adjust the retainer on the M 2 backplane Chapter 4 Read the installation Guidelines on page 27 Power off the server for this task on page ATTENTION Static Sensitive Device Ground package before opening on page 29 Before a...

Page 68: ...7 Power off the server for this task on page ATTENTION Static Sensitive Device Ground package before opening on page 29 Before installing the M 2 backplane and M 2 drive 1 Touch the static protective package that contains the new M 2 backplane and M 2 drive to any unpainted surface on the outside of the server Then take the new M 2 backplane and M 2 drive out of the package and place them on a sta...

Page 69: ...e M 2 drive down until the notch 1 catches on the lip of the retainer 2 Step 3 Slide the retainer forward toward the connector to secure the M 2 drive into place Attention When sliding the retainer forward ensure that the two nubs 3 on the retainer enter the small holes 4 on the M 2 backplane Once they enter the holes you will hear a soft click sound Figure 34 Instruction for sliding the retainer ...

Page 70: ...th the guide pins on the system board Then insert the M 2 backplane into the M 2 slot on the system board and press it down to fully seat it Figure 35 M 2 backplane installation After installing the M 2 drive and M 2 backplane 66 User Guide forThinkAgile MX Certified Node 2U ...

Page 71: ...tml PCIe adapter replacement Use this information to remove and install a PCIe adapter The PCIe adapter can be an Ethernet card a host bus adapter a RAID adapter a PCIe solid state drive or any other supported PCIe adapters PCIe adapters vary by type but the installation and removal procedures are the same Remove a PCIe adapter Use this information to remove a PCIe adapter This topic contains the ...

Page 72: ... LOM NIC with two or four ports as well as up to two PCIe NICs For nodes with multiple NICs verify which has failed Identify the failed NIC by either checking in the XCC or checking the indicator lights on the network ports 2 Power off the node and if the cable management arm is not in place disconnect all the cables 3 Remove the appliance from the rack 4 Remove the top cover 5 Remove the riser as...

Page 73: ... follow all of the packaging instructions and use any packaging materials that are provided Remove a PCIe adapter from the system board Use this information to remove a PCIe adapter from the system board Chapter 4 Read the installation Guidelines on page 27 Power off the server for this task on page ATTENTION Static Sensitive Device Ground package before opening on page 29 Notes Depending on the s...

Page 74: ... of the PCIe adapter a small and equal amount until it is removed from the slot If you are instructed to return the old PCIe adapter follow all packaging instructions and use any packaging materials that are provided Install a PCIe adapter Use this information to install a PCIe adapter on the riser assembly or on the system board This topic contains the following information Install a PCIe adapter...

Page 75: ...apter on the riser assembly complete the following steps Step 1 Align the PCIe adapter with the PCIe slot on the riser card Then carefully press the PCIe adapter straight into the slot until it is securely seated and its bracket also is secured Figure 40 PCIe adapter installation Note Carefully handle the PCIe adapter by its edges Step 2 Pivot the PCIe adapter retention latch to the closed positio...

Page 76: ...on that comes with the PCIe adapter and follow those instructions in addition to the instructions in this topic Before installing the PCIe adapter on the system board 1 Touch the static protective package that contains the new PCIe adapter to any unpainted surface on the outside of the server Then take the new PCIe adapter out of the package and place it on a static protective surface 2 If the new...

Page 77: ...age 32 Rack latches replacement Use this information to remove and install the rack latches Note Depending on the model the left rack latch might be assembled with a VGA connector and the right rack latch might be assembled with the front I O assembly Remove the rack latches Use this information to remove the rack latches Chapter 4 Read the installation Guidelines on page 27 Power off the server f...

Page 78: ...t in a safe place Figure 43 ID label plate removal To remove the rack latches complete the following steps Step 1 Do one of the following If the rack latches are not assembled with a VGA connector or the front I O assembly go to the next step If the rack latches are assembled with a VGA connector the front I O assembly or both complete the following steps 74 User Guide forThinkAgile MX Certified N...

Page 79: ...he VGA cable 1 the front I O assembly cable 2 or both cables from the system board Figure 44 Cable routing for the VGA connector and the front I O assembly on rack latches Chapter 5 Hardware replacement procedures 75 ...

Page 80: ...the side of the server Then remove the cable retainer from the chassis Figure 45 Cable retainer removal Step 2 On each side of the server remove the screws that secure the rack latch Figure 46 Screws removal 76 User Guide forThinkAgile MX Certified Node 2U ...

Page 81: ...age 27 Power off the server for this task on page ATTENTION Static Sensitive Device Ground package before opening on page 29 Note If the rack latches are not assembled with a VGA connector or the front I O assembly you can install the rack latches without powering off the server To install the rack latches complete the following steps Step 1 Touch the static protective package that contains the ne...

Page 82: ...e chassis Then press the rack latch onto the chassis and slightly slide it backward Figure 48 Rack latch installation Step 3 Install the screws to secure the rack latch on each side of the server Figure 49 Screws installation 78 User Guide forThinkAgile MX Certified Node 2U ...

Page 83: ...bly or both complete the following steps 1 Route the VGA cable the front I O assembly cable or both cables across the notch on the chassis as shown Then install the screws to secure the cable retainer Figure 50 Cable retainer installation Chapter 5 Hardware replacement procedures 79 ...

Page 84: ...VGA cable 1 the front I O assembly cable 2 or both cables to the system board Figure 51 Cable routing for the VGA connector and the front I O assembly on rack latches 80 User Guide forThinkAgile MX Certified Node 2U ...

Page 85: ...ing the RAID adapter might impact your RAID configurations Back up your data before you begin to avoid any data loss due to a RAID configuration change Remove the RAID adapter Use this information to remove the RAID adapter from the RAID adapter slot on the system board Chapter 4 Read the installation Guidelines on page 27 Power off the server for this task on page ATTENTION Static Sensitive Devic...

Page 86: ...eturn the old RAID adapter follow all packaging instructions and use any packaging materials that are provided Install the RAID adapter Use this information to install the RAID adapter in the RAID adapter slot on the system board Chapter 4 Read the installation Guidelines on page 27 Power off the server for this task on page ATTENTION Static Sensitive Device Ground package before opening on page 2...

Page 87: ...ep 3 Push the right side latch open Step 4 Push the RAID adapter to the fully horizontal position and insert it into the RAID adapter slot Step 5 Slide the left side latch to the locked position After installing the RAID adapter 1 Connect cables to the new RAID adapter See Internal cable routing on page 31 2 Complete the part replacement See Complete the parts replacement on page 32 Security bezel...

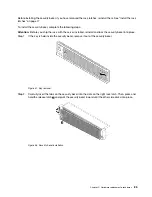
Page 88: ...ezel outward to remove it from the chassis Figure 56 Security bezel removal Attention Before you ship the rack with the server installed reinstall and lock the security bezel into place Install the security bezel Use this information to install the security bezel Chapter 4 Read the installation Guidelines on page 27 84 User Guide forThinkAgile MX Certified Node 2U ...

Page 89: ...reinstall and lock the security bezel into place Step 1 If the key is held inside the security bezel remove it out of the security bezel Figure 57 Key removal Step 2 Carefully insert the tabs on the security bezel into the slots on the right rack latch Then press and hold the release latch 1 and pivot the security bezel inward until the other side clicks into place Figure 58 Security bezel install...

Page 90: ...Voltages with hazardous energy might cause heating when shorted with metal which might result in spattered metal burns or both S014 CAUTION Hazardous voltage current and energy levels might be present Only a qualified service technician is authorized to remove the covers where the following label is attached Remove the top cover Use this information to remove the top cover 86 User Guide forThinkAg...

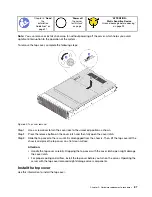
Page 91: ...cked position as shown Step 2 Press the release button on the cover latch and then fully open the cover latch Step 3 Slide the top cover to the rear until it is disengaged from the chassis Then lift the top cover off the chassis and place the top cover on a flat clean surface Attention Handle the top cover carefully Dropping the top cover with the cover latch open might damage the cover latch For ...

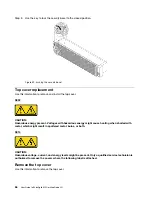
Page 92: ...bel order it together with the new top cover The service label is free of charge To install the top cover complete the following steps Figure 61 Top cover installation Note Before you slide the top cover forward ensure that all the tabs on the top cover engage the chassis correctly If the tabs do not engage the chassis correctly it will be very difficult to remove the top cover later Step 1 Ensure...

Page 93: ...After installing the top cover complete the parts replacement See Complete the parts replacement on page 32 Chapter 5 Hardware replacement procedures 89 ...

Page 94: ...90 User Guide forThinkAgile MX Certified Node 2U ...

Page 95: ...on for your ThinkSystem products at the following location http thinksystem lenovofiles com help index jsp You can take these steps to try to solve the problem yourself Check all cables to make sure that they are connected Check the power switches to make sure that the system and any optional devices are turned on Check for updated software firmware and operating system device drivers for your Len...

Page 96: ...ollecting service data To clearly identify the root cause of a server issue or at the request of Lenovo Support you might need collect service data that can be used for further analysis Service data includes information such as event logs and hardware inventory Service data can be collected through the following tools Lenovo XClarity Provisioning Manager Use the Collect Service Data function of Le...

Page 97: ...can run the g ge et tiin nf fo or r command For more information about running the g ge et tiin nf fo or r see http sysmgt lenovofiles com help topic toolsctr_cli_lenovo onecli_r_getinfor_command html Contacting Support You can contact Support to obtain help for your issue You can receive hardware service through a Lenovo Authorized Service Provider To locate a service provider authorized by Lenov...

Page 98: ...94 User Guide forThinkAgile MX Certified Node 2U ...

Page 99: ...demarks of Intel Corporation in the United States other countries or both Microsoft and Windows are trademarks of the Microsoft group of companies Linux is a registered trademark of Linus Torvalds All other trademarks are the property of their respective owners 2018 Lenovo Copyright Lenovo 2018 2019 95 ...

Page 100: ...96 User Guide forThinkAgile MX Certified Node 2U ...

Page 101: ...disk drive replacing 40 hardware service and support telephone numbers 93 help 91 hot swap drive installing 43 replacing 40 hot swap drives removing 41 hot swap power supply installing 51 removing 47 replacing 47 I installation guidelines 2 27 installation guidelines 2 27 installing DIMM 39 hot swap drive 43 hot swap power supply 51 LOM adapter 59 M 2 backplane and M 2 drive 64 PCIe adapter 70 rac...

Page 102: ...ner on M 2 backplane adjusting 63 S security bezel installing 84 removing 83 replacing 83 server components 13 service and support before you call 91 hardware 93 software 93 service data 92 software service and support telephone numbers 93 solid state drive replacing 40 static sensitive devices handling 4 29 support web page custom 91 system board components 21 system board LED 22 system error LED...

Page 103: ......

Page 104: ......
Reviews: