


Figures
1.
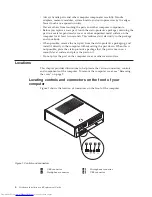
Controls
and
connectors
.
.
.
.
.
.
.
.
. 4
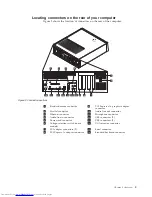
2.
Connector
locations
.
.
.
.
.
.
.
.
.
. 5
3.
Component
locations
.
.
.
.
.
.
.
.
.
. 7
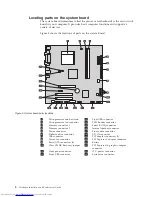
4.
System
board
parts
locations
.
.
.
.
.
.
. 8
5.
Removing
the
cover
.
.
.
.
.
.
.
.
.
. 10
6.
Removing
the
bezel
.
.
.
.
.
.
.
.
.
. 10
7.
Removing
the
PCI
adapter
.
.
.
.
.
.
. 11
8.
Removing
the
drive
bay
assembly
.
.
.
.
. 11
9.
Retaining
clips
.
.
.
.
.
.
.
.
.
.
. 12
10.
Positioning
the
memory
module
.
.
.
.
. 13
11.
Opening
the
adapter
latch
.
.
.
.
.
.
. 14
12.
Securing
the
adapter
.
.
.
.
.
.
.
.
. 14
13.
Drive
bays
.
.
.
.
.
.
.
.
.
.
.
.
. 16
14.
Retaining
bracket
.
.
.
.
.
.
.
.
.
. 17
15.
Installing
the
drive
.
.
.
.
.
.
.
.
.
. 17
16.
Connecting
a
parallel
ATA
drive
.
.
.
.
. 18
17.
Connecting
a
serial
ATA
drive
.
.
.
.
.
. 18
18.
Retaining
bracket
.
.
.
.
.
.
.
.
.
. 19
19.
Installing
the
diskette
drive
.
.
.
.
.
.
. 19
20.
Battery
removal
.
.
.
.
.
.
.
.
.
.
. 20
21.
Battery
installation
.
.
.
.
.
.
.
.
.
. 20
22.
Removing
the
hard
disk
drive
.
.
.
.
.
. 21
23.
Aligning
the
pins
with
the
holes
in
the
hard
disk
drive
.
.
.
.
.
.
.
.
.
.
.
.
. 22
24.
Removing
the
diskette
drive
.
.
.
.
.
.
. 23
25.
Retaining
bracket
for
diskette
drive
.
.
.
. 23
26.
Installing
the
new
diskette
drive
.
.
.
.
. 23
27.
Removing
the
optical
drive
.
.
.
.
.
.
. 24
28.
Retaining
bracket
for
optical
drive
.
.
.
.
. 24
29.
Installing
the
new
optical
drive
.
.
.
.
.
. 24
30.
Removing
the
heat
sink
and
fan
assembly
25
31.
Replacing
the
screws
to
the
heat
sink
and
fan
assembly
.
.
.
.
.
.
.
.
.
.
.
.
. 26
32.
Removing
the
system
fan
assembly
.
.
.
. 27
33.
Removing
the
memory
module
.
.
.
.
.
. 28
34.
Installing
the
memory
module
.
.
.
.
.
. 28
35.
Removing
the
adapter
.
.
.
.
.
.
.
.
. 29
36.
Installing
the
new
adapter
.
.
.
.
.
.
. 29
37.
Keyboard
connectors
.
.
.
.
.
.
.
.
. 30
38.
Mouse
connectors
.
.
.
.
.
.
.
.
.
. 31
39.
Replacing
the
cover
.
.
.
.
.
.
.
.
.
. 33
40.
Kensington
lock
location
.
.
.
.
.
.
.
. 35
41.
Padlock
loop
.
.
.
.
.
.
.
.
.
.
.
. 36
©
Lenovo
2005,
2008.
Portions
©
IBM
Corp.
2005.
v
Summary of Contents for ThinkCentre 7096
Page 2: ......
Page 3: ...ThinkCentre Hardware Installation and Replacement Guide ...
Page 6: ...iv Hardware Installation and Replacement Guide ...
Page 8: ...vi Hardware Installation and Replacement Guide ...
Page 10: ...2 Hardware Installation and Replacement Guide ...
Page 40: ...32 Hardware Installation and Replacement Guide ...
Page 46: ...38 Hardware Installation and Replacement Guide ...
Page 49: ......
Page 50: ...Part Number 45C6431 Printed in USA 1P P N 45C6431 ...


