•
Lenovo PCI Express Quick Test
•
Lenovo RAID Quick Test
•
Lenovo Motherboard Bus Quick Test
The quick test programs are applicable on the following operating systems:
• Microsoft
®
Windows
®
10
• Microsoft Windows 8.1
• Microsoft Windows 8
• Microsoft Windows 7
• Microsoft Windows Server
®
2003
• Microsoft Windows Server 2008
T
To
run
a
test
using
quick
test
program,
do
the
following:
1. Go to the C:\SWTOOLS\ldiag directory.
2. Double-click the gui_lsc_lite.exe file.
3. When the
User Account Control
window opens, click
Yes
.
4. Select the device class to be tested.
5. Select the devices to be tested.
6. Select the test to be performed.
7. Follow the instructions on the screen to start the test. When a problem is detected, information
messages are displayed. Refer to the messages to troubleshoot the problem.
UEFI diagnostic program
A UEFI diagnostic program is preinstalled on the computer. It enables you to test memory modules and
internal storage devices, view system information, and check and recover bad sectors on internal storage
devices.
To run the UEFI diagnostic program, do the following:
1. Turn on the computer. If the computer cannot be turned on, go to “Power system checkout” on page 26,
and check the power sources. If an error code is displayed, go to “Symptom-to-FRU index” on page 40
for error code descriptions and troubleshooting hints.
2. When the ThinkPad logo is displayed, repeatedly press and release the F10 key. The main screen of the
UEFI diagnostic program is displayed.
3. Follow the instructions on the screen to use the diagnostic program.
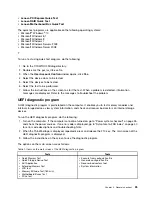
The options on the main screen are as follows:
Table 1. Items on the main screen of the UEFI diagnostic program
Tests
Tools
• Quick Memory Test
• Quick Storage Device Test
• Exit Application
• Extended Memory Test
• LCD test
• Memory Bit Fade Test (180 min)
• Motherboard Buses Test
• PCI-e test
• Execute from configuration file
• Generate configuration file
• Recover bad sectors tool
• System Information
Chapter 3
.
General checkout
25

