background image


The laptop comes with an 

AC Power Adapter

.  While you use ac power, the battery charges 

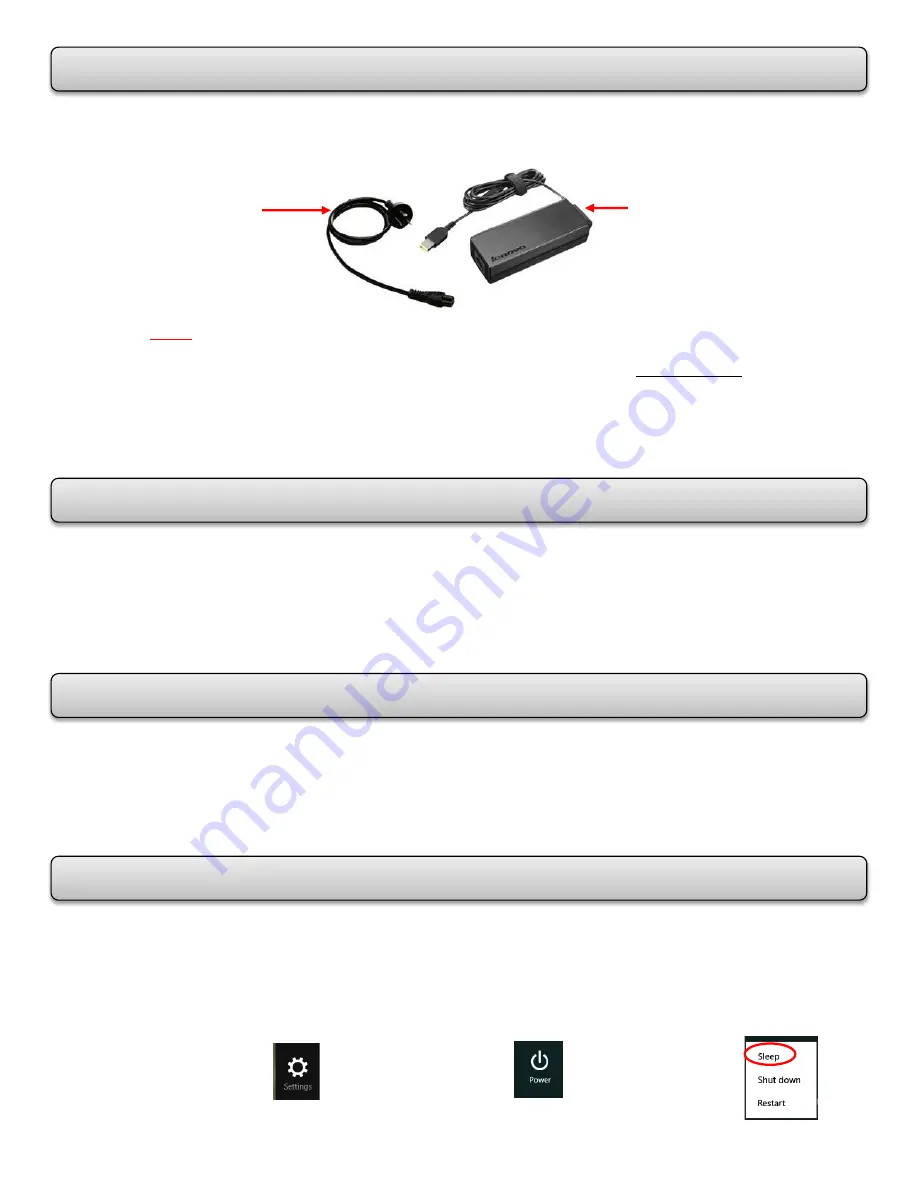
automatically.  The 

AC Power Adapter

 has two basic components: 


NOTE:


Using an 

improper power cord

 could cause severe damage to your computer. 


To connect the 

AC Power Adapter

, perform the following actions in this order: 

1. Connect the power cord to an electrical outlet. 
2. Connect the power cord to the transformer pack. 
3. Connect the 

AC Power Adapter

 to the ac power connector of the computer. 


Before you 

charge the battery

, make sure that its temperature is at least 10°C (50°F). 


The battery will be fully charged in about 3-6 hours. 


When the AC Power Adapter is not in use, disconnect it from the electrical outlet. 


Do not bind the power cord tightly around the transformer pack when it is connected 
to the transformer. 


The computer does not start recharging the battery if the remaining power is greater than 
95%.  To 

maximize the life of the battery

, do the following: 


Use the battery until the charge is completely depleted. 


Recharge the battery completely before using it.  


In 

Sleep Mode

, your work is saved to memory, and then the solid-state drive or the hard 

disk drive and the computer display are turned off. When your computer wakes up, your 
work is restored within seconds.  


To set up Sleep Mode

 – Swipe the right side of the screen to bring up the charms.  


            Click on 

Settings

.


Click on 

Power

.                       Click on 

Sleep


AC POWER ADAPTER 


CHARGING THE BATTERY 


MAXIMIZING THE BATTERY LIFE 


SLEEP MODE 


The 

Transformer Pack


(converts ac power for  
use with the computer)


The 

Power Cord


 (plugs into the ac outlet and 
into the


transformer pack)


4

Summary of Contents for ThinkPad Edge E540

Page 1: ...Alvin ISD TECHNOLOGY SERVICES August 2014 ...

Page 2: ...ning Equipment 1 Laptop Features 2 Dock the Laptop 3 Battery Status Icon 3 AC Power Adapter 4 Charging the Battery 4 Maximizing the Battery Life 4 Sleep Mode 4 Multi Touch Screen 5 Care Cleaning for Multi Touch Screen 6 Special Keyboard Keys 6 CD DVD Multi Burner Drive 7 Back Up Your Files 7 Connect Wirelessly to Alvin ISD Network 8 Connect to Your Home Network 8 Tips for Using Laptop at Home 9 Ou...

Page 3: ...they are away from their desks for an extended period of time If they leave their room they need to lock the laptop in order for the equipment to be secure They should lock the laptop using the key issued to them Employees must return any and all equipment to the District facility from which it has been assigned within 24 hours of being reassigned to another position or upon the termination of emp...

Page 4: ...Camera Microphones Power Button ThinkPad Trackpad Media Card Reader Slot Numeric Keypad System Status Indicator TrackPoint Pointing Stick Always on USB Optical Drive Ethernet AC Power OneLink Connector Left and Right Click Zones work like the left and right mouse buttons Scroll Zone Left Click Zone Right Click Zone Side Views HDMI USB VGA Audio Multi Touch Screen 2 ...

Page 5: ...ication area displays the percentage of battery power remaining To view the percentage Rear View of Dock OneLink Connector used to connect the dock to the laptop USB Ethernet HDMI and Power connectors Front View of Dock Combo Audio connector and USB connectors Power Button functions the same as the one on the laptop DOCK THE LAPTOP BATTERY STATUS ICON NOTE If you press the Power Button on the dock...

Page 6: ...ot bind the power cord tightly around the transformer pack when it is connected to the transformer The computer does not start recharging the battery if the remaining power is greater than 95 To maximize the life of the battery do the following Use the battery until the charge is completely depleted Recharge the battery completely before using it In Sleep Mode your work is saved to memory and then...

Page 7: ...You can perform tasks by touching the Multi Touch Screen or by using the mouse MULTI TOUCH SCREEN 5 ...

Page 8: ... piece of absorbent cotton to remove fingerprints or dust from the multi touch screen Do not apply solvents to the cloth Gently wipe the screen using a top down motion Do not apply any pressure on the screen Function Keys Mute Speakers Decrease Volume Increase Volume Mute Microphone Darken Display Brighten Display Display Output Wireless Network Open Settings Open Search View Programs Opened All P...

Page 9: ... U Drive regularly or periodically back up your files on your U Drive or on a USB thumb drive Files that are saved on the U Drive can be accessed anywhere else in the district or online at home through the Alvin ISD Cloud Back Up on U Drive On the Server 1 On your desktop click on the File Explorer folder 2 Click the U Drive that is labeled with your username 3 Click and drag the items you want to...

Page 10: ... your computer you should be able to get on the Internet Sometimes you might need to unplug your cable modem and then plug it in again Wireless Connection Click on the wireless icon in your system tray in the bottom right corner of your desktop Click on the name of your wireless access point Contact your ISP if you do not know the name You may see a few wireless access points Some may be labeled s...

Page 11: ...hed copy of your inbox This will not be the same as at school when you are on the network so don t use the desktop version of Outlook at home If you go to your email through the Alvin ISD Cloud at https cloud alvinisd net you can use the desktop version of Outlook but only in the Alvin ISD Cloud Most computer issues can be resolved by rebooting your computer If you are having trouble with your mac...

Page 12: ... on Staff and Tech Support Helpdesk You will receive an e mail confirmation that a HelpDesk ticket has been submitted For additional Training contact Beauté See Alvin ISD Technology Trainer 281 245 2483 bsee alvinisd net HELP DESK ADDITIONAL TRAINING Use your Network Log In and Password Click on Get Help Enter your information in all of the areas When you are finished click Submit Ticket 10 ...

Reviews: