background image

Note:

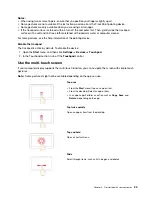
The cellular service is provided by authorized mobile service carriers in some countries or regions. 

You must have a cellular plan from a service carrier to connect to the cellular network.

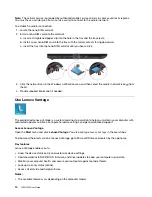
To establish a cellular connection:  

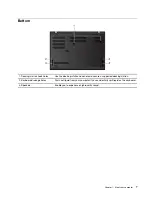
1.  Locate the nano-SIM card slot. 

2.  Install a nano-SIM card into the card slot.

a.  Insert a straightened paper clip into the hole in the tray and the tray ejects.

b.  Install a new nano-SIM card into the tray with the metal contacts facing downward.

c.  Insert the tray into the nano-SIM card slot until you hear a click. 

3.  Click the network icon in the Windows notification area, and then select the cellular network icon 

from 

the list.

4.  Provide required information if needed.

Use Lenovo Vantage

The preinstalled Lenovo Vantage is a customized one-stop solution to help you maintain your computer with 
automated updates and fixes, configure hardware settings, and get personalized support.

Access Lenovo Vantage

Open the 

Start 

menu and click 

Lenovo Vantage

. You also can type 

Lenovo Vantage 

in the search box.

To download the latest version of Lenovo Vantage, go to Microsoft Store and search by the app name.

Key features

Lenovo Vantage enables you to:

•  Know the device status easily and customize device settings.

•  Download and install UEFI BIOS, firmware, and driver updates to keep your computer up-to-date.

•  Monitor your computer health, and secure your computer against outside threats.

•  Look up warranty status (online).

•  Access 

User Guide 

and helpful articles.

Notes: 

•  The available features vary depending on the computer model.

14

L490/L590 User Guide

Summary of Contents for ThinkPad L490

Page 1: ...L490 L590 User Guide ...

Page 2: ...t safety information on page 95 Safety and Warranty Guide Setup Guide Second Edition September 2019 Copyright Lenovo 2019 LIMITED AND RESTRICTED RIGHTS NOTICE If data or software is delivered pursuant to a General Services Administration GSA contract use reproduction or disclosure is subject to restrictions set forth in Contract No GS 35F 05925 ...

Page 3: ...d or microSD card 31 Airplane mode 32 Chapter 4 Accessories 33 Purchase options 33 Docking station 33 Front view 34 Rear view 35 Attach a docking station 36 Detach a docking station 37 Connect multiple external displays 38 Chapter 5 Secure your computer and information 39 Lock the computer 39 Use passwords 39 Password types 39 Set change and remove a password 41 Use the fingerprint reader for sele...

Page 4: ...nd support 87 Frequently asked questions 87 Error messages 88 Beep errors 89 Self help resources 90 Call Lenovo 91 Before you contact Lenovo 91 Lenovo Customer Support Center 92 Purchase additional services 93 Appendix A Important safety information 95 Appendix B Accessibility and ergonomic information 109 Appendix C Supplemental information about the Linux operating system 113 Appendix D Complian...

Page 5: ... might not be applicable to your computer Documentation content is subject to change without notice Lenovo makes constant improvements on the documentation of your computer including this User Guide To get the latest documentation go to https support lenovo com Microsoft makes periodic feature changes to the Windows operating system through Windows Update As a result some information in this docum...

Page 6: ...iv L490 L590 User Guide ...

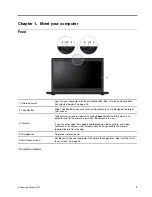
Page 7: ... record videos by clicking Camera from the Start menu The indicator next to the camera is on when the camera is in use If you use other apps that support photographing video chatting and video conference the camera starts automatically when you enable the camera required feature from the app 4 Microphones Capture or record sound 5 Multi touch screen Enable you to use your computer with simple touc...

Page 8: ... hibernation mode Blinking slowly The computer is in sleep mode 2 Fingerprint reader Log in to your computer with enrolled fingerprints See Use the fingerprint reader for selected models on page 42 3 Trackpad Perform finger touch and all the functions of a traditional mouse See Use the trackpad on page 21 4 NFC mark Your computer supports NFC near field communication You can share information with...

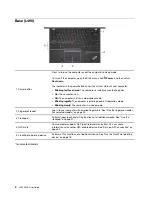
Page 9: ...ing slowly The computer is in sleep mode 2 Numeric keypad Quickly input numbers 3 Fingerprint reader Log in to your computer with enrolled fingerprints See Use the fingerprint reader for selected models on page 42 4 NFC mark Your computer supports NFC near field communication You can share information with another NFC enabled device See Set up a NFC connection on page 30 5 Trackpad Perform finger ...

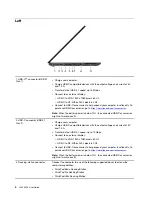
Page 10: ...r USB 3 1 Gen 2 Charge your computer Charge USB C compatible devices with the output voltage and current of 5 V and 1 5 A Transfer data at USB 3 1 speed up to 10 Gbps Connect to an external display USB C to VGA 1920 x 1080 pixels 60 Hz USB C to DP 4096 x 2304 pixels 60 Hz Connect to USB C accessories to help expand your computer functionality To purchase USB C accessories go to https www lenovo co...

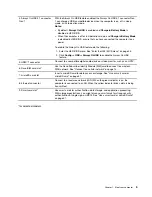
Page 11: ... 5 HDMI connector Connect to a compatible digital audio device or video monitor such as an HDTV 6 Nano SIM card slot Use the Nano Subscriber Identity Module SIM card to connect to a wireless WAN network See Connect to a cellular network on page 13 7 microSD card slot Insert a microSD card for data access or storage See Use a smart card or microSD card on page 31 8 Ethernet connector Connect to a l...

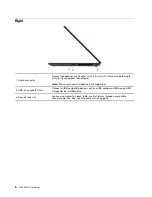
Page 12: ...e The conventional microphone is not supported 2 USB 3 1 connector Gen 1 Connect a USB compatible device such as a USB keyboard USB mouse USB storage device or USB printer 3 Security lock slot Lock your computer to a desk table or other fixtures through a compatible security cable lock See Lock the computer on page 39 6 L490 L590 User Guide ...

Page 13: ...station hook holes to secure a supported docking station 2 Keyboard drainage holes Drain out liquid from your computer if you accidentally spill liquid on the keyboard 3 Speakers Enable you to experience high quality sound Chapter 1 Meet your computer 7 ...

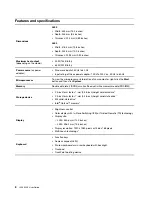
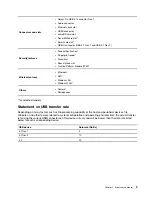
Page 14: ...lick the Start button and then click System Memory Double data rate 4 DDR4 small outline dual in line memory module SODIMM Storage device 2 5 inch form factor 7 mm 0 28 inch height hard disk drive 2 5 inch form factor 7 mm 0 28 inch height solid state drive M 2 solid state drive Intel Optane memory Display Brightness control Color display with In Plane Switching IPS or Twisted Nematic TN technolog...

Page 15: ...NFC Wireless LAN Wireless WAN Others Camera Microphones for selected models Statement on USB transfer rate Depending on many factors such as the processing capability of the host and peripheral devices file attributes and other factors related to system configuration and operating environments the actual transfer rate using the various USB connectors on this device will vary and will be slower tha...

Page 16: ...10 L490 L590 User Guide ...

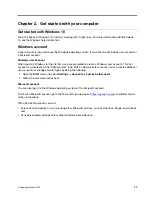
Page 17: ... of the Administrator type With an Administrator account you can create additional user accounts or change account types by doing the following 1 Open the Start menu and select Settings Accounts Family other users 2 Follow the on screen instructions Microsoft account You can also log in to the Windows operating system with a Microsoft account To create a Microsoft account go to the Microsoft sign ...

Page 18: ...eb 8 Task View Display all opened apps and switch among them 9 Windows notification area Display notifications and status of some features 10 Battery status icon Display power status and change battery or power settings When your computer is not connected to ac power the icon changes to 11 Network icon Connect to an available wireless network and display the network status When connected to a wire...

Page 19: ...dows version for which the computer is licensed Instead the Product ID is recorded in the computer firmware Whenever a Windows 10 product is installed the installation program checks the computer firmware for a valid matching Product ID to complete the activation In some cases an earlier Windows version might be preinstalled under the terms of the Windows 10 Pro license downgrade rights Connect to...

Page 20: ...ormation if needed Use Lenovo Vantage The preinstalled Lenovo Vantage is a customized one stop solution to help you maintain your computer with automated updates and fixes configure hardware settings and get personalized support Access Lenovo Vantage Open the Start menu and click Lenovo Vantage You also can type Lenovo Vantage in the search box To download the latest version of Lenovo Vantage go t...

Page 21: ...mproving your experience with your computer The description of features might be different from that on your actual user interface Interact with your computer Your computer provides you various ways to navigate the screen Chapter 2 Get started with your computer 15 ...

Page 22: ... Panel and view by Large icons or Small icons 2 Click Keyboard or Lenovo Keyboard Manager and select the option of your preference Switch the function of the F1 F12 keys between the standard function and special function printed as an icon on each key When the Fn Lock indicator is on Press F1 F12 to use the standard function Press Fn F1 F12 to use the special function When the Fn Lock indicator is...

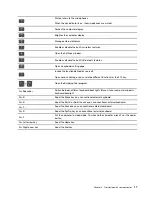
Page 23: ...r the F12 key Open the Snipping Tool program Fn Spacebar Switch between different keyboard backlight statuses if your computer supports keyboard backlight Fn B Equal the Break key on a conventional external keyboard Fn K Equal the ScrLK or Scroll Lock key on a conventional external keyboard Fn P Equal the Pause key on a conventional external keyboard Fn S Equal the SysRq key on a conventional exte...

Page 24: ...pecial function or standard function 1 Go to Control Panel and view by Large icons or Small icons 2 Click Keyboard or Lenovo Keyboard Manager and select the option of your preference Switch the function of the F1 F12 keys between the standard function and special function printed as an icon on each key When the Fn Lock indicator is on Press F1 F12 to use the standard function Press Fn F1 F12 to us...

Page 25: ...Fn Spacebar Switch between different keyboard backlight statuses if your computer supports keyboard backlight Fn B Equal the Break key on a conventional external keyboard Fn K Equal the ScrLK or Scroll Lock key on a conventional external keyboard Fn P Equal the Pause key on a conventional external keyboard Fn S Equal the SysRq key on a conventional external keyboard Fn 4 Put the computer to sleep ...

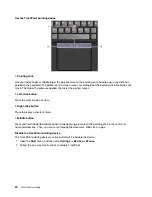
Page 26: ... button Press to select or open an item 3 Right click button Press to display a shortcut menu 4 Middle button Press and hold the dotted middle button while applying pressure to the pointing stick in the vertical or horizontal direction Then you can scroll through the document Web site or apps Disable the TrackPoint pointing device The TrackPoint pointing device is active by default To disable the ...

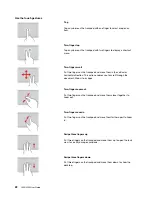
Page 27: ...king and scrolling functions of a traditional mouse Use the trackpad 1 Left click zone Press to select or open an item You also can tap anywhere on the surface of the trackpad with one finger to perform the left click action 2 Right click zone Press to display a shortcut menu You also can tap anywhere on the surface of the trackpad with two fingers to perform the right click action Chapter 2 Get s...

Page 28: ...action enables you to scroll through the document Web site or apps Two finger zoom out Put two fingers on the trackpad and move them closer together to zoom out Two finger zoom in Put two fingers on the trackpad and move them farther apart to zoom in Swipe three fingers up Put three fingers on the trackpad and move them up to open the task view to see all your open windows Swipe three fingers down...

Page 29: ...kpad is active by default To disable the device 1 Open the Start menu and then click Settings Devices Touchpad 2 In the Touchpad section turn off the Touchpad control Use the multi touch screen If your computer display supports the multi touch function you can navigate the screen with simple touch gestures Note Some gestures might not be available depending on the app you use Tap once From the Sta...

Page 30: ...he tablet mode Show a hidden title bar Swipe in from the top edge to the bottom edge when your computer is in the tablet mode Close the current app Tips Turn off the computer before cleaning the multi touch screen Use a dry soft and lint free cloth or a piece of absorbent cotton to remove fingerprints or dust from the multi touch screen Do not apply solvents to the cloth The multi touch screen is ...

Page 31: ...n the Start menu and click Camera 3 To take a photo click the camera icon If you want to record video click the video icon to switch to video mode If you use other programs that provide features such as photographing video capturing and video conference the camera starts automatically when you enable the camera required feature Connect to an external display Connect your computer to a projector or...

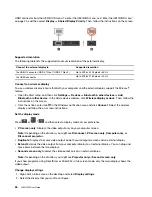
Page 32: ...nter icon in the Windows notification area and click Connect Select the wireless display and follow the on screen instructions Set the display mode Press or and then select a display mode of your preference PC screen only Displays the video output only on your computer screen Note Depending on the situation you might see Disconnect PC screen only Computer only or Disconnect projector Duplicate Dis...

Page 33: ...ample you can define which one is the main display and which one is the secondary display You also can change the resolution and orientation Note If you set a higher resolution for the computer display than the external display only part of the screen can be displayed on the external display Chapter 2 Get started with your computer 27 ...

Page 34: ...28 L490 L590 User Guide ...

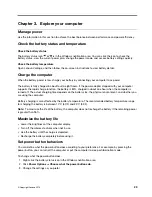
Page 35: ...f The actual charging time depends on the battery size the physical environment and whether you are using the computer Battery charging is also affected by the battery temperature The recommended battery temperature range for charging the battery is between 10 C 50 F and 35 C 95 F Note To maximize the life of the battery the computer does not recharge the battery if the remaining power is greater ...

Page 36: ...connection is successful place the devices 10 meters 33 feet at most from the computer 1 Turn on Bluetooth on the computer Press or Open the Start menu and then click Settings Devices Bluetooth other devices Turn on the Bluetooth switch 2 Click Add Bluetooth or other device Bluetooth 3 Select a Bluetooth device and then follow the on screen instructions Your Bluetooth enabled device and computer w...

Page 37: ...ion Smart cards with slits are not supported Do not insert such a smart card into the smart card reader of your computer Otherwise the reader might get damaged Install the card 1 Locate the card slot on the left side of the computer 2 Insert the card firmly into the card slot until it is secured in place Notes For the media card ensure that the metal contacts are facing down and pointing toward th...

Page 38: ...e mode is enabled all wireless features are disabled To enable or disable the Airplane mode 1 Open the Start menu 2 Click Settings Network Internet Airplane mode 3 Turn on or turn off the Airplane mode switch 32 L490 L590 User Guide ...

Page 39: ... of your computer Options include memory modules storage devices network cards port replicators or docking stations batteries power adapters keyboards mice and more To shop at Lenovo go to https www lenovo com accessories Docking station You can use the following docking stations to extend the capacity of your computer ThinkPad Basic Docking Station ThinkPad Pro Docking Station ThinkPad Ultra Dock...

Page 40: ...led You can contact Lenovo sales to purchase a system lock with the option part number 4XE0Q56388 2 Key lock indicator This indicator turns on when the system lock key is in the locked position 3 Docking status indicator This indicator turns on when your computer is successfully connected to the docking station 4 Power button Press the power button to turn on or turn off the computer attached to t...

Page 41: ... Pro Docking Station ThinkPad Ultra Docking Station 1 Audio connector 2 ac power connector 3 DisplayPort connector 4 VGA connector 5 USB 2 0 connector 6 Always On USB 3 1 connector Gen 1 7 USB 3 1 connector Gen 1 8 Ethernet connector 9 Security lock slot 10 USB C connector 11 HDMI connector 12 Always On USB 3 1 connector Gen 2 13 USB 3 1 connector Gen 2 Chapter 4 Accessories 35 ...

Page 42: ...ock skip step 4 and step 7 in the following instruction If you do not connect the docking station to ac power the computer attached runs on battery power 1 Connect the docking station to ac power 2 Disconnect the cables and devices from the left side of the computer 3 Turn the system lock key to the unlocked position 4 Align the top left corner of the computer with the guide post of the docking st...

Page 43: ...m lock key to the locked position Attention When the computer is attached to a docking station always hold the whole assembly when you need to move your computer Otherwise the docking station might drop down Detach a docking station Note The ThinkPad Basic Docking Station does not ship with a system lock installed If you do not purchase and install a system lock skip step 1 in the following instru...

Page 44: ...king station To ensure that the multiple displays work correctly observe the following guidelines and connect the external displays to the appropriate connectors Docking station Supported external displays Video connectors ThinkPad Basic Docking Station Up to two DisplayPort VGA ThinkPad Pro Docking Station Up to two DisplayPort x2 ThinkPad Ultra Docking Station Up to three DisplayPort x2 HDMI VGA...

Page 45: ...w lenovoquickpick com Use passwords This section introduces types of passwords in UEFI Unified Extensible Firmware Interface BIOS Basic Input Output System and how to set change and remove a password Password types You can set a power on password supervisor password system management password or hard disk password in UEFI BIOS to prevent unauthorized access to your computer However you are not pro...

Page 46: ...tem management password if no supervisor password has been set Otherwise you cannot change the configurations in the following steps 2 Select Security Password System Management Password Access Control 3 Follow the on screen instructions If you have set both the supervisor password and the system management password the supervisor password overrides the system management password If you have set b...

Page 47: ... Password Power On Password by using the arrow keys 4 Type the current supervisor password in the Enter Current Password field Then leave the Enter New Password field blank and press Enter twice 5 In the Changes have been saved window press Enter 6 Press F10 to save changes and exit the UEFI BIOS menu If you have not set a supervisor password contact a Lenovo authorized service provider to have th...

Page 48: ...e Start menu and then click Settings Accounts Sign in options Then follow the on screen instructions to finish the enrollment During the enrollment the fingerprints are associated with the Windows password automatically It is recommended that you enroll more than one fingerprint in case of any injuries to your fingers Log in with your fingerprint Maintain the fingerprint reader To ensure that the ...

Page 49: ...ions and ensure that you are centered and looking directly at the camera When the program recognizes your face it automatically unlocks the screen and signs you in to the Windows operating system Use firewalls and antivirus programs Your computer might be preinstalled with a firewall program The firewall protects against computer Internet security threats unauthorized access intrusions and Interne...

Page 50: ...44 L490 L590 User Guide ...

Page 51: ... UEFI BIOS menu However you cannot change the system configurations that are protected by the supervisor password Navigate in the UEFI BIOS interface Attention The default configurations are already optimized for you in boldface Improper change of the configurations might cause unexpected results You can navigate in the UEFI BIOS interface by pressing the following keys F1 Display the General Help...

Page 52: ...section introduces the recovery information of the Windows 10 operating system Ensure that you read and follow the on screen recovery instructions The data on your computer might be deleted during the recovery process To avoid data loss make a backup copy of all the data that you want to keep Restore system files and settings to an earlier point 1 Go to Control Panel and view by Large icons or Sma...

Page 53: ... recovery options by following the on screen instructions Create and use a recovery USB device It is recommended that you create a recovery USB drive as early as possible as a backup for the Windows recovery programs With the recovery USB drive you can troubleshoot and fix the problems even if the preinstalled Windows recovery programs are damaged If you did not create a recovery USB drive as a pr...

Page 54: ... Windows BitLocker Drive Encryption feature and your computer has a Trusted Platform Module ensure that you have disabled the feature 2 Ensure that the security chip is set to Active a Restart the computer When the logo screen is displayed press F1 to enter the UEFI BIOS menu b Select Security Security Chip and press Enter The Security Chip submenu opens c Ensure that the security chip for TPM 2 0...

Page 55: ...load and install Intel Optane Memory and Storage Management program 3 Launch the program Click Intel Optane Memory Enable Intel Optane Memory and then follow the instructions on the screen to enable it Install device drivers You should download the latest driver for a component when you notice poor performance from that component or when you added a component This action might eliminate the driver...

Page 56: ...50 L490 L590 User Guide ...

Page 57: ...me upon request You might be required to return the defective part that is replaced by the CRU When return is required 1 return instructions a prepaid shipping label and a container will be included with the replacement CRU and 2 you might be charged for the replacement CRU if Lenovo does not receive the defective CRU within thirty 30 days of your receipt of the replacement CRU For full details se...

Page 58: ... the built in battery 1 Restart your computer When the logo screen is displayed immediately press F1 to enter the UEFI BIOS menu 2 Select Config Power The Power submenu is displayed 3 Select Disable Built in Battery and press Enter 4 Select Yes in the Setup Confirmation window The built in battery is disabled and the computer turns off automatically Wait three to five minutes to let the computer c...

Page 59: ...e base cover assembly 1 Then pry up the latches 2 and 3 successively to remove the base cover assembly 4 Figure 4 Removing the base cover assembly for L490 Figure 5 Removing the base cover assembly for L590 Chapter 7 CRU replacement 53 ...

Page 60: ...bly 2 Figure 6 Installing the base cover assembly for L490 Figure 7 Installing the base cover assembly for L590 6 Turn over the computer Connect the ac power adapter and all disconnected cables to the computer Troubleshooting If the computer does not start up after you reinstall the base cover assembly disconnect the ac power adapter and then reconnect it to the computer 54 L490 L590 User Guide ...

Page 61: ...e Fast Startup and the built in battery on page 52 2 Turn off the computer and disconnect the computer from ac power and all connected cables 3 Close the computer display and turn over the computer 4 Remove the base cover assembly See Base cover assembly on page 52 5 Open the latches on both sides of the memory module slot at the same time 1 and then remove the memory module 2 Note A Mylar film mi...

Page 62: ...on is only for the computer with user installable modules The following information is only for the computer with user installable modules Ensure that you use only a Lenovo authorized wireless module specifically tested for this computer model Otherwise the computer will generate an error code beep sequence when you turn on the computer Prerequisite Before you start read Appendix A Important safet...

Page 63: ...ccess the wireless WAN card peel off the film first a Gently disconnect the wireless cable connectors with your fingers 1 Then remove the screw that secures the wireless WAN card 2 and the card pops up b Carefully remove the wireless WAN card out of the slot 3 Chapter 7 CRU replacement 57 ...

Page 64: ...ollowing instructions Attention The internal storage drive is sensitive Inappropriate handling might cause damage and permanent loss of data When handling the internal storage drive observe the following guidelines Replace the internal storage drive only for upgrade or repair The internal storage drive is not designed for frequent changes or replacement Before replacing the internal storage drive ...

Page 65: ...es 3 Close the computer display and turn over the computer 4 Remove the base cover assembly See Base cover assembly on page 52 5 Disconnect the cable from the system board 6 Pull the tape to remove the storage drive 7 Disconnect the cable from the storage drive Chapter 7 CRU replacement 59 ...

Page 66: ...8 Detach the bracket from the storage drive 9 Attach the bracket to a new storage drive 10 Connect the cable to the storage drive 60 L490 L590 User Guide ...

Page 67: ...ot Prerequisite Before you start read Appendix A Important safety information on page 95 and print the following instructions Attention If you replace a M 2 solid state drive you might need to install a new operating system For details on how to install a new operating system see Install Windows 10 and drivers on page 48 The internal storage drive is sensitive Inappropriate handling might cause da...

Page 68: ... supervisor password has been set enter the correct password when prompted You also can press Enter to skip the password prompt and enter the BIOS menu However you cannot change the system configurations that are protected by the supervisor password b Select Config Storage Intel R Rapid Storage Technology Intel Optane Disable c Select to preserve user data and select Yes to confirm your operation ...

Page 69: ... the adapter 9 Remove the screws that secure the protective cover 1 and then remove the cover 2 Note Depending on the model a thermal pad is installed on the protective cover to prevent possible overheating Ensure that the thermal pad is not moved and damaged Chapter 7 CRU replacement 63 ...

Page 70: ...ove the M 2 solid state drive out of the M 2 slot 12 Align the contact edge of the new M 2 solid state drive with the key in the slot Carefully insert the M 2 solid state drive into the M 2 slot at an angle of about 20 degrees 1 Then pivot the new M 2 solid state drive downward 2 64 L490 L590 User Guide ...

Page 71: ... Install the screw to secure the M 2 solid state drive 14 Install the protective cover 1 and then install the screws to secure the cover 2 15 Connect the cable to the adapter Chapter 7 CRU replacement 65 ...

Page 72: ...on page 95 and print the following instructions Attention If you replace a M 2 solid state drive you might need to install a new operating system For details on how to install a new operating system see Install Windows 10 and drivers on page 48 The internal storage drive is sensitive Inappropriate handling might cause damage and permanent loss of data When handling the internal storage drive obser...

Page 73: ...ut the internal storage drive on a soft material such as cloth to absorb physical shocks Replacement procedure 1 Disable the built in battery See Disable Fast Startup and the built in battery on page 52 2 Turn off the computer and disconnect the computer from ac power and all connected cables 3 Close the computer display and turn over the computer 4 Remove the base cover assembly See Base cover as...

Page 74: ...connect the cable from the adapter 8 Remove the screws that secure the protective cover 1 and then remove the cover 2 9 Remove the screw that secures the M 2 solid state drive bracket 68 L490 L590 User Guide ...

Page 75: ...state drive out of the slot Note Depending on the model a thermal pad is installed in the M 2 solid state drive slot to prevent possible overheating Ensure that the thermal pad is not moved and damaged 12 Install the new M 2 solid state drive to the bracket Chapter 7 CRU replacement 69 ...

Page 76: ...insert the M 2 solid state drive assembly into the slot at an angle of about 20 degrees 1 Then pivot the bracket downward 2 14 Install the screw to secure the M 2 solid state drive bracket 15 Install the protective cover 1 and then install the screws to secure the cover 2 70 L490 L590 User Guide ...

Page 77: ...and then pivot it downward 2 Ensure that the adapter is seated in place 18 Connect the cable to the system board 19 Reinstall the base cover assembly 20 Turn over the computer Connect the ac power adapter and all disconnected cables Chapter 7 CRU replacement 71 ...

Page 78: ...re replacing the M 2 solid state drive make a backup copy of all the data that you want to keep Do not apply pressure to the M 2 solid state drive Do not touch the contact edge or circuit board of the M 2 solid state drive Otherwise the M 2 solid state drive might get damaged Do not make the M 2 solid state drive subject to physical shocks or vibration Put the M 2 solid state drive on a soft mater...

Page 79: ...id state drive out of the slot 2 6 Install a new M 2 solid state drive by doing the following a Align the contact edge of the new M 2 solid state drive with the key in the slot Then carefully insert the M 2 solid state drive into the slot at an angle of about 20 degrees 1 Pivot the new M 2 solid state drive downward 2 b Install the screw to secure the M 2 solid state drive in place 3 7 Reinstall t...

Page 80: ...frame forward or backward in some of the following steps In this case ensure that you do not press or hold the keys while sliding the keyboard frame Otherwise the keyboard frame cannot be moved 1 Disable the built in battery See Disable Fast Startup and the built in battery on page 52 2 Ensure that the computer is turned off and disconnected from ac power and all cables 3 Close the computer displa...

Page 81: ...and b into the slot between the TrackPoint buttons and the trackpad 1 Slightly pivot the tool downward 2 to release the left and right TrackPoint buttons Then remove the two TrackPoint buttons 3 5 Loosen the screws that secure the keyboard Chapter 7 CRU replacement 75 ...

Page 82: ...shown 7 Pivot the tool in the direction as shown to release the keyboard 1 Push the keyboard in the direction as shown by arrows 2 to release the latches from the keyboard bezel 8 Pivot the keyboard slightly upward 1 and then turn over the keyboard 2 76 L490 L590 User Guide ...

Page 83: ...9 Put the keyboard on the palm rest as shown and detach the connectors Then remove the keyboard 10 Attach the connectors and turn over the keyboard Chapter 7 CRU replacement 77 ...

Page 84: ...s shown Ensure that the front edge of the keyboard the edge that is close to the display is under the keyboard bezel 12 Slide the keyboard in the direction as shown Ensure that the latches are secured under the keyboard frame 78 L490 L590 User Guide ...

Page 85: ...13 Tighten the screws to secure the keyboard 14 Take the new TrackPoint buttons out of the new keyboard package Install the TrackPoint buttons as shown Chapter 7 CRU replacement 79 ...

Page 86: ... Appendix A Important safety information on page 95 and print the following instructions Replacement procedure 1 Disable the built in battery See Disable Fast Startup and the built in battery on page 52 2 Turn off the computer and disconnect the computer from ac power and all connected cables 3 Close the computer display and turn over the computer 4 Remove the base cover assembly See Base cover as...

Page 87: ...speaker cables 2 6 Remove the screws that secure the speaker assembly 1 and then remove the speaker assembly 2 7 Install the new speaker assembly in place 1 and route the speaker cables Then install the screws to secure the speaker assembly 2 Chapter 7 CRU replacement 81 ...

Page 88: ...Appendix A Important safety information on page 95 and print the following instructions Replacement procedure 1 Disable the built in battery See Disable Fast Startup and the built in battery on page 52 2 Turn off the computer and disconnect the computer from ac power and all connected cables 3 Close the computer display and turn over the computer 4 Remove the base cover assembly See Base cover ass...

Page 89: ...speaker cables 2 6 Remove the screws that secure the speaker assembly 1 and then remove the speaker assembly 2 7 Install the new speaker assembly in place 1 and route the speaker cables Then install the screws to secure the speaker assembly 2 Chapter 7 CRU replacement 83 ...

Page 90: ...95 and print the following instructions Replacement procedure 1 Disable the built in battery See Disable Fast Startup and the built in battery on page 52 2 Turn off the computer and disconnect the computer from ac power and all connected cables 3 Close the computer display and turn over the computer 4 Remove the base cover assembly See Base cover assembly on page 52 5 Remove the screws that secure...

Page 91: ...dio board in place 1 and then reinstall the screws that secure it 2 7 Reinstall the base cover assembly 8 Turn over the computer Connect the ac power adapter and all disconnected cables to the computer Chapter 7 CRU replacement 85 ...

Page 92: ...86 L490 L590 User Guide ...

Page 93: ...er What do I do if I spill liquid on the computer 1 Carefully unplug the ac power adapter and turn off the computer immediately The more quickly you stop the current from passing through the computer the more likely you will reduce damage from short circuits Attention Although you might lose some data or work by turning off the computer immediately leaving the computer on might make your computer ...

Page 94: ...age drive If the problem still exists replace the storage drive Error The non volatile system UEFI variable storage is nearly full Note This error indicates that the operating system or programs cannot create modify or delete data in the non volatile system UEFI variable storage due to insufficient storage space after POST The non volatile system UEFI variable storage is used by the UEFI BIOS and ...

Page 95: ...e proper diagnostic app and install it on your smartphone 3 Run the diagnostic app and place the smartphone near the computer 4 Press Fn on your computer to emit the beep again The diagnostic app decodes the beep error and shows possible solutions on the smartphone Note Do not attempt to service a product yourself unless instructed to do so by the Customer Support Center or product documentation O...

Page 96: ...Warranty Guide Setup Guide This User Guide Regulatory Notice 1 Go to https support lenovo com 2 Detect your computer or select computer model manually 3 Select Documentation and filter out the documentation you want Lenovo Support Web site with the latest support information of the following Drivers and software Diagnostic solutions Product and service warranty Product and parts details Knowledge ...

Page 97: ...enovo 1 Record the problem symptoms and details What is the problem Is it continuous or intermittent Any error message or error code What operating system are you using Which version Which software applications were running at the time of the problem Can the problem be reproduced If so how 2 Record the system information Product name Machine type and serial number Chapter 8 Help and support 91 ...

Page 98: ... Customer Support Center for help Telephone numbers For a list of the Lenovo Support phone numbers for your country or region go to https pcsupport lenovo com supportphonelist for the latest phone numbers Note Phone numbers are subject to change without notice If the number for your country or region is not provided contact your Lenovo reseller or Lenovo marketing representative 92 L490 L590 User ...

Page 99: ... hardware available Services not covered Replacement or use of parts not manufactured for or by Lenovo or nonwarranted parts Identification of software problem sources Configuration of UEFI BIOS as part of an installation or upgrade Changes modifications or upgrades to device drivers Installation and maintenance of network operating systems NOS Installation and maintenance of programs For the term...

Page 100: ...94 L490 L590 User Guide ...

Page 101: ...includes references to power adapters and batteries In addition some products such as speakers and monitors ship with external power adapters If you have such a product this information applies to your product In addition computer products contain a coin sized internal battery that provides power to the system clock even when the computer is unplugged so the battery safety information applies to a...

Page 102: ... keep liquids away from your computer Protect the cables from being damaged Applying strong force to cables may damage or break them Route communication lines or the cables of an ac power adapter a mouse a keyboard a printer or any other electronic device so that they cannot be walked on tripped over pinched by your computer or other objects or in any way subject to treatment that could interfere ...

Page 103: ...t from your product You might also hear sounds like popping cracking or hissing These might merely mean that an internal electronic component has failed in a safe and controlled manner Or they might indicate a potential safety issue Do not take risks or attempt to diagnose the situation yourself Contact the Customer Support Center for further guidance For a list of Service and Support phone number...

Page 104: ...ts approved for customer installation are referred to as Customer Replaceable Units or CRUs Lenovo provides documentation with instructions when it is appropriate for customers to install options or replace CRUs You must closely follow all instructions when installing or replacing parts The Off state of a power indicator does not necessarily mean that voltage levels inside a product are zero Befor...

Page 105: ...gradual corrosion of power cord terminals and or the connector terminals on a power adapter which can eventually result in overheating Ensure that all power cord connectors are securely and completely plugged into receptacles Do not use any power adapter that shows corrosion at the ac input pins or shows signs of overheating such as deformed plastic at the ac input pins or anywhere on the power ad...

Page 106: ...t rating Consult an electrician for more information if you have questions about power loads and branch circuit ratings Be sure that the power outlet you are using is properly wired easily accessible and located close to the equipment Do not fully extend power cords in a way that will stress the cords Be sure that the power outlet provides the correct voltage and current for the product you are in...

Page 107: ...temperature charged to approximately 30 to 50 of capacity We recommend that the batteries be charged about once per year to prevent overdischarge Do not put the battery in trash that is disposed of in landfills When disposing of the battery comply with local ordinances or regulations Notice for built in rechargeable battery DANGER Do not attempt to remove or replace the built in rechargeable batte...

Page 108: ...um coin cell battery is swallowed or placed inside any part of the body seek medical care immediately Do not Throw or immerse into water Heat to more than 100 C 212 F Repair or disassemble Leave in an extremely low air pressure environment Leave in an extremely high temperature environment Crush puncture cut or incinerate Dispose of the battery as required by local ordinances or regulations The fo...

Page 109: ... computer or charge the battery near flammable materials or in explosive environments Ventilation slots fans and or heat sinks are provided with the product for safety comfort and reliable operation These features might inadvertently become blocked by placing the product on a bed sofa carpet or other flexible surface Never block cover or disable these features When the ac power adapter is connecte...

Page 110: ...ntil all internal parts enclosures are fastened into place Never use the computer when internal parts and circuits are exposed DANGER Connect and disconnect cables as described in the following procedures when installing moving or opening covers on this product or attached devices To connect 1 Turn everything OFF 2 First attach all cables to devices 3 Attach signal cables to connectors 4 Attach po...

Page 111: ...onnectors do not comply with specifications of EN 50332 2 The headphone output connector of your computer complies with EN 50332 2 Sub clause 7 This specification limits the computer s maximum wide band true RMS output voltage to 150 mV To help protect against hearing loss ensure that the headphones or earphones you use also comply with EN 50332 2 Clause 7 limits for a wide band characteristic vol...

Page 112: ... When you install a static sensitive option or CRU touch the static protective package containing the part to a metal expansion slot cover or other unpainted metal surface on the computer for at least two seconds This reduces static electricity in the package and your body When possible remove the static sensitive part from the static protective packaging and install the part without setting it do...

Page 113: ...thorized Lenovo repair technician should disassemble and repair your computer Do not modify or tape the latches to keep the display open or closed Avoid directly exposing your computer and peripherals to the air from an appliance that can produce negative ions Wherever possible ground your computer to facilitate safe electrostatic discharge Clean your computer It is a good practice to clean your c...

Page 114: ...108 L490 L590 User Guide ...

Page 115: ...k Turn on or turn off Mouse Keys Left Alt Left Shift PrtScn or PrtSc Turn on or turn off High Contrast For more information go to https windows microsoft com and then search using any of the following keywords keyboard shortcuts key combinations shortcut keys Ease of Access Center Ease of Access Center on the Windows operating system enables you to configure your computers to suit their physical a...

Page 116: ...and send e mails To use Speech Recognition 1 Go to Control Panel and view by Category 2 Click Ease of Access Speech Recognition 3 Follow the on screen instructions Screen reader technologies Screen reader technologies are primarily focused on software program interfaces help systems and various online documents For additional information about screen readers see the following Use PDFs with screen ...

Page 117: ...ugh a screen reader Each image in the documentation also includes adequate alternative text so that visually impaired users can understand the image when they use a screen reader Ergonomic information Good ergonomic practice is important to get the most from your personal computer and to avoid discomfort Arrange your workplace and the equipment you use to suit your individual needs and the kind of...

Page 118: ...g It might not be possible to observe the best ergonomic practices when you are using your computer while on the move or in a casual setting Regardless of the setting try to observe as many of the tips as possible Sitting properly and using adequate lighting for example helps you maintain desirable levels of comfort and performance If your work area is not in an office setting ensure to take speci...

Page 119: ...tory usr share doc lenovo doc If you cannot view the LLW either from the Web site or from your computer contact your local Lenovo office or reseller to obtain a printed version of the LLW Access Linux distributions Linux is an open source operating system and popular Linux distributions include Ubuntu and Fedora To learn more about the Ubuntu operating system go to https www ubuntu com To learn mo...

Page 120: ...114 L490 L590 User Guide ...

Page 121: ...tegrated wireless cards that operate within the guidelines identified by radio frequency RF safety standards and recommendations therefore Lenovo believes that this product is safe for use by consumers These standards and recommendations reflect the consensus of the worldwide scientific community and result from deliberations of panels and committees of scientists who continually review and interp...

Page 122: ...nt Directive 2014 53 EU on the approximation of the laws of the Member States relating to radio equipment The full text of the system EU declaration of conformity is available at https www lenovo com us en compliance eu doc Lenovo cannot accept responsibility for any failure to satisfy the protection requirements resulting from a non recommended modification of the product including the installati...

Page 123: ...과하지 않도록 설계되었습니다 장치 액세서리 및 최신 부품을 사용할 경우 SAR 값이 달라질 수 있 습니다 SAR 값은 국가 보고 및 테스트 요구 사항과 네트워크 대역에 따라 다를 수 있습니다 본 장치 는 사람의 신체에서 20mm 이상의 거리에서 사용할 수 있습니다 Environmental information of countries and regions This section provides environmental recycling and RoHS information about Lenovo products Recycling and environmental information Lenovo encourages owners of information technology IT equipment to respo...

Page 124: ...llect and recycle a disused Lenovo computer or monitor If you are a company employee and need to dispose of a Lenovo computer or monitor that is the property of the company you must do so in accordance with the Law for Promotion of Effective Utilization of Resources Computers and monitors are categorized as industrial waste and should be properly disposed of by an industrial waste disposal contrac...

Page 125: ...specializadas no manuseio de resíduos industriais devidamente certificadas pelos orgãos ambientais de acordo com a legislação local A Lenovo possui um canal específico para auxiliá lo no descarte desses produtos Caso você possua um produto Lenovo em situação de descarte ligue para o nosso SAC ou encaminhe um e mail para reciclar lenovo com informando o modelo número de série e cidade a fim de envi...

Page 126: ...r Lenovo product You can find details about the battery in the product documentation If the battery needs to be replaced contact your place of purchase or contact Lenovo for service If you need to dispose of a lithium battery insulate it with vinyl tape contact your place of purchase or a waste disposal operator and follow their instructions Dispose of battery packs from Lenovo products Your Lenov...

Page 127: ...electrical and electronic equipment RoHS recast or RoHS 2 For more information about Lenovo worldwide compliance on RoHS go to https www lenovo com rohs communication Turkish RoHS The Lenovo product meets the requirements of the Republic of Turkey Directive on the Restriction of the Use of Certain Hazardous Substances in Waste Electrical and Electronic Equipment WEEE Ukraine RoHS India RoHS RoHS c...

Page 128: ...122 L490 L590 User Guide ...

Page 129: ...ot installed and used in accordance with the instructions may cause harmful interference to radio communications However there is no guarantee that interference will not occur in a particular installation If this equipment does cause harmful interference to radio or television reception which can be determined by turning the equipment off and on the user is encouraged to try to correct the interfe...

Page 130: ...t CAN ICES 3 B NMB 3 B European Union conformity EU Contact Lenovo Slovakia Landererova 12 811 09 Bratislava Slovakia Compliance with the EMC Directive This product is in conformity with the protection requirements of EU Council Directive 2014 30 EU on the approximation of the laws of the Member States relating to electromagnetic compatibility This product has been tested and found to comply with ...

Page 131: ... Paragraf 5 des EMVG ist die Lenovo Deutschland GmbH Meitnerstr 9 D 70563 Stuttgart Japan VCCI Class B compliance statement Japan compliance statement for products which connect to the power mains with rated current less than or equal to 20 A per phase Japan notice for ac power cord The ac power cord shipped with your product can be used only for this specific product Do not use the ac power cord ...

Page 132: ...Startup Interrupt menu Then press F9 or tap the Regulatory Information option The E label screen is displayed Korean E label notice TCO certification Selected models are TCO Certified and bear the TCO Certified logo Note TCO Certified is an international third party sustainability certification for IT products For details go to https www lenovo com us en pdf social_responsibility tco_certified pdf...

Page 133: ...а является видом эксплуатационных документов Дата изготовления месяц и год Указана на этикетке на упаковке продукции в графе Date дата указана в формате год месяц дата Для получения более подробной информации посетите веб сайт https support lenovo com Единый знак обращения на рынке стран Таможенного союза Brazil audio notice Ouvir sons com mais de 85 decibéis por longos períodos pode provocar dano...

Page 134: ...al financial savings a cleaner environment and the reduction of greenhouse gas emissions For more information about ENERGY STAR go to https www energystar gov Lenovo encourages you to make efficient use of energy an integral part of your day to day operations To help in this endeavor Lenovo has preset a default power plan To change the power plan see Set the power plan on page 30 128 L490 L590 Use...

Page 135: ...right to improve and or modify the products and software programs described in the manuals included with your computer and the content of the manual at any time without additional notice The software interface and function and hardware configuration described in the manuals included with your computer might not match exactly the actual configuration of the computer that you purchase For the config...

Page 136: ...vo com Trademarks LENOVO LENOVO logo THINKPAD THINKPAD logo TRACKPOINT and ULTRACONNECT are trademarks of Lenovo Intel Intel Optane and Thunderbolt are trademarks of Intel Corporation or its subsidiaries in the U S and or other countries Microsoft Windows Direct3D BitLocker and Cortana are trademarks of the Microsoft group of companies Mini DisplayPort mDP and DisplayPort are trademarks of the Vid...

Page 137: ......

Page 138: ......
Reviews: