background image

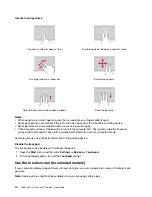
Use the touch gestures

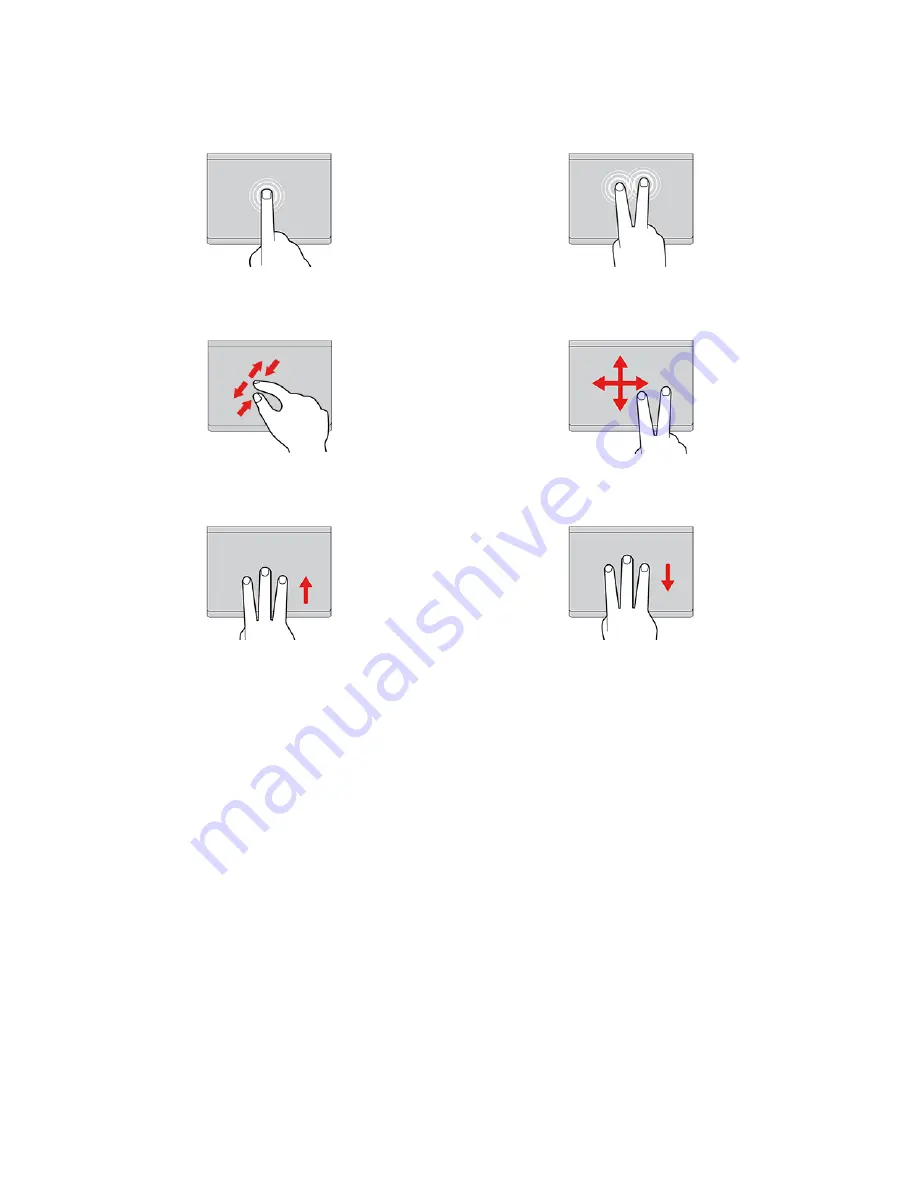
Tap once to select or open an item.

Tap twice quickly to display a shortcut menu.

Two-finger zoom in or zoom out.

Scroll through items.

Open the task view to see all open windows.

Show the desktop.

Notes: 

•  When using two or more fingers, ensure that you position your fingers slightly apart.
•  Some gestures are not available if the last action was done from the TrackPoint pointing device.
•  Some gestures are only available when you are using certain apps.
•  If the trackpad surface is stained with oil, turn off the computer first. Then, gently wipe the trackpad 

surface with a soft and lint-free cloth moistened with lukewarm water or computer cleaner.

For more gestures, see the help information of the pointing device.

Disable the trackpad

The trackpad is active by default. To disable the device: 

1.  Open the 

Start 

menu, and then click 

Settings 

➙ 

Devices 

➙ 

Touchpad

.

2.  In the Touchpad section, turn off the 

Touchpad 

control.

Use the touch screen (for selected models)

If your computer display supports the multi-touch function, you can navigate the screen with simple touch 
gestures.

Note:

Some gestures might not be available when you are using certain apps.

14

ThinkPad P15v Gen 2 and T15p Gen 2 User Guide

Summary of Contents for ThinkPad P15p Gen 1

Page 1: ...ThinkPad P15v Gen 2 and T15p Gen 2 User Guide ...

Page 2: ...d Warranty Guide Setup Guide Generic Safety and Compliance Notices First Edition July 2021 Copyright Lenovo 2021 LIMITED AND RESTRICTED RIGHTS NOTICE If data or software is delivered pursuant to a General Services Administration GSA contract use reproduction or disclosure is subject to restrictions set forth in Contract No GS 35F 05925 ...

Page 3: ...tion 27 Lock the computer 27 Log in with your fingerprint 27 Log in with your face ID for selected models 28 Protect data against power loss for selected models 28 UEFI BIOS passwords 28 Password types 28 Set change and remove a password 29 Associate your fingerprints with passwords for selected models 30 Chapter 5 Configure advanced settings 31 UEFI BIOS 31 Enter the UEFI BIOS menu 31 Navigate in...

Page 4: ...Appendix A Compliance information 57 Appendix B Notices and trademarks 59 ii ThinkPad P15v Gen 2 and T15p Gen 2 User Guide ...

Page 5: ...formation Illustrations in this documentation might look different from your product Depending on the model some optional accessories features software programs and user interface instructions might not be applicable to your computer Documentation content is subject to change without notice To get the latest documentation go to https pcsupport lenovo com Copyright Lenovo 2021 iii ...

Page 6: ...iv ThinkPad P15v Gen 2 and T15p Gen 2 User Guide ...
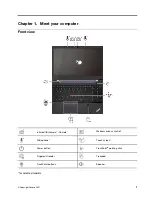
Page 7: ...uter Front view Infrared IR camera Camera Webcam privacy shutter Microphone Touch screen Power button TrackPoint pointing stick Fingerprint reader Trackpad TrackPoint buttons Speaker for selected models Copyright Lenovo 2021 1 ...

Page 8: ...to protect your privacy Related topics Log in with your face ID for selected models on page 28 Use the touch screen for selected models on page 14 Use the TrackPoint pointing device on page 12 Log in with your fingerprint on page 27 Use the trackpad on page 13 2 ThinkPad P15v Gen 2 and T15p Gen 2 User Guide ...
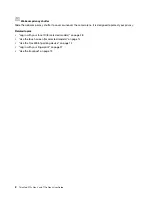
Page 9: ...ur computer supports the HDMI 2 1 standard by default If you connect an external display to your computer through the HDMI connector with an uncertified HDMI cable the external display might not work In this case use a certified HDMI 2 1 cable instead Related topics Charge the computer on page 24 USB specifications on page 6 Use an SD card or a smart card for selected models on page 25 Connect to ...

Page 10: ... Connect to the wired Ethernet on page 9 Lock the computer on page 27 4 ThinkPad P15v Gen 2 and T15p Gen 2 User Guide ...
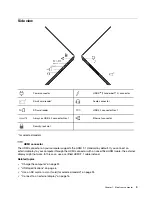
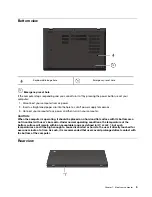
Page 11: ...r computer CAUTION When the computer is operating it should be placed on a hard and flat surface with its bottom area not in contact with user s bare skin Under normal operating conditions the temperature of the bottom surface will remain within an acceptable range as defined in IEC 62368 1 but such temperatures can still be high enough to cause discomfort or harm to the user if directly touched f...

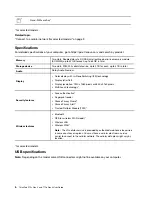
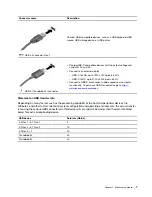
Page 12: ...logy Display ratio 16 9 Display resolution 1920 x 1080 pixels or 3840 x 2160 pixels Multi touch technology Security features Face authentication Fingerprint reader Glance Privacy Guard Glance Privacy Alert Trusted Platform Module TPM Wireless features Bluetooth GPS on wireless WAN model Wireless LAN Wireless WAN Note The 4G cellular service is provided by authorized mobile service carriers in some...

Page 13: ...r computer functionality To purchase USB C accessories go to https www lenovo com accessories Statement on USB transfer rate Depending on many factors such as the processing capability of the host and peripheral devices file attributes and other factors related to system configuration and operating environments the actual transfer rate using the various USB connectors on this device will vary and ...

Page 14: ...8 ThinkPad P15v Gen 2 and T15p Gen 2 User Guide ...

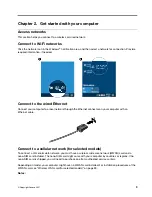
Page 15: ...nector on your computer with an Ethernet cable Connect to a cellular network for selected models To connect a 4G cellular data network you must have a wireless wide area network WWAN card and a nano SIM card installed The nano SIM card might come with your computer by countries or regions If no nano SIM card is shipped you will need to purchase one from authorized service carriers Depending on mod...

Page 16: ...tion of the card and ensure that it is seated correctly 3 Turn on the computer 4 Click the network icon and then select the cellular network icon from the list Provide required information if needed Turn on the Airplane mode When the Airplane mode is enabled all wireless features are disabled 1 Click the action center icon in the Windows notification area 2 Click Airplane mode to turn on the Airpl...

Page 17: ...hones Darken display Brighten display Manage external displays Enable disable wireless Open collapse notification center Answer incoming calls on Microsoft Teams Decline incoming calls on Microsoft Teams Open the Vantage app You can customize the function of this key on the Vantage app Open calculator Enter sleep mode Open Snipping Tool Toggle keyboard backlight for selected models Break operation...

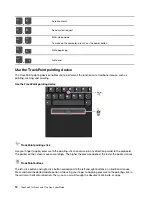
Page 18: ... to apply pressure to the pointing stick nonslip cap in any direction parallel to the keyboard The pointer on the screen moves accordingly The higher the pressure applied the faster the pointer moves TrackPoint buttons The left click button and right click button correspond to the left and right buttons on a traditional mouse Press and hold the dotted middle button while using your finger to apply...

Page 19: ...s Mouse 2 Follow the on screen instructions to disable TrackPoint Replace the pointing stick nonslip cap Note Ensure that the new cap has grooves a Use the trackpad You can use the trackpad to perform all the pointing clicking and scrolling functions of a traditional mouse Use the trackpad Left click zone Right click zone Chapter 2 Get started with your computer 13 ...

Page 20: ...ed with oil turn off the computer first Then gently wipe the trackpad surface with a soft and lint free cloth moistened with lukewarm water or computer cleaner For more gestures see the help information of the pointing device Disable the trackpad The trackpad is active by default To disable the device 1 Open the Start menu and then click Settings Devices Touchpad 2 In the Touchpad section turn off...

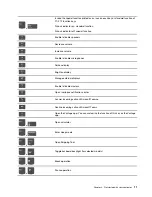
Page 21: ...d to right click Slide to scroll through items Zoom out Zoom in Swipe from the left view all open windows Swipe from the right open action center Swipe downwards shortly show title bar Swipe downwards close the current app Drag Chapter 2 Get started with your computer 15 ...

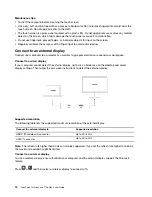
Page 22: ...ions or expand your workspace Connect to a wired display If your computer cannot detect the external display right click a blank area on the desktop and select display settings Then follow the on screen instructions to detect the external display Supported resolution The following table lists the supported maximum resolution of the external display Connect the external display to Supported resolut...

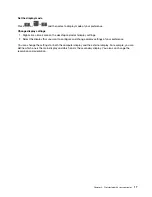
Page 23: ...ngs 2 Select the display that you want to configure and change display settings of your preference You can change the settings for both the computer display and the external display For example you can define which one is the main display and which one is the secondary display You also can change the resolution and orientation Chapter 2 Get started with your computer 17 ...

Page 24: ...18 ThinkPad P15v Gen 2 and T15p Gen 2 User Guide ...
Page 25: ...ful articles Notes The available features vary depending on the computer model The Vantage app makes periodic updates of the features to keep improving your experience with your computer The description of features might be different from that on your actual user interface Lenovo Quick Clean Depending on the model your computer might support the Lenovo Quick Clean feature The preinstalled Lenovo Q...

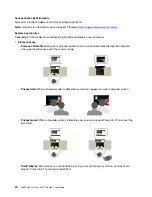
Page 26: ...ep your computer awake when in use and automatically lock the computer when your head moves out of the camera range Privacy Alert When a shoulder surfer is detected an alert icon appears on your computer screen Privacy Guard When a shoulder surfer is detected your screen is blurred Press Alt F2 to cancel the blur effect Smart Display Blur screens you are not looking at If you are not facing any sc...

Page 27: ...rt Pointer Relocate the pointer to the screen you are facing When the pointer moves from one screen to another it is temporarily drawn large Note Snap Window and Smart Pointer only work when your computer is connected to external displays Ensure that external displays are placed at the same height of your computer Promote digital wellness Posture check Remind you to adjust your posture once you hu...

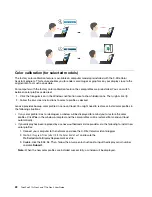
Page 28: ... need to restore or install color profiles in the following situations If any color profile is lost or damaged a window will be displayed to remind you to restore the color profiles Click Yes in the window prompted and the color profiles will be restored from Lenovo Cloud automatically If your display has been replaced by a Lenovo authorized service provider do the following to install new color p...

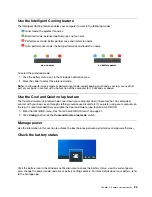
Page 29: ... above Use the Cool and Quiet on lap feature The Cool and Quiet on lap feature helps cool down your computer when it becomes hot Any extended contact with your body even through clothing could cause discomfort If you prefer using your computer on the lap it is recommended that you enable the Cool and Quiet on lap feature in UEFI BIOS 1 Enter the UEFI BIOS menu See Enter the UEFI BIOS menu on page ...

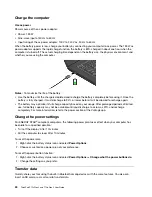
Page 30: ...ull charge capacity based on your usage After prolonged periods of limited use full battery capacity may not be available until you discharge to as low as 20 and recharge completely For more information refer to the power section of the Vantage app Change the power settings For ENERGY STAR compliant computers the following power plan takes effect when your computer has been idle for a specified du...

Page 31: ...ght get damaged Install or remove the card 1 Locate the card slot 2 Insert the card firmly into the card slot until it is secured in place Notes For the SD card ensure that the metal contacts are facing downward and pointing toward the card slot For the smart card ensure that the metal contacts are facing upward and pointing toward the card slot Attention Before removing the card 1 Click the trian...

Page 32: ...To shop at Lenovo go to https www lenovo com accessories 26 ThinkPad P15v Gen 2 and T15p Gen 2 User Guide ...
Page 33: ... 2 Select the fingerprint setting and then follow the on screen instruction to enroll your fingerprint Note It is recommended that you put your finger at the middle of the fingerprint reader during enrollment and enroll more than one fingerprint in case of any injuries to your fingers After the enrollment the fingerprints are associated with the Windows password automatically 3 Log in with your fi...

Page 34: ...xtensible Firmware Interface BIOS Basic Input Output System to strengthen the security of your computer Password types You can set a power on password supervisor password system management password or NVMe password in UEFI BIOS to prevent unauthorized access to your computer However you are not prompted to enter any UEFI BIOS password when your computer resumes from sleep mode Power on password If...

Page 35: ... NVMe password for each computer in the network The user of the computer can change the user NVMe password as desired but only the administrator can remove the user NVMe password When prompted to enter an NVMe password press F1 to switch between the admin NVMe password and user NVMe password Notes The NVMe password is not available in the following situations A Trusted Computing Group TCG Opal com...

Page 36: ...gement password If you forget your system management password do the following to remove the system management password If you have set a supervisor password and remember it 1 Restart the computer When the logo screen is displayed immediately press F1 2 Type the supervisor password to enter the UEFI BIOS menu 3 Select Security Password System Management Password by using the arrow keys 4 Type the ...

Page 37: ...Restart the computer When the logo screen is displayed press F1 2 Select Date Time and set the system date and time as desired 3 Press F10 to save changes and exit Change the startup sequence 1 Restart the computer When the logo screen is displayed press F1 2 Select Startup Boot Then press Enter The default device order list is displayed Note No bootable device is displayed if the computer cannot ...

Page 38: ...requirements for RAID levels Your computer supports the following internal storage drives 2 5 inch form factor 7 mm 0 28 inch height hard disk drive M 2 Non Volatile Memory Express NVMe solid state drive for selected models Note Ensure that your computer has two identical storage drives installed two hard disk drives or M 2 NVMe solid state drives with the same capacity for supported RAID levels I...

Page 39: ...is only available for RAID 0 e Capacity Customize the capacity of the RAID volume The default RAID volume is the largest value f Create Volume Press Enter to finish configurations of the preceding options and create a volume Note The Create Volume option might not be selectable for some reasons for example if different types of drives are selected the option is not selectable If it is not selectab...

Page 40: ... Enter to initiate the rebuild process After you initiate the rebuild process the Intel R Rapid Storage Technology window is displayed The RAID 1 volume under rebuilding is displayed under RAID Volumes with a Rebuilding mark 5 Wait a few minutes When the rebuild process finishes successfully the Rebuilding mark is changed to the Normal mark 6 Press F10 to save changes and exit Install a Windows op...

Page 41: ...bled Then press F10 to save the settings and exit 8 Follow the on screen instructions to install the device drivers and necessary programs 9 After installing the device drivers apply Windows Update to get the latest updates for example the security patches Install device drivers You should download the latest driver for a component when you notice poor performance from that component or when you a...

Page 42: ...36 ThinkPad P15v Gen 2 and T15p Gen 2 User Guide ...
Page 43: ...ons a prepaid shipping label and a container will be included with the replacement CRU and 2 you might be charged for the replacement CRU if Lenovo does not receive the defective CRU within thirty 30 days of your receipt of the replacement CRU For full details see the Lenovo Limited Warranty documentation at https www lenovo com warranty llw_02 CRU list The following is a list of CRUs of your comp...

Page 44: ...cally Wait three to five minutes to let the computer cool Replace a CRU Follow the replacement procedure to replace a CRU Base cover assembly Prerequisite Before you start read Generic Safety and Compliance Notices and print the following instructions Note Do not remove the base cover assembly when your computer is connected to ac power Otherwise there might be a risk of short circuits For access ...

Page 45: ...puter with user installable modules Ensure that you use only a Lenovo authorized wireless module specifically tested for this computer model Otherwise the computer will generate an error code beep sequence when you turn on the computer Prerequisite Before you start read Generic Safety and Compliance Notices and print the following instructions Attention Do not touch the contact edge of the wireles...

Page 46: ...ose the computer display 3 Remove the nano SIM card tray if your computer comes with one See Connect to a cellular network for selected models on page 9 4 Turn over the computer 5 Remove the base cover assembly See Base cover assembly on page 38 Removal procedure Installation procedure Plug the orange cable into the M connector and the blue cable into the D G connector 40 ThinkPad P15v Gen 2 and T...

Page 47: ...ast Startup and the built in battery on page 37 2 Turn off the computer and disconnect the computer from ac power and all connected cables Then close the computer display 3 Remove the nano SIM card tray if your computer comes with one See Connect to a cellular network for selected models on page 9 4 Turn over the computer 5 Remove the base cover assembly See Base cover assembly on page 38 Removal ...

Page 48: ... state drive observe the following guidelines Replace the M 2 solid state drive only for upgrade or repair The M 2 solid state drive is not designed for frequent changes or replacement Before replacing the M 2 solid state drive make a backup copy of all the data that you want to keep Do not apply pressure to the M 2 solid state drive Do not touch the contact edge or circuit board of the M 2 solid ...

Page 49: ... NVMe0 For access do the following 1 Disable the built in battery See Disable Fast Startup and the built in battery on page 37 2 Turn off the computer and disconnect the computer from ac power and all connected cables Then close the computer display 3 Remove the nano SIM card tray if your computer comes with one See Connect to a cellular network for selected models on page 9 4 Turn over the comput...

Page 50: ... assembly See Base cover assembly on page 38 Removal procedure Keyboard Prerequisite Before you start read Generic Safety and Compliance Notices and print the following instructions For access do the following 1 Disable the built in battery See Disable Fast Startup and the built in battery on page 37 2 Turn off the computer and disconnect the computer from ac power and all connected cables Removal...

Page 51: ...h the keyboard in the direction as shown to release the latches from the keyboard bezel 3 Pivot the keyboard slightly upward as shown by arrow 1 and then turn over the keyboard 2 Chapter 6 CRU replacement 45 ...

Page 52: ... be instructed to slide the keyboard frame forward or backward in some of the following steps In this case ensure that you do not press or hold the keys while sliding the keyboard frame Otherwise the keyboard frame cannot be moved 1 Attach the connectors and then turn over the keyboard 46 ThinkPad P15v Gen 2 and T15p Gen 2 User Guide ...

Page 53: ... shown Ensure that the top edge of the keyboard the edge that is close to the display is under the keyboard bezel 3 Slide the keyboard in the direction as shown Ensure that the latches are secured under the keyboard frame Chapter 6 CRU replacement 47 ...

Page 54: ... Configure the keyboard language in UEFI BIOS a Enter the UEFI BIOS menu See Enter the UEFI BIOS menu on page 31 b Click Config Keyboard Mouse Keyboard Layout and then select your keyboard language 48 ThinkPad P15v Gen 2 and T15p Gen 2 User Guide ...
Page 55: ... power button for about seven seconds Then reconnect to ac power and restart the computer What do I do if I spill liquid on the computer 1 Carefully unplug the ac power adapter and turn off the computer immediately The more quickly you stop the current from passing through the computer the more likely you will reduce damage from short circuits Attention Although you might lose some data or work by...

Page 56: ...e to insufficient storage space after POST The non volatile system UEFI variable storage is used by the UEFI BIOS and by the operating system or programs This error occurs when the operating system or programs store large amounts of data in the variable storage All data needed for POST such as UEFI BIOS setup settings chipset or platform configuration data are stored in a separate UEFI variable st...

Page 57: ...e proper diagnostic app and install it on your smartphone 3 Run the diagnostic app and place the smartphone near the computer 4 Press Fn on your computer to emit the beep again The diagnostic app decodes the beep error and shows possible solutions on the smartphone Note Do not attempt to service a product yourself unless instructed to do so by the Customer Support Center or product documentation O...

Page 58: ...ck Diagnostics Operating System Diagnostics and then follow the on screen instructions Use the Vantage app to Configure device settings Download and install UEFI BIOS drivers and firmware updates Secure your computer from outside threats Diagnose hardware problems Check the computer warranty status Access User Guide and helpful articles Note The available features vary depending on the computer mo...

Page 59: ...countries and regions the Genuine Microsoft label is required only on computer models licensed for Windows Pro editions The absence of a Genuine Microsoft label does not indicate that the preinstalled Windows version is not genuine For details on how to tell whether your preinstalled Windows product is genuine refer to the information provided by Microsoft at https www microsoft com en us howtotel...

Page 60: ...st phone numbers Note Phone numbers are subject to change without notice If the number for your country or region is not provided contact your Lenovo reseller or Lenovo marketing representative Services available during the warranty period Problem determination Trained personnel are available to assist you with determining if you have a hardware problem and deciding what action is necessary to fix...

Page 61: ...erating systems NOS Installation and maintenance of programs For the terms and conditions of the Lenovo Limited Warranty that apply to your Lenovo hardware product go to https www lenovo com warranty llw_02 https pcsupport lenovo com warrantylookup Purchase additional services During and after the warranty period you can purchase additional services from Lenovo at https pcsupport lenovo com warran...

Page 62: ...56 ThinkPad P15v Gen 2 and T15p Gen 2 User Guide ...

Page 63: ...P00119C01 TP00119C11 TP00119C21 TP00119C31 TP00119C41 ThinkPad P15v Gen 2 21A9 and 21AA ThinkPad T15p Gen 2 21A7 and 21A8 1 for India only Further compliance information related to your product is available at https www lenovo com compliance Locate the UltraConnect wireless antennas Your computer has an UltraConnect wireless antenna system You can enable wireless communication wherever you are The...

Page 64: ... shipping packaging 20 C to 60 C 4 F to 140 F Storage without packaging 5 C to 43 C 41 F to 109 F Note When you charge the battery its temperature must be no lower than 10 C 50 F Relative humidity Operating 8 to 95 at wet bulb temperature 23 C 73 F Storage and transportation 5 to 95 at wet bulb temperature 27 C 81 F 58 ThinkPad P15v Gen 2 and T15p Gen 2 User Guide ...
Page 65: ...ht to improve and or modify the products and software programs described in the manuals included with your computer and the content of the manual at any time without additional notice The software interface and function and hardware configuration described in the manuals included with your computer might not match exactly the actual configuration of the computer that you purchase For the configura...

Page 66: ...notice For the latest information or any questions or comments contact or visit the Lenovo Web site https pcsupport lenovo com Trademarks LENOVO LENOVO logo THINKPAD THINKPAD logo TRACKPOINT and ULTRACONNECT are trademarks of Lenovo Intel and Thunderbolt are trademarks of Intel Corporation or its subsidiaries in the U S and or other countries Linux is the registered trademark of Linus Torvalds in ...

Reviews: