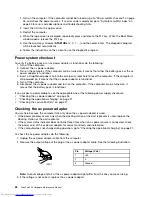
4. If the voltage is acceptable, replace the system board.
Note:
Noise from the ac power adapter does not always indicate a defect.
Checking the operational charging
This computer supports only batteries specially designed for this specific system and manufactured by
Lenovo or an authorized builder. The system does not support unauthorized batteries or batteries designed
for other systems. If an unauthorized battery or a battery designed for another systems is installed, the
system will not charge.
Attention:
Lenovo has no responsibility for the performance or safety of unauthorized batteries, and
provides no warranties for failures or damage arising out of their use.
To check whether the battery charges properly during operation, do the following:
1. Discharge the battery until the remained battery power is less than 50%.
2. Connect the computer to ac power to charge the battery. If the battery status icon in the Windows
notification area indicates that the battery is not charging, remove the battery and let it return to room
temperature.
3. Reinstall the battery. If the battery is still not charging, replace the battery pack.
4. Check the battery status icon again. If the same error still exists, replace the system board.
Checking the battery pack
To check the battery pack, do the following:
1. Turn off the computer and disconnect the ac power adapter.
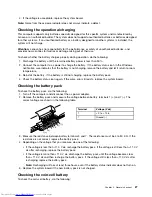
2. Remove the battery pack and measure the voltage between battery terminals 1 (+) and 7 (-). The
correct voltage are shown in the following table.
Terminal
Voltage (V dc)
1
+ 0 to + 12.6
7
Ground (-)
1(+)
2(+)
3
4
5
6(-)
7(-)
3. Measure the resistance between battery terminals 5 and 7. The resistance must be 4 to 30 K Ω. If the
resistance is not correct, replace the battery pack.
4. Depending on the voltage that you measure, do one of the following:
• If the voltage is less than +11.0 V dc, recharge the battery pack. If the voltage is still less than +11.0 V
dc after recharging, replace the battery pack.
• If the voltage is more than +11.0 V dc, discharge the battery pack until the voltage becomes less
than +11.0 V dc and then recharge the battery pack. If the voltage still is less than +11.0 V dc after
recharging, replace the battery pack.
Note:
Recharging will take at least three hours, even if the battery status indicator does not turn on.
5. Replace the system board if the new battery pack is not charged.
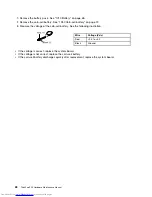
Checking the coin-cell battery
To check the coin-cell battery, do the following:
Chapter 3
.
General checkout
27
Summary of Contents for ThinkPad P50
Page 1: ...ThinkPad P50 Hardware Maintenance Manual ...
Page 6: ...iv ThinkPad P50 Hardware Maintenance Manual ...
Page 11: ...DANGER DANGER DANGER DANGER DANGER Chapter 1 Safety information 5 ...
Page 12: ...6 ThinkPad P50 Hardware Maintenance Manual ...
Page 13: ...PERIGO PERIGO PERIGO PERIGO Chapter 1 Safety information 7 ...
Page 14: ...PERIGO PERIGO PERIGO PERIGO DANGER 8 ThinkPad P50 Hardware Maintenance Manual ...
Page 15: ...DANGER DANGER DANGER DANGER DANGER DANGER Chapter 1 Safety information 9 ...
Page 16: ...DANGER VORSICHT VORSICHT VORSICHT VORSICHT 10 ThinkPad P50 Hardware Maintenance Manual ...
Page 17: ...VORSICHT VORSICHT VORSICHT VORSICHT Chapter 1 Safety information 11 ...
Page 18: ...12 ThinkPad P50 Hardware Maintenance Manual ...
Page 19: ...Chapter 1 Safety information 13 ...
Page 20: ...14 ThinkPad P50 Hardware Maintenance Manual ...
Page 21: ...Chapter 1 Safety information 15 ...
Page 22: ...16 ThinkPad P50 Hardware Maintenance Manual ...
Page 23: ...Chapter 1 Safety information 17 ...
Page 24: ...18 ThinkPad P50 Hardware Maintenance Manual ...
Page 28: ...22 ThinkPad P50 Hardware Maintenance Manual ...
Page 46: ...40 ThinkPad P50 Hardware Maintenance Manual ...
Page 64: ...58 ThinkPad P50 Hardware Maintenance Manual ...
Page 122: ...116 ThinkPad P50 Hardware Maintenance Manual ...
Page 123: ......
Page 124: ...Part Number SP40J71944_01 Printed in China 1P P N SP40J71944_01 1PSP40J71944_01 ...

