background image

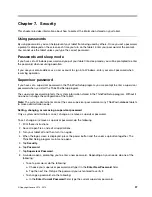
Chapter 8. Recovery overview

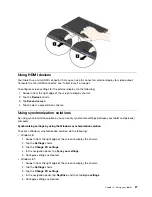
This section provides information about the recovery solutions.

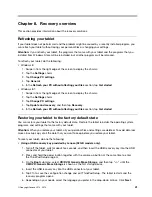
Refreshing your tablet

If your tablet does not perform well and the problem might be caused by a recently installed program, you
can refresh your tablet without losing your personal files or changing your settings.

Attention:

If you refresh your tablet, the programs that came with your tablet and the programs that you

installed from Windows Store will be reinstalled, but all other programs will be removed.

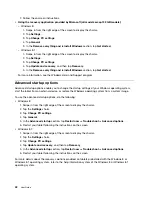
To refresh your tablet, do the following:

• Windows 8:

1. Swipe in from the right edge of the screen to display the charms.

2. Tap the

Settings

charm.

3. Tap

Change PC settings

.

4. Tap

General

.

5. In the

Refresh your PC without affecting your files

section, tap

Get started

.

• Windows 8.1:

1. Swipe in from the right edge of the screen to display the charms.

2. Tap the

Settings

charm.

3. Tap

Change PC settings

.

4. Tap

Update and recovery

, and then tap

Recovery

.

5. In the

Refresh your PC without affecting your files

section, tap

Get started

.

Restoring your tablet to the factory default state

You can restore your tablet to the factory default state. Restore the tablet reinstalls the operating system,
programs, and settings that came with your tablet.

Attention:

When you restore your tablet, all your personal files and settings are deleted. To avoid data loss,

make a backup copy of all the data that you want to keep before you restore your tablet.

To reset your tablet, do one the following:

Using a USB recovery key provided by Lenovo (32 GB models only)

:

1. Turn off the tablet, wait for about five seconds, and then insert the USB recovery key into the USB

connector of your tablet.

2. Press and hold the power button together with the volume up button at the same time to enter

the ThinkPad Setup program.

3. On the

Boot

submenu, select

CD/DVD: Generic Mass Storage

, and then tap “+/–” until the

CD/DVD: Generic Mass Storage

is shown as the first startup device.

4. Insert the USB recovery key into the USB connector of your tablet.

5. Tap F10 to save the configuration change and exit ThinkPad Setup. The tablet restarts and the

recovery program opens.

6. Depending on your needs, select the language you prefer in the drop-down list box. Click

Next

.

© Copyright Lenovo 2012, 2013

41

Summary of Contents for ThinkPad Tablet 2

Page 1: ...User Guide ThinkPad Tablet 2 ...

Page 2: ...The Safety Warranty and Setup Guide and the Regulatory Notice have been uploaded to the Web site To refer to them go to http www lenovo com UserManuals Fourth Edition September 2013 Copyright Lenovo 2012 2013 LIMITED AND RESTRICTED RIGHTS NOTICE If data or software is delivered pursuant a General Services Administration GSA contract use reproduction or disclosure is subject to restrictions set for...

Page 3: ...and watching videos 24 Listening to music 24 Reading books 24 Working with Email 25 Using the screen capture function 25 Working with USB devices 25 Using the dc in connector 25 Using the USB connector 25 Using the micro SD card reader 26 Using HDMI devices 27 Using synchronization solutions 27 Sharing your Internet connection 28 Using the GPS satellite receiver 29 Chapter 6 ThinkPad Tablet 2 opti...

Page 4: ...Class B compliance statement 63 Korea Class B compliance statement 64 Japanese VCCI Class B statement 64 Japan compliance statement for products which connect to the power mains with rated current less than or equal to 20 A per phase 64 Lenovo product service information for Taiwan 64 Additional regulatory information 65 Appendix B Environmental recycling and disposal information 67 Lenovo recycli...

Page 5: ...creen is made of glass The glass might break if the tablet is dropped on a hard surface is the subject of a high impact or is crushed by a heavy object If the glass chips or cracks do not touch the broken glass or attempt to remove it from the tablet Stop using the tablet immediately and contact Lenovo technical support for repair replacement or disposal information Do not disassemble or modify yo...

Page 6: ... and headphone output voltage and the sound pressure level Therefore to protect your hearing adjust the equalizer to an appropriate level Excessive use of headphones or earphones for a long period of time at high volume can be dangerous if the output of the headphone or earphone connectors do not comply with specifications of EN 50332 2 The headphone output connector of your tablet complies with E...

Page 7: ...ate protection in the form of firewalls antivirus software and anti spyware software and keep this software up to date Keep electrical appliances such as an electric fan radio high powered speakers air conditioner and microwave oven away from your tablet because the strong magnetic fields generated by these appliances can damage the screen and the data on the tablet Be aware of heat generated by y...

Page 8: ...vi User Guide ...

Page 9: ...res to give you the basic information you will need to start using the tablet Front and side view Figure 1 ThinkPad Tablet 2 front and side view 1 Tablet Digitizer Pen storage 9 ThinkPad Tablet 2 Dock connector 2 SIM card slot 10 Emergency reset hole 3 Micro SD card reader 11 dc in connector 4 Power button 12 USB connector 5 Headphone or microphone connector 13 Front facing camera 6 Volume control...

Page 10: ...nector to listen to stereo sound from the tablet or connect a microphone to record audio or make calls You also can connect a headset with an integrated microphone that uses a combined audio microphone connector 6 Volume control buttons Press the volume up or down button to adjust the tablet volume 7 Screen rotation lock button Press the button to disable the screen auto rotation function Press ag...

Page 11: ...sor detects the brightness of the environment The screen brightness automatically adjusts depending on the ambient light conditions detected by the built in ambient light sensor 15 Windows button Press the Windows button to go to the Start screen at any time 16 Multi touch screen Tap the screen to use the controls on the screen including icons menu items and the onscreen keyboard For more informat...

Page 12: ...ther with the supplied USB cable to provide ac power to your tablet and charge the battery Tablet Digitizer Pen for some models If your tablet is equipped with a Tablet Digitizer Pen use it to input text or draw graphics in a natural manner and perform other operations without tapping the screen with your finger For more information see Using the Tablet Digitizer Pen on page 11 Features Processor ...

Page 13: ...c in connector One ThinkPad Tablet 2 Dock connector One headphone or microphone connector Card slot or card reader SIM card slot Micro SD card reader GPS and wireless features Global Positioning System GPS satellite receiver Bluetooth 4 0 NFC on some models Wireless LAN 802 11a g n Wireless WAN on some models Specifications Size Width 262 6 mm 10 3 inches Depth 164 6 mm 6 48 inches Height 9 8 mm 0...

Page 14: ... to 43 0 C 41 F to 109 F At altitudes above 2438 m 8000 ft Maximum temperature when operating under unpressurized conditions 31 3 C 88 F Relative humidity Operating 8 to 80 Storage 5 to 95 If possible place your tablet in a dry well ventilated area without direct exposure to sunshine Do not use or store your tablet in dusty dirty areas or extreme hot or cold areas 6 User Guide ...

Page 15: ...een tap and hold your finger on the item move your finger to the desired location and then take your finger off the screen Swipe or slide Move your finger in a vertical or horizontal direction on the screen to scroll through the Start screen Web pages lists picture thumbnails and so on Zoom Zoom out Move two fingers close together on the screen as if you are picking something up to reduce the view...

Page 16: ...en applications Swipe in from the left edge Move the pointer to the top left corner of your screen and then click Keep clicking to cycle through the open applications To view the recently used applications or select an active application from the list Swipe in and out on the left edge Move the pointer to the top left corner of the screen and then move the pointer downward along the left edge To ma...

Page 17: ...in from the top or bottom edge tap Customize and then tap the desired icon Press and hold the desired icon Windows 8 Move the desired icon downward until a tick icon is displayed then release your finger Windows 8 1 Right click a blank area on the Start screen click Customize and then click the desired icon Right click the desired icon Windows 8 Right click the desired icon Chapter 2 Getting start...

Page 18: ...and other characters When you rotate the tablet the onscreen keyboard automatically rotates to the corresponding portrait or landscape view To open the onscreen keyboard do the following Windows 8 1 Swipe in from the right edge of the screen to display the charms 2 Tap the Search charm 3 Tap App 4 Tap On Screen Keyboard Windows 8 1 1 Swipe in from the right edge of the screen to display the charms...

Page 19: ...ns 5 Follow the onscreen instructions Disabling the onscreen keyboard If you prefer to use a physical keyboard connect an external USB keyboard or pair a ThinkPad Tablet 2 Bluetooth Keyboard with Stand to your tablet The onscreen keyboard is disabled automatically when you type from the physical keyboard Using the Tablet Digitizer Pen The Tablet Digitizer Pen enables you to input text in a natural...

Page 20: ...k the tablet health condition and battery status view user manuals for your tablet get the warranty information for your tablet and explore help and support information Lenovo ThinkVantage Tools Provide easy access to various Lenovo applications such as System Update Password manager and so on ThinkVantage System Update Keep the software on your tablet up to date by downloading and installing soft...

Page 21: ...ed to purchase one from the service carrier Attention When installing or removing the SIM card do not touch the SIM card metal connectors As a precaution always hold your tablet in your hand before you install or remove the SIM card to avoid electrostatic discharges To install a SIM card do the following 1 Turn off the tablet 2 Open the SIM card slot cover and locate the SIM card slot To locate th...

Page 22: ...k Refer to Installing the SIM card on page 13 for instructions on how to install a SIM card Note Some tablets support access to Wi Fi networks only See Connecting to a Wi Fi network on page 15 for instructions on connecting to a Wi Fi network To connect to the mobile network do the following 1 Swipe in from the right edge of the screen to display the charms 2 Tap the Settings charm 3 Tap the netwo...

Page 23: ... navigation panel tap Devices 5 In the Download over metered connections section slide to the left to turn it off Windows 8 1 1 Swipe in from the right edge of the screen to display the charms 2 Tap Settings Change PC settings 3 In the navigation panel tap PC and devices Devices 4 In the Download over metered connections section slide to the left to turn it off Connecting to a Wi Fi network Wi Fi ...

Page 24: ...led a service set identifier or SSID you must add that Wi Fi network before you can connect to it To add a Wi Fi network do the following Note Ensure that Airplane mode is set to Off 1 Swipe in from the right edge of the screen to display the charms 2 Tap the Settings charm 3 Tap the network icon A list of available Wi Fi networks is displayed 4 Tap Hidden network 5 Follow the onscreen instruction...

Page 25: ...m 3 Tap Change PC settings 4 In the navigation panel tap PC and devices and then tap Bluetooth 5 When the list of devices is displayed tap the Bluetooth device you want to pair tap Pair and then follow the instructions on both devices to pair them Unpairing a Bluetooth device To unpair a Bluetooth device do the following Windows 8 1 Swipe in from the right edge of the screen to display the charms ...

Page 26: ...18 User Guide ...

Page 27: ...r from your tablet when the battery power is full or leave the ac adapter connected to operate from ac power Alternatively you can use any of the following charging methods to safely recharge the internal battery of your tablet Charging method Tablet on Display is on Tablet off or in screen lock mode Display is off ThinkPad Tablet 2 Dock fastest charging method Approved Approved ThinkPad Tablet AC...

Page 28: ...e of the screen to display the charms 2 Tap the Settings charm 3 Tap Change PC settings 4 In the navigation panel tap Sync your settings 5 Switch off Sync your settings Windows 8 1 1 Swipe in from the right edge of the screen to display the charms 2 Tap the Settings charm 3 Tap Change PC settings 4 In the navigation panel tap SkyDrive and then tap Sync settings 5 Switch off Sync settings with SkyD...

Page 29: ...imate status of your battery at any time by checking the Desktop battery status icon on the taskbar To check for the accurate status and adjust your tablet power settings to achieve the best balance between performance and power saving do the following 1 From the Start screen tap Lenovo Settings Power 2 Check your battery status and configure settings To check the battery status in Lenovo Support ...

Page 30: ...22 User Guide ...

Page 31: ... up for a data plan with your service carrier in your area With some carriers you can choose a data plan track your data usage and change or cancel your plan With some plans you pay based on the amount of data used while with other plans you pay a fixed fee for unlimited data use Some Web sites require you to enter a user name and password before you can gain access The Password Manager program pr...

Page 32: ...ng camera or Rear facing camera from the Select a camera drop down list box to switch the cameras You also can use the camera with other applications that provide features such as photographing video capturing and video conferencing To download other applications tap Lenovo App Store or Windows Store from the Start screen Then follow the onscreen instructions Viewing pictures and watching videos T...

Page 33: ...or dc charge only Using the USB connector Use the USB connector to connect a compatible USB device such as a USB mouse USB keyboard or USB memory key To locate the USB connector on your tablet see Tablet layout on page 1 Notes The USB connector is compatible with the USB 2 0 standard The USB connector can provide a maximum of 2 5 W power output Working with a USB keyboard or USB mouse If you are a...

Page 34: ...ader do the following 1 Open the card reader cover and locate the micro SD card reader 2 Make sure that the metal contacts of the card are facing down and pointing toward the tablet 3 Insert the card firmly into the micro SD card reader until you hear a click The card might stop before it is completely installed into the card reader Removing a flash media card To remove a flash media card do the f...

Page 35: ...n easily synchronize settings between your tablet and personal computer Synchronizing settings by using the Windows synchronization solution To access Windows synchronization solution do the following Windows 8 1 Swipe in from the right edge of the screen to display the charms 2 Tap the Settings charm 3 Tap the Change PC settings 4 In the navigation panel tap Sync your settings 5 Configure setting...

Page 36: ...ed to your network in the drop down list box Sharing your Internet connection using NFC NFC is a wireless technology that enables you to establish radio communication between two devices by touching them together or bringing them into close proximity usually no more than a few centimeters If your tablet is NFC enabled to invite and connect another NFC enabled device to your hotspot do the followin...

Page 37: ...o pinpoint your location down to the street level Use location based applications such as Google Maps to find your current location get directions to your destination and find other location based information Note For longer battery life disable the GPS satellite receiver when not in use Chapter 5 Using your tablet 29 ...

Page 38: ...30 User Guide ...

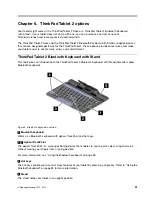
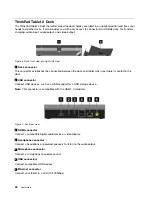
Page 39: ...rd with Stand This topic gives an introduction to the ThinkPad Tablet 2 Bluetooth Keyboard with Stand hereafter called Bluetooth keyboard Figure 5 Bluetooth keyboard overview 1 Bluetooth keyboard Works as a Bluetooth keyboard with optical TrackPoint and hot keys 2 3 Optical TrackPoint The optical TrackPoint is a cursor positioning device that enables to you to point select drag and scroll without ...

Page 40: ...tion between the dock and tablet when your tablet is seated in the dock 2 USB connector Connect USB devices such as a USB keyboard or a USB storage device Note This connector is compatible with the USB 2 0 standard Figure 7 Dock rear view 1 HDMI connector Connect a compatible digital audio device or video display 2 Headphone connector Connect a headphone or powered speakers to listen to the audio ...

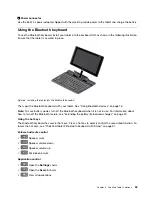
Page 41: ...vices on page 16 Note To save battery power turn off the Bluetooth keyboard when it is not in use For information about how to turn off the Bluetooth feature see Extending the battery life between charges on page 20 Using the hot keys The Bluetooth keyboard has several hot keys Press a hot key to quickly control the associated function To locate the hot keys see ThinkPad Tablet 2 Bluetooth Keyboar...

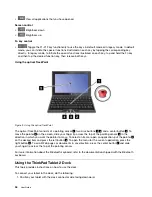
Page 42: ...center button 3 To move the pointer 5 on the screen slide your finger tip across the top of the pointing sensor 1 in the direction in which you want the pointer to move To select an item or open an application put the pointer 5 on the desired item and press the left button 4 To open the menu for the current application press the right button 2 To scroll Web pages or documents in any direction pres...

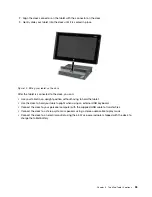
Page 43: ...t position without having to hold the tablet Use the dock to hold your tablet upright when using an external USB keyboard Connect the dock to your personal computer with the supplied USB cable to transfer files Connect the dock to a stereo system or speakers using a stereo audio cable to play music Connect the dock to an electrical outlet using the 65 W ac power adapter shipped with the dock to ch...

Page 44: ...36 User Guide ...

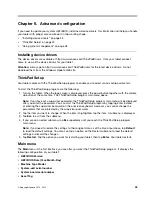
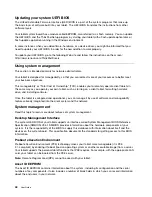
Page 45: ...Setup program Without it no one can change the configuration of the tablet Note The system administrator can set the same supervisor password on many ThinkPad notebook tablets to make administration easier Setting changing or removing a supervisor password Only a system administrator can set change or remove a supervisor password To set change or remove a supervisor password do the following 1 Pri...

Page 46: ...rity menu of the ThinkPad Setup program are the following Security Chip Selection select he security chip you want to use Security Chip activate inactivate or disable the security chip Security Reporting Options enable or disable each security reporting option Clear Security Chip clear the encryption key Physical Presence for Provisioning enables or disables the confirmation message when you chang...

Page 47: ...formation about how to use the firewall program refer to the online help that comes with the program Protecting data against viruses Your tablet is preinstalled with an antivirus program so you can detect and eliminate viruses The antivirus program is designed to help you detect and eliminate viruses Lenovo provides a full version of antivirus software on your tablet with a free 30 day subscriptio...

Page 48: ...40 User Guide ...

Page 49: ... Restoring your tablet to the factory default state You can restore your tablet to the factory default state Restore the tablet reinstalls the operating system programs and settings that came with your tablet Attention When you restore your tablet all your personal files and settings are deleted To avoid data loss make a backup copy of all the data that you want to keep before you restore your tab...

Page 50: ...rom an external device or restore the Windows operating system from a system image To use the advanced startup options do the following Windows 8 1 Swipe in from the right edge of the screen to display the charms 2 Tap the Settings charm 3 Tap Change PC settings 4 Tap General 5 In the Advanced startup section tap Restart now Troubleshoot Advanced options 6 Restart your tablet following the instruc...

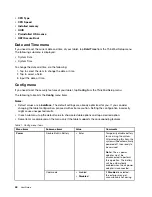
Page 51: ... password the ThinkPad Setup program main menu will be displayed after you enter the password You can start the ThinkPad Setup program by tapping Enter instead of entering the supervisor password on the onscreen keyboard However you cannot change the parameters that are protected by the supervisor password 2 Tap the item you want to change When the item is highlighted tap the item A submenu is dis...

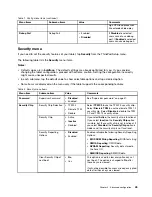
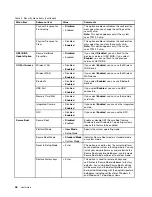
Page 52: ...ou If you consider changing the tablet configuration proceed with extreme caution Setting the configuration incorrectly might cause unexpected results In each submenu tap the default value to show selectable options and tap a desired option Some items are displayed on the menu only if the tablet supports the corresponding features Table 1 Config menu items Menu items Submenu items Value Comments D...

Page 53: ...visor Password Disabled Enabled See Supervisor password on page 37 Security Chip Selection TPM2 0 Discrete TPM Disable Select TPM2 0 to use the TPM 2 0 security chip Select Discrete TPM to use the discrete TPM 1 2 security chip Select Disable to disable the TPM 2 0 and TPM 1 2 security chips Security Chip Active Inactive Disabled If you select Active the security chip is functional If you select I...

Page 54: ...USB connectors Memory Card Slot Disabled Enabled If you select Enabled you can use the memory card slots Integrated Camera Disabled Enabled If you select Enabled you can use the integrated camera I O Port Access NFC Disabled Enabled If you select Enabled you can use the NFC Secure Boot Disabled Enabled Enable or disable UEFI Secure Boot feature Windows 8 and Windows 8 1 operating systems require t...

Page 55: ... to save the changes and restart the system The following table lists the Startup menu items Notes Default values are in boldface In each submenu tap the default value to show selectable options and select a desired option Some items are displayed on the menu only if the tablet supports the corresponding features Table 3 Startup menu items Menu item Value Comments Boot See Changing the startup seq...

Page 56: ...k drive and installing software Once the tablet is configured and operational you can manage it by use of software and manageability features already integrated into the client system and the network System management Read this topic to learn more about features of system management Desktop Management Interface The system UEFI BIOS of your tablet supports an interface called System Management BIOS...

Page 57: ...your tablet from a management console The following requirements must be met Your tablet must be started over the LAN Your tablet must be engaged in a Preboot eXecution Environment Network management software must be installed on the remote administrator s tablet Chapter 9 Advanced configuration 49 ...

Page 58: ...50 User Guide ...

Page 59: ...commodate your preferences for comfort If your work area is not in an office setting be sure to take special note of employing active sitting and utilizing work breaks Note that there are many ThinkPad product solutions available to help you modify and expand your tablet to best suit your needs Access the Web site http www lenovo com accessories services index html to view some of these options Ex...

Page 60: ...g Travel tips Use the following travel tips to travel more confidently and efficiently with your tablet 1 While it is safe to allow your tablet to go through the x ray machines at airport security stations it is important to keep your eyes on the tablet at all times to prevent theft 2 Put your tablet in a protective case when not in use to prevent damage or scratching Travel tips on airplanes If y...

Page 61: ... so that you can enjoy this product for a long time Cleaning your tablet To clean your tablet unplug all cables and turn off the tablet by pressing and holding the power button for a few seconds Then wipe the tablet screen with a soft lint free dry cloth to clear stains and smudges Note Do not use screen cleaners household cleaners aerosol sprays solvents alcohol ammonia or abrasives to clean your...

Page 62: ...54 User Guide ...

Page 63: ...em persists contact Lenovo for technical support Multi touch screen problems Problem The multi touch screen responds slowly or improperly Suggested solution Do the following 1 Ensure that your hands are clean and dry when touching the screen 2 Restart your tablet to try again If the problem persists contact Lenovo for technical support Battery problem Problem The battery does not charge correctly ...

Page 64: ...ps responding and you cannot turn off the tablet by pressing and holding the power button insert a straightened paper clip into the emergency reset hole to reset the tablet Then restart your tablet To locate the emergency reset hole see Tablet layout on page 1 If you still encounter the same problem after you restart your tablet reset your tablet and restart it again you can perform a factory data...

Page 65: ...ber are invalid Solution Machine Type and Serial Number are invalid Have the tablet serviced Message 2201 Machine UUID is invalid Solution Machine UUID is invalid Have the tablet serviced Errors without messages Problem My screen keeps blanking when I do not want it to Solution You can disable any system timers such as the LCD turn off timer or the blank timer by doing the following 1 Go the deskt...

Page 66: ...the solid state drive by using the software and recover the partition if required Use either the Rescue and Recovery workspace or the recovery discs to restore the system to the factory state If the problem persists have the tablet serviced Problem My screen goes blank while the tablet is on Solution Your screen saver or power management might have been enabled Do either of the following Touch the...

Page 67: ...Support Center go to http www lenovo com support phone for the latest telephone numbers and hours of operation During the warranty period you can get the following services from the Customer Support Center Problem determination Trained personnel are available to assist you with determining if you have a hardware problem and deciding what action is necessary to fix the problem Lenovo hardware repai...

Page 68: ...egistration Follow the onscreen instructions to create an account 2 From the Start screen tap Lenovo Support Discussion Forum Procedure 2 1 Go to http www lenovo com register and follow the onscreen instructions to create an account 2 Go to http www lenovo com support 3 Tap Lenovo Community Finding ThinkPad options If you want to expand the capabilities of your tablet Lenovo has a number of hardwa...

Page 69: ...evices However the level of energy emitted is far much less than the electromagnetic energy emitted by wireless devices such as mobile phones Due to the fact that integrated wireless cards operate within the guidelines found in radio frequency safety standards and recommendations Lenovo believes they are safe for use by consumers These standards and recommendations reflect the consensus of the sci...

Page 70: ...ept to any of the embargoed countries in the EAR E1 country list Electronic emission notices Federal Communications Commission FCC Declaration of Conformity The following information refers to the ThinkPad Tablet 2 machine types 3679 and 3682 This equipment has been tested and found to comply with the limits for a Class B digital device pursuant to Part 15 of the FCC Rules These limits are designe...

Page 71: ...9 Think Place Building One Morrisville NC 27560 Phone Number 919 294 5900 Industry Canada Class B emission compliance statement This Class B digital apparatus complies with Canadian ICES 003 Cet appareil numérique de la classe B est conforme à la norme NMB 003 du Canada European Union Compliance to the Electromagnetic Compatibility Directive This product is in conformity with the protection requir...

Page 72: ...ische Verträglichkeit von Betriebsmitteln EMVG früher Gesetz über die elektromagnetische Verträglichkeit von Geräten Dies ist die Umsetzung der EU Richtlinie 2004 108 EG früher 89 336 EWG in der Bundesrepublik Deutschland Zulassungsbescheinigung laut dem Deutschen Gesetz über die elektromagnetische Verträglichkeit von Betriebsmitteln EMVG vom 20 Juli 2007 früher Gesetz über die elektromagnetische ...

Page 73: ...wireless regulatory notices refer to the Regulatory Notice that came with your tablet If your tablet is shipped without the Regulatory Notice you can obtain a PDF version from the Lenovo Web site at http www lenovo com UserManuals Appendix A Regulatory information 65 ...

Page 74: ...66 User Guide ...

Page 75: ...ive Utilization of Resources Computers and monitors are categorized as industrial waste and should be properly disposed of by an industrial waste disposal contractor certified by a local government In accordance with the Law for Promotion of Effective Utilization of Resources Lenovo Japan provides through its PC Collecting and Recycling Services for the collecting reuse and recycling of disused co...

Page 76: ...pany employee who uses a Lenovo notebook computer and need to dispose of a battery pack contact the proper person in Lenovo sales service or marketing and follow that person s instructions You also can refer to the instructions at http www lenovo com jp ja environment recycle battery If you use a Lenovo notebook computer at home and need to dispose of a battery pack you must comply with local ordi...

Page 77: ...ent and human health due to the presence of hazardous substances For additional WEEE information go to http www lenovo com recycling Battery recycling information for Taiwan Battery recycling information for the United States and Canada Battery recycling information for the European Union Notice This mark applies only to countries within the European Union EU Batteries or packaging for batteries a...

Page 78: ...work available to customers for the return recycling and treatment of batteries and accumulators Customer participation is important to minimize any potential effects of batteries and accumulators on the environment and human health due to the potential presence of hazardous substances For proper collection and treatment go to http www lenovo com recycling China recycling information for Waste Ele...

Page 79: ...lication Lenovo might make improvements and or changes in the product s and or the program s described in this publication at any time without notice The products described in this document are not intended for use in implantation or other life support applications where malfunction might result in injury or death to persons The information contained in this document does not affect or change Leno...

Page 80: ...of the Microsoft group of companies Intel Atom is a trademark of Intel Corporation in the U S and or other countries The terms HDMI and HDMI High Definition Multimedia Interface are trademarks or registered trademarks of HDMI Licensing LLC in the United States and other countries Other company product and service names may be trademarks or service marks of others 72 User Guide ...

Page 81: ...ardous substances in electrical and electronic equipment RoHS recast or RoHS 2 For more information about Lenovo progress on RoHS go to http www lenovo com social_responsibility us en RoHS_Communication pdf China RoHS Turkish RoHS The Lenovo product meets the requirements of the Republic of Turkey Directive on the Restriction of the Use of Certain Hazardous Substances in Electrical and Electronic ...

Page 82: ...Ukraine RoHS India RoHS RoHS compliant as per E Waste Management Handling Rules 2011 74 User Guide ...

Page 83: ......

Page 84: ......

Reviews: