background image

Interface

• 4-in-1 digital media card reader

• Audio connector

• HDMI connector

• Mini DisplayPort connector

• Always On USB 3.0 connector

• Two USB 3.0 connectors

• RJ45 Ethernet connector

• Smart-card reader (available on some models)

• Docking station connector (available on some models)

GPS and wireless features

• Global Positioning System (GPS) satellite receiver (available on models with wireless WAN)

• Integrated Bluetooth

• Integrated wireless LAN

• Integrated wireless WAN (available on some models)

• WiGig (available on some models)

Security feature

• Fingerprint reader (available on some models)

Specifications

Size

• Width: 305.5 mm (12 inches)

• Depth: 208.5 mm (8.2 inches)

• Height: 20.3 mm (0.8 inch)

Heat output

• 45 W (154 Btu/hr) maximum

Power source (ac power adapter)

• Sine-wave input at 50 to 60 Hz

• Input rating of the ac power adapter: 100 to 240 V ac, 50 to 60 Hz

Operating environment

Environment

• Maximum altitude without pressurization: 3048 m (10 000 ft)

• Temperature

– At altitudes up to 2438 m (8000 ft)

– Operating: 5.0°C to 35.0°C (41°F to 95°F)

– Storage: 5.0°C to 43.0°C (41°F to 109°F)

Chapter 1

.

Product overview

11

Summary of Contents for ThinkPad X260

Page 1: ...ThinkPad X260 User Guide ...

Page 2: ... 157 The latest Safety Warranty and Setup Guide and the Regulatory Notice are available on the Lenovo Support Web site at http www lenovo com UserManuals First Edition December 2015 Copyright Lenovo 2015 LIMITED AND RESTRICTED RIGHTS NOTICE If data or software is delivered pursuant a General Services Administration GSA contract use reproduction or disclosure is subject to restrictions set forth in...

Page 3: ...ing help about the Windows operating system 16 Special keys 17 Function keys and key combinations 17 Windows key 19 ThinkPad pointing device 19 TrackPoint pointing device 20 Trackpad 20 Trackpad touch gestures 21 Replacing the cap of the pointing stick 22 Customizing the ThinkPad pointing device 23 Power management 23 Using the ac power 23 Checking the battery status 24 Charging the batteries 24 M...

Page 4: ...em 102 Problems with ports and connectors 102 Chapter 9 Recovery overview 105 Recovery overview for the Windows 7 operating system 105 Creating and using a recovery media 105 Performing backup and recovery operations 106 Using the Rescue and Recovery workspace 107 Creating and using a rescue medium 108 Reinstalling preinstalled programs and device drivers 109 Solving recovery problems 110 Recovery...

Page 5: ...47 Japan notice for ac power cord 147 Lenovo product service information for Taiwan 148 Eurasian compliance mark 148 Brazil audio notice 148 Appendix C WEEE and recycling statements 149 Important WEEE information 149 Recycling information for China 149 Recycling information for Japan 149 Recycling information for Brazil 150 Battery recycling information for Taiwan 151 Battery recycling information...

Page 6: ...iv ThinkPad X260 User Guide ...

Page 7: ...yboard by lifting your hands from the palm rest Protect yourself from the heat generated by the ac power adapter When the ac power adapter is connected to an electrical outlet and your computer it generates heat Extended contact with your body even through clothing may cause a skin burn Do not place the ac power adapter in contact with any part of your body while it is in use Never use it to warm ...

Page 8: ... Lenovo Limited Warranty For more information see Warranty Information in the Safety Warranty and Setup Guide that comes with your computer Customer safety is important Our products are developed to be safe and effective However personal computers are electronic devices Power cords power adapters and other features can create potential safety risks that can result in physical injury or property da...

Page 9: ...rheating smoke sparks or fire Damage to a battery such as cracks dents or creases discharge from a battery or a buildup of foreign substances on the battery A cracking hissing or popping sound or strong odor that comes from the product Signs that liquid has been spilled or an object has fallen onto the computer product the power cord or power adapter The computer product power cord or power adapte...

Page 10: ...apters from liquids For instance do not leave your power cord or power adapter near sinks tubs toilets or on floors that are cleaned with liquid cleansers Liquids can cause a short circuit particularly if the power cord or power adapter has been stressed by misuse Liquids also can cause gradual corrosion of power cord terminals and or the connector terminals on a power adapter which can eventually...

Page 11: ...his is a safety feature Do not defeat this safety feature by trying to insert it into a non grounded outlet If you cannot insert the plug into the outlet contact an electrician for an approved outlet adapter or to replace the outlet with one that enables this safety feature Never overload an electrical outlet The overall system load should not exceed 80 percent of the branch circuit rating Consult...

Page 12: ...sh or puncture the battery Do not short circuit the battery or expose it to water or other liquids Keep the battery away from children Keep the battery away from fire Stop using the battery if it is damaged or if you notice any discharge or the buildup of foreign materials on the battery leads Store the rechargeable batteries or products containing the rechargeable batteries at room temperature ch...

Page 13: ...dtsc ca gov hazardouswaste perchlorate Heat and product ventilation DANGER Computers ac power adapters and many accessories can generate heat when turned on and when batteries are charging Notebook computers can generate a significant amount of heat due to their compact size Always follow these basic precautions When your computer is turned on or the battery is charging the base the palm rest and ...

Page 14: ...t exceed 35 C 95 F Electrical current safety information DANGER Electric current from power telephone and communication cables is hazardous To avoid a shock hazard Do not use your computer during a lightning storm Do not connect or disconnect any cables or perform installation maintenance or reconfiguration of this product during an electrical storm Connect all power cords to a properly wired and ...

Page 15: ...ones CAUTION Excessive sound pressure from earphones and headphones can cause hearing loss Adjustment of the equalizer to maximum increases the earphone and headphone output voltage and the sound pressure level Therefore to protect your hearing adjust the equalizer to an appropriate level Excessive use of headphones or earphones for a long period of time at high volume can be dangerous if the outp...

Page 16: ...s is replaced by trained service personnel Polyvinyl Chloride PVC cable and cord notice Many personal computer products and accessories contain cords cables or wires such as power cords or cords to connect the accessory to a personal computer If this product has such a cord cable or wire then the following warning applies WARNING Handling the cord on this product or cords associated with accessori...

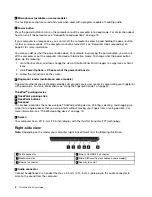
Page 17: ...puter hardware features to give you the basic information you need to start using the computer Front view Note Depending on the model your computer might look different from the following illustration 1 Camera available on some models 2 Microphones available on some models 3 Power button 4 Fingerprint reader available on some models 5 TrackPoint pointing stick 6 TrackPoint buttons 7 Trackpad 8 Scr...

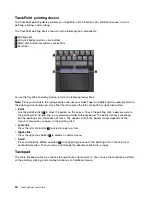
Page 18: ...ructions on the screen 4 Fingerprint reader available on some models Fingerprint authentication technology provides simple and secure user access by associating your fingerprint with passwords For more information see Using the fingerprint reader on page 57 ThinkPad pointing device 5 TrackPoint pointing stick 6 TrackPoint buttons 7 Trackpad The keyboard contains the Lenovo unique ThinkPad pointing...

Page 19: ...this connector ensure that the USB mark is facing upward Otherwise the connector might get damaged 3 Media card slot Your computer has a media card slot Insert your flash media card into this slot to read the data on the card For more information about the supported cards see Using a flash media card or a smart card on page 33 4 Micro SIM card tray available on some models If your computer has a w...

Page 20: ... from theft purchase a security cable lock that fits the security lock slot to lock the computer to a stationary object Note You are responsible for evaluating selecting and implementing the locking device and security feature Lenovo makes no comments judgments or warranties about the function quality or performance of the locking device and security feature 4 ThinkPad X260 User Guide ...

Page 21: ...DVD player or a high definition digital television HDTV 4 Mini DisplayPort connector Use the mini DisplayPort connector to connect your computer to a compatible projector external display or HDTV The mini DisplayPort connector of your computer supports audio as well as video streaming This compact connector enables a plug and play setup and supports adapters that can plug into Digital Visual Inter...

Page 22: ...c power is unavailable 3 Docking station connector You can use the connector to connect the computer to a supported docking station to extend the computer capabilities when you are at the office or at home For more information about the supported docking stations see ThinkPad docking stations on page 35 4 Speakers Your computer is equipped with a pair of stereo speakers Status indicators This topi...

Page 23: ... in use 4 6 System status indicators The indicator in the ThinkPad logo on the lid and the indicator in the center of the power button show the system status of the computer Blinks for three times The computer is initially connected to power On The computer is on in normal mode Blinks fast The computer is entering sleep or hibernation mode Blinks slowly The computer is in sleep mode Off The comput...

Page 24: ...hine type and model label identifies your computer When you contact Lenovo for help the machine type and model information helps support technicians to identify your computer and provide faster service Depending on the computer model the machine type and model label might be located on the computer cover under the battery or on the power adapter The following illustration shows the location of the...

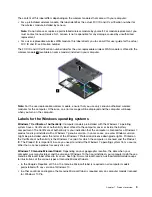
Page 25: ...ng system have a Certificate of Authenticity label affixed to the computer cover or inside the battery compartment The Certificate of Authenticity is your indication that the computer is licensed for a Windows 7 product and is preinstalled with a Windows 7 genuine version In some cases an earlier Windows version might be preinstalled under the terms of the Windows 7 Professional license downgrade ...

Page 26: ...oprocessor information of your computer do the following For Windows 7 Open the Start menu right click Computer and then click Properties For Windows 10 Do one of the following Open the Start menu and then click Settings If Settings is not displayed click All apps to display all programs and then click Settings System About Right click the Start button and select System Memory Double data rate 4 D...

Page 27: ...ated wireless WAN available on some models WiGig available on some models Security feature Fingerprint reader available on some models Specifications Size Width 305 5 mm 12 inches Depth 208 5 mm 8 2 inches Height 20 3 mm 0 8 inch Heat output 45 W 154 Btu hr maximum Power source ac power adapter Sine wave input at 50 to 60 Hz Input rating of the ac power adapter 100 to 240 V ac 50 to 60 Hz Operatin...

Page 28: ...s with Lenovo programs to help you work easily and securely Note The available programs are subject to change without notice To learn more about the programs and other computing solutions offered by Lenovo go to http www lenovo com support Accessing Lenovo programs To access Lenovo programs on your computer do the following 1 Click the Start button to open the Start menu Locate a program by the pr...

Page 29: ...ser interface is also automatically adjusted Communications Utility Windows 7 The Communications Utility program enables you to configure settings for the integrated camera and audio devices Fingerprint Manager Pro Lenovo Fingerprint Manager or Touch Fingerprint Manager Windows 7 If your computer comes with a fingerprint reader the Fingerprint Manager Pro program Lenovo Fingerprint Manager program...

Page 30: ...o such as alerts on system updates and alerts on conditions that require your attention Password Manager Windows 7 The Password Manager program automatically captures and fills in authentication information for Windows programs and Web sites Power Manager Windows 7 The Power Manager program provides convenient flexible and complete power management for the computer It enables you to adjust your co...

Page 31: ...tification of free software and special promotional offers To register your computer with Lenovo go to http www lenovo com register and follow the instructions on the screen If you are using a Windows 7 operating system you also can register your computer through the preinstalled Lenovo Product Registration program The program launches automatically after you have used your computer for a period o...

Page 32: ... external display Ensure that you follow the procedure in the topic Connecting an external display on page 30 With the Extend desktop function you can display output on both the computer display and the external display See Choosing a display mode on page 31 I have been using the computer for some time already and it is getting slower What should I do Follow the General tips for preventing problem...

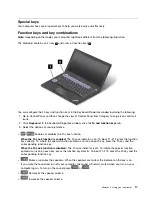
Page 33: ...Enables or disables the Fn Lock function When the Fn Lock function is enabled The Fn Lock indicator is on To input F1 F12 press the function keys directly To initiate the special function printed as an icon on each key press the Fn key and the corresponding function key When the Fn Lock function is disabled The Fn Lock indicator is off To initiate the special function printed as an icon on each ke...

Page 34: ...s Fn Spacebar Controls the keyboard backlight There are three modes for the keyboard backlight Off Low and High Press Fn Spacebar to change the mode of the keyboard backlight Fn 4 Puts the computer into sleep mode To return to normal operation press the Fn key or power button Fn End Has the same function as the Insert key on a conventional keyboard Fn B Has the same function as the Break key on a ...

Page 35: ...ointing device enables you to perform all the functions of a traditional mouse such as pointing clicking and scrolling With the ThinkPad pointing device you also can perform various touch gestures such as rotating and zooming in or out The ThinkPad pointing device consists of the following two devices 1 TrackPoint pointing device 2 Trackpad By default both the TrackPoint pointing device and the tr...

Page 36: ... move the pointer on the screen To use the pointing stick apply pressure to the pointing stick nonslip cap in any direction parallel to the keyboard The pointer moves accordingly but the pointing stick itself does not move The speed at which the pointer moves depends on the amount of pressure you apply to the pointing stick Left click Press the left click button 2 to select or open an item Right c...

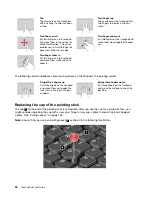
Page 37: ...the trackpad and move them in the vertical or horizontal direction This action enables you to scroll through the document Web site or apps Ensure that you position your two fingers slightly apart from each other With the trackpad you also can perform various touch gestures For information about using the touch gestures see Trackpad touch gestures on page 21 Trackpad touch gestures The following se...

Page 38: ... to zoom in The following section introduces some touch gestures on the Windows 10 operating system Swipe three fingers up Put three fingers on the trackpad and move them up to open the task view to see all your open windows Swipe three fingers down Put three fingers on the trackpad and move them down to show the desktop Replacing the cap of the pointing stick The cap 1 on the end of the pointing ...

Page 39: ... power The power to run your computer can come either from the removable battery the built in battery or from ac power through the ac power adapter While you use ac power the batteries charge automatically Connecting the ac power adapter To connect the ac power adapter do the following Attention Using an improper power cord might severely damage the computer Note Ensure that you perform the action...

Page 40: ...ree hours The charging time is affected by the battery size and the physical environment You can check the battery charging status at any time through the battery status icon in the Windows notification area Note To maximize the life of the battery the computer does not start recharging the battery if the remaining power is greater than 95 Managing the battery power To achieve the best balance bet...

Page 41: ...to Control Panel and click System and Security 2 Click Administrative Tools 3 Click Task Scheduler If you are prompted for an administrator password or confirmation type the password or provide confirmation 4 From the left pane select the task folder for which you want to enable the wake up function The scheduled tasks are displayed 5 Click a scheduled task and then click the Conditions tab 6 Unde...

Page 42: ... if you notice any discharge from your battery or the buildup of foreign materials on the battery leads stop using the battery and obtain a replacement from the battery manufacturer DANGER Only recharge the battery pack strictly according to instructions included in the product documentation DANGER Do not put the battery pack in trash that is disposed of in landfills When disposing of the battery ...

Page 43: ... connect to this type of network Your computer comes with a built in wireless network card and a configuration utility to help you establish wireless connections and monitor the connection status This enables you to stay connected to your network while you are at the office in a meeting room or at home with no need for a wired connection To establish a wireless LAN connection do the following 1 Cl...

Page 44: ...on No signal Power to the wireless radio is on The signal strength of the wireless connection is excellent Power to the wireless radio is on The signal strength of the wireless connection is marginal Power to the wireless radio is on The signal strength of the wireless connection is poor To improve signal strength move your computer closer to the wireless access point Using the wireless WAN connec...

Page 45: ...ofile is active or none exists Current location profile is disconnected Current location profile is connected Wireless status icon status Power to the WAN radio is off No association No signal Weak signal Medium signal Strong signal Using the Bluetooth connection Bluetooth can connect devices that are a short distance from one another It is commonly used for connecting peripheral devices to a comp...

Page 46: ...nected to the HDMI connector of your computer Up to 2560 x 1600 with an external display connected to the mini DisplayPort connector of your computer For more information about the external display refer to the manuals provided with it Connecting an external display You can use either a wired display or a wireless display The wired display can be connected to the HDMI or mini DisplayPort connector...

Page 47: ...ideo output from your computer display to an external display You can drag and move items between the two displays Projector only Shows the video output only on an external display Note Depending on the situation you might see Projector only or Second screen only Note If you show DOS or programs using DirectDraw or Direct3D in full screen mode only the main display shows the video output Changing ...

Page 48: ... 12 For Windows 10 Open the Start menu and click Camera from the all apps list When the camera is started the green camera in use indicator turns on You also can use the integrated camera with other programs that provide features such as photographing video capturing and video conferencing To use the integrated camera with other programs open one of the programs and start the photographing video c...

Page 49: ...ia card or a smart card do not put your computer into sleep or hibernation mode before the data transfer is completed otherwise your data could get damaged Installing a flash media card or a smart card Attention Before you start installing a card touch a metal table or a grounded metal object This action reduces any static electricity from your body The static electricity could damage the card To ...

Page 50: ...ration To remove a flash media card or a smart card do the following 1 Click the triangular icon in the Windows notification area to show hidden icons Then right click the Safely Remove Hardware and Eject Media icon 2 Select the item you want to remove to stop the card 3 Press the card to eject it from your computer 4 Remove the card and store it safely for future use Note If you do not remove the...

Page 51: ...als ThinkPad docking stations You can attach your computer to one of the supported docking stations to expand working capability Your computer might support the following docking stations ThinkPad Basic Dock ThinkPad Basic USB 3 0 Dock ThinkPad Pro Dock ThinkPad Ultra Dock ThinkPad USB 3 0 Dock ThinkPad USB 3 0 Ultra Pro Dock CAUTION When the computer is attached to a docking station never pick up...

Page 52: ... connector Used to attach your computer Rear view 1 Always On USB connector Used to connect devices that are compatible with USB 2 0 or charge some mobile digital devices and smartphones when your computer is in sleep or hibernation mode 2 USB 2 0 connectors Used to connect devices that are compatible with USB 2 0 3 USB 3 0 connector Used to connect devices that are compatible with USB 3 0 4 Ether...

Page 53: ...r 2 Key lock indicator This indicator turns on when the system lock key is in the locked position 3 Docking status indicator This indicator turns on when your computer is docked 4 Eject button Press the eject button to release the computer from the docking station 5 Sliding adjuster Use the sliding adjuster as a guide to align the docking station connector on your computer when you attach the dock...

Page 54: ...r Used to connect the ac power adapter 6 DisplayPort connector Used to attach a high performance monitor a direct drive monitor or other devices that use a DisplayPort connector 7 DVI connector Used to connect a monitor that supports Digital Visual Interface DVI connection Note The DVI connector provides a digital interface only This connector can only be used with a computer that supports DVI con...

Page 55: ...e locked position 3 Docking status indicator This indicator turns on when your computer is docked 4 Eject button Press the eject button to release the computer from the docking station 5 Sliding adjuster Use the sliding adjuster as a guide to align the docking station connector on your computer when you attach the docking station 6 Docking station connector Used to attach your computer 7 System lo...

Page 56: ...dapter 6 DisplayPort connectors Used to attach a high performance monitor a direct drive monitor or other devices that use a DisplayPort connector 7 HDMI connector Used to connect a high definition television 8 DVI connector Used to connect a monitor that supports Digital Visual Interface DVI connection Note The DVI connector provides a digital interface only This connector can only be used with a...

Page 57: ...al 3 Align the top left corner of the computer with the position mark of the docking station Insert your computer into the docking station vertically until you hear a click 1 The computer is attached to the docking station Then turn the system lock key to the locked position 2 4 Check the docking status indicator If the docking status indicator is not turned on it indicates that your computer is n...

Page 58: ...mputer moves up Then grasp both sides of the computer to remove it Guidelines on connecting multiple external displays to a docking station You can connect multiple external displays to a supported ThinkPad docking station To ensure that the multiple displays work correctly observe the following guidelines and connect the displays to appropriate connectors Do not use the connector combinations as ...

Page 59: ...computer display can work at the same time As a result if you connect three external displays to the ThinkPad Ultra Dock the display connected to the VGA connector will not work when your computer display is on When the computer display is off When the computer display is on Chapter 3 Enhancing your computer 43 ...

Page 60: ...ton of the docking station is locked and you cannot remove your computer The key lock indicator is on when the eject button is locked The security cable is locked When the key is in position 2 the eject button of the docking station is unlocked and you can remove your computer The key lock indicator is off when the eject button is unlocked The security cable is locked 44 ThinkPad X260 User Guide ...

Page 61: ...e surrounding light sources proper seating and the placement of your computer hardware can help you improve your performance and achieve greater comfort The following example shows someone in a conventional setting Even when not in such a setting you can follow many of these tips Develop good habits and they will serve you well General posture Make minor modifications in your working posture to de...

Page 62: ...equent work breaks are the key ingredients for healthy computing Your computer is light and mobile you can easily reposition your working surface to accommodate many posture modifications Work area setup options Familiarize yourself with all of your office furniture so that you know how to adjust your work surface seat and other work tools to accommodate your preferences for comfort If your work a...

Page 63: ...sages On Screen Keyboard If you prefer to type or enter data into your computer using a mouse joystick or other pointing device instead of a physical keyboard you can use On Screen Keyboard On Screen Keyboard displays a visual keyboard with all the standard keys You can select keys using the mouse or another pointing device or you can tap to select the keys if your computer supports multi touch sc...

Page 64: ...ight prevent some items from fitting on the screen Customizable item size You can make the items on your screen easier to read by changing the item size To change the item size temporarily use the Magnifier tool in Ease of Access Center See Ease of Access Center on page 47 To change the item size permanently do the following Change the size of all the items on your screen 1 Go to Control Panel and...

Page 65: ... tips If you intend to use your computer or wireless services such as Internet and Bluetooth check with the airline for restrictions and availability of services before boarding the airplane If there are restrictions on the use of computers with wireless features on the airplane you must abide by those restrictions If necessary enable the Airplane mode before boarding In the Airplane mode all wire...

Page 66: ...50 ThinkPad X260 User Guide ...

Page 67: ...be prompted to enter it Typing passwords When this icon is displayed type a power on password or a supervisor password When this icon is displayed type a user hard disk password To type a master hard disk password press F1 When the icon changes to type the master hard disk password Note To return to the icon press F1 again Power on password You can set a power on password to help protect your comp...

Page 68: ...n stored in the ThinkPad Setup program If you have set a supervisor password no one can change the configuration of the computer without the password It provides the following security features If only a supervisor password is set a password prompt is displayed when you try to start the ThinkPad Setup program Unauthorized users cannot access the ThinkPad Setup program without the password The syst...

Page 69: ... New Password field type the new supervisor password and press Enter then retype the password in the Confirm New Password field and press Enter To remove a password do the following a In the Enter Current Password field type the current supervisor password and press Enter b Leave the Enter New Password and Confirm New Password fields blank Press Enter twice 4 A Setup Notice window is displayed Pre...

Page 70: ... If you select User Master do the following a First set a user hard disk password When a message window prompts you to set the user hard disk password press Enter to continue Type your new user hard disk password in the Enter New Password field and press Enter Retype the password in the Confirm New Password field and press Enter b Then set a master hard disk password When a message window prompts ...

Page 71: ...f you set a hard disk password of over seven characters the hard disk drive can be used only with a computer that can recognize a hard disk password of over seven characters If you then install the hard disk drive in a computer that cannot recognize a hard disk password that contains more than seven characters you cannot access the drive Record your password and store it in a safe place If you for...

Page 72: ...Encryption For more information about Windows BitLocker Drive Encryption see the help information system of the Windows operating system or search for Microsoft Windows BitLocker Drive Encryption Step by Step Guide on the Microsoft Web site Disk Encryption storage drive Some models contain the Disk Encryption storage drive This feature helps to protect your computer against security attacks on med...

Page 73: ... fingerprints with your power on password and hard disk password manually create a connection Enrolling your fingerprints It is recommended that you enroll more than one fingerprint in case of any injuries to your fingers To enroll your fingerprints do the following For Windows 7 1 Start the Fingerprint Manager Pro program For instructions on how to start the Fingerprint Manager Pro program see Le...

Page 74: ...e top joint of your finger on the sensor 2 Apply light pressure and swipe your finger toward you across the reader in one smooth motion Do not lift your finger when you are swiping it 58 ThinkPad X260 User Guide ...

Page 75: ...e your computer to a Lenovo authorized servicer or a marketing representative to have the password canceled If you forget your hard disk password Lenovo cannot reset your password or recover data from the storage drive You must take your computer to a Lenovo authorized servicer or a marketing representative to have the storage drive replaced Proof of purchase is required and a fee will be charged ...

Page 76: ... finger is wrinkled Your finger is rough dry or injured Your finger is stained with dirt mud or oil The surface of your finger is different from when you enrolled your fingerprint Your finger is wet A finger is used that has not been enrolled To improve the situation try the following Clean or wipe your hands to remove any excess dirt or moisture from the fingers Enroll and use a different finger ...

Page 77: ...o http www lenovo com support to download the tool If an Encryption storage drive is supported and installed in your computer you can logically dispose of all the data on the drive in a short time by erasing the cryptographic key The data encrypted with the old key is not physically erased but remains on the drive however it cannot be decrypted without the old key This feature is also available wi...

Page 78: ...62 ThinkPad X260 User Guide ...

Page 79: ...ing the ThinkPad Setup program on page 65 3 Select Startup Boot to display the Boot Priority Order submenu 4 Select the drive that contains the operating system installation program for example USB HDD Then press Esc 5 Select Startup UEFI Legacy Boot Then do one of the following To install the Windows 7 32 bit operating system select Legacy Only or Both To install the Windows 7 64 bit operating sy...

Page 80: ... following 1 Start the ThinkPad Setup program See Using the ThinkPad Setup program on page 65 2 Select Startup Boot to display the Boot Priority Order submenu 3 Select the drive that contains the operating system installation program for example USB HDD Then press Esc 4 Select Restart and ensure that OS Optimized Defaults is enabled Then press the F9 key to load default settings 5 Press the F10 ke...

Page 81: ... and device drivers on page 109 Using the ThinkPad Setup program The ThinkPad Setup program enables you to select various setup configurations for your computer through configuring the BIOS To configure the BIOS of your computer do the following 1 Restart the computer When the ThinkPad logo is displayed press F1 The ThinkPad Setup program starts Note If you are required to enter the supervisor pas...

Page 82: ...ID OA2 Config menu To change the configuration of your computer select the Config tab from the ThinkPad Setup menu The following table lists the Config menu items Default values are in boldface The menu items might change without notice Depending on the model the default value might vary Attention The default configurations are already optimized for you Improper change of the configurations might ...

Page 83: ...tocol Version 6 IPv6 network stack for UEFI environment UEFI PXE Boot Priority for UEFI Only boot mode or Both with UEFI first for boot capability and IPv6 and IPv4 stacks are both enabled IPv6 First IPv4 First Select network stack priority for UEFI PXE boot USB UEFI BIOS Support Disabled Enabled Enable or disable boot support for USB storage devices Always On USB Disabled Enabled If you select En...

Page 84: ... above two options press Fn Esc to enable FnLock The FnLock indicator is on when FnLock is enabled Keyboard Mouse Fn Sticky key Disabled Enabled When the option is enabled you can press the Fn key to keep it in a pressed condition then press the desired function key The action is equivalent to pressing the required key simultaneously with the Fn key When you press the Fn key twice the state is loc...

Page 85: ...attery Maximum Performance Battery Optimized Select the mode of Intel SpeedStep technology at runtime Maximum Performance Always highest speed Battery Optimized Always lowest speed Disabled No runtime support highest speed Adaptive Thermal Management Scheme for AC Maximize Performance Balanced Scheme for Battery Maximize Performance Balanced Select a thermal management scheme to use Maximize Perfo...

Page 86: ... Disabled Enable or disable keyboard beep when unmanageable key combinations are pressed Intel AMT Control Disabled Enabled Permanently Disabled If you select Enabled Intel AMT Active Management Technology is configured and additional setup items are provided in MEBx Management Engine BIOS Extension Setup If you select Permanently Disabled you will never be able to enable it again Be cautious when...

Page 87: ...tem Value Comments Supervisor Password Disabled Enabled See Supervisor password on page 52 Lock UEFI BIOS Settings Disabled Enabled Enable or disable the function that protects items in ThinkPad Setup from being changed by a user who does not have the supervisor password By default this is set to Disabled If you set the supervisor password and enable this function no one but you can change any ite...

Page 88: ...ote Hard Disk 1 means the hard disk drive built into your computer Predesktop Authentication Disabled Enabled Enable or disable fingerprint authentication before the operating system is loaded Reader Priority External Internal Internal Only If External Internal is selected an external fingerprint reader is used if attached Otherwise an internal fingerprint reader is used If Internal Only is select...

Page 89: ...he security chip is hidden and it is not functional Note This item is displayed when Security Chip Selection is set to Discrete TPM Security Chip Enabled Disabled If you select Enabled the security chip is functional If you select Disabled the security chip is hidden and it is not functional Note This item is displayed when Security Chip Selection is set to Intel PTT Clear Security Chip Enter Clea...

Page 90: ...rectly select Disabled and reset the setting Intel Virtualization Technology Disabled Enabled If you select Enabled a Virtual Machine Monitor VMM can utilize the additional hardware capabilities provided by Intel Virtualization Technology Virtualization Intel VT d Feature Disabled Enabled Intel VT d stands for Intel Virtualization Technology for Directed I O When enabled a VMM can utilize the plat...

Page 91: ... Boot feature Select Enable to prevent unauthorized operating systems from running at boot time Select Disabled to allow any operating systems to run at boot time Platform Mode Setup Mode User Mode Specify the system operating mode Secure Boot Mode Standard Mode Custom Mode Specify the Secure Boot mode Reset to Setup Mode This option is used to clear the current platform key and put the system int...

Page 92: ...are displayed on the menu only if the computer supports the corresponding features Table 4 Startup menu items Menu item Value Comments Boot Select the boot device when you press the power button to turn on the computer Network Boot Select the boot device when the system wakes from LAN If Wake On LAN is enabled the network administrator can turn on all of the computers in a LAN remotely by use of n...

Page 93: ...anges Discard the changes and restart the computer Load Setup Defaults Restore to the factory default settings Note Enable OS Optimized Defaults to meet the Windows 10 certification requirement When you change this setting some other settings are changed automatically such as CSM Support UEFI Legacy Boot Secure Boot and Secure RollBack Prevention Discard Changes Discard the changes Save Changes Sa...

Page 94: ...opriate LAN card your computer can be started from the PXE server Note The Remote Initial Program Load RIPL or RPL function cannot be used with your computer Wake on LAN The network administrator can turn on a computer from a management console by using the Wake on LAN feature When the Wake on LAN feature is enabled many operations such as data transfer software updates and Flash updates of the UE...

Page 95: ...fied on the Network Boot menu and then follow the boot order list on the Boot menu To define a Network Boot sequence do the following 1 Start the ThinkPad Setup program See Using the ThinkPad Setup program on page 65 2 Select Startup Network Boot The boot device list is displayed 3 Select a boot device to make it as the top boot priority 4 Press the F10 key to save and exit Note You can press the ...

Page 96: ...80 ThinkPad X260 User Guide ...

Page 97: ...d are easily installed Schedule system restore operations to take a system snapshot periodically For more information about system restore see Chapter 9 Recovery overview on page 105 Update device drivers and UEFI BIOS when needed Profile your machine at http www lenovo com support to keep up to date with current drivers and revisions Keep up to date for device drivers on other non Lenovo hardware...

Page 98: ...dated device drivers from the Lenovo Web site by doing the following 1 Go to http www lenovo com ThinkPadDrivers 2 Select the entry for your computer and then follow the instructions on the screen to download and install necessary software Getting the latest drivers using System Update The System Update program helps you keep the software on your computer up to date Update packages are stored on L...

Page 99: ...when using the computer close to an appliance that can produce negative ions give special attention to the following Avoid directly exposing your computer to the air from an appliance that can produce negative ions Keep your computer and peripherals as far as possible from such an appliance Wherever possible ground your computer to facilitate safe electrostatic discharge Note Not all such applianc...

Page 100: ...gerprint reader is dirty or stained The surface of the fingerprint reader is wet The fingerprint reader often fails to enroll or authenticate your fingerprint Register your computer Register your ThinkPad computer with Lenovo at http www lenovo com register For more information see Registering your computer on page 15 Be sure not to modify your computer Only an authorized ThinkPad repair technicia...

Page 101: ...n the computer display do the following 1 Gently wipe the display with a dry soft lint free cloth If you see a scratchlike mark on your display it might be a stain transferred from the keyboard or the TrackPoint pointing stick when the cover was pressed from the outside 2 Wipe or dust the stain gently with a soft dry cloth 3 If the stain remains moisten a soft lint free cloth with water or a 50 50...

Page 102: ...86 ThinkPad X260 User Guide ...

Page 103: ...ry default state For more information see Performing backup and recovery operations on page 106 To run the Lenovo Solution Center program see Lenovo programs on page 12 For additional information refer to the Lenovo Solution Center help system Note If you are unable to isolate and repair the problem yourself after running Lenovo Solution Center program save and print the log files created by the p...

Page 104: ...tentially causing irreparable damage to your computer If you spill something on your computer Attention Be sure that no liquid creates a short circuit between you and the ac power adapter if in use Although you might lose some data or work by turning off the computer immediately leaving the computer on might make your computer unusable 1 Carefully unplug the ac power adapter immediately 2 Turn off...

Page 105: ...n error on HDD0 Main HDD Solution The hard disk is not working Have the hard disk serviced Message 2110 Read error on HDD0 Main HDD Solution The hard disk is not working Have the hard disk serviced Message 2200 Machine Type and Serial Number are invalid Solution Machine Type and Serial Number are invalid Have the computer serviced Message 2201 Machine UUID is invalid Solution Machine UUID is inval...

Page 106: ...ystem board problem Shut down the computer immediately and have the computer serviced Five short beeps pause five more short beeps and pause TCG compliant functionality related problem might be the BIOS code validation failure Shut down the computer immediately and have the computer serviced Memory module problems Print these instructions now and keep the instructions with your computer for refere...

Page 107: ...nections You have installed all networking software that is necessary for your network environment Check with your LAN administrator for the necessary networking software Problem The adapter stops working for no apparent reason Solution The network driver files might be corrupt or missing Update the driver by referring to the previous solution for the procedure to make sure that the correct device...

Page 108: ...d Sound Playback 3 If you are using a Headset profile select Bluetooth Hands free Audio and click the Set Default button If you are using an AV profile select Stereo Audio and click the Set Default button 4 Click OK to close the Sound window Problem PIM items sent from the Windows 7 operating systems cannot be received correctly into the address book of any other Bluetooth enabled device Solution ...

Page 109: ...splays and multimedia devices including the computer display the external display audio devices and the optical drive Computer screen problems Problem My screen keeps blanking when I do not want it to Solution If your computer is preinstalled with the Windows 7 operating system you can disable any system timers such as the LCD turn off timer or the blank timer by doing the following 1 Start Power ...

Page 110: ...ad or press a key to exit the screen saver Press the power button to resume the computer from sleep or hibernation mode Problem The screen is blank Solution Do the following Press the display mode switching key to bring up the image If you are using the ac power adapter or using the batteries and the battery status icon shows that the batteries are not depleted press the brightness up key to make ...

Page 111: ... your computer Solution Press and hold the power button for four seconds or more to turn off your computer then turn it on again Problem Missing discolored or bright dots appear on the screen every time you turn on your computer Solution This is an intrinsic characteristic of the TFT technology Your computer display contains multiple thin film transistors TFTs A small number of missing discolored ...

Page 112: ...and then click Update driver 10 Click Browse my computer for driver software and then click Let me pick from a list of device drivers on my computer 11 Clear the Show compatible hardware check box 12 Select the correct manufacturer and model for the external display If you cannot find your monitor on the list stop the installation of this driver and use the driver shipped with your monitor 13 Afte...

Page 113: ...elf and adjust the settings there Usually the external display has buttons for access to the setup menu For details see the documentation that comes with the monitor Problem DVI monitor cannot be recognized Solution Ensure that you connect the DVI monitor to the supported docking station first and then turn on the DVI monitor before you turn on the computer Problem The option for enabling the DVI ...

Page 114: ...e grayed out This means that its position is fixed by the hardware and cannot be changed Problem The volume sliders do not stay in place when some audio programs are used Solution It is normal for the sliders to change position when certain sound programs are used The programs are aware of the settings in the Volume Mixer window and are allowed to change the settings themselves An example is the W...

Page 115: ...e with fully charged batteries Solution The surge protector in the battery might be active Turn off the computer for one minute to reset the protector then turn on the computer again Problem The batteries cannot be charged Solution You cannot charge a battery when it is too hot Turn off the computer and allow it to cool to room temperature After it cools recharge the batteries If the batteries sti...

Page 116: ...n Turn off the computer by pressing and holding the power button for four seconds or more If the system is still not reset remove the ac power adapter and reset the system by inserting one end of a needle or a straightened paper clip into the emergency reset hole To locate the emergency reset hole refer to Bottom view on page 6 Boot problems Print these instructions now and keep them with your com...

Page 117: ... or in hibernation mode Connect the ac power adapter to the computer then press the power button to resume operation If the system still does not return from sleep mode your system might stop responding and you might not be able to turn off the computer In this case you need to reset the computer If you have not saved your data it might be lost To reset the computer press and hold the power button...

Page 118: ...blem is not being caused by the application Check that your computer has the minimum required memory to run the application Refer to the manuals supplied with the application Check the following The application is designed to operate with your operating system Other applications run correctly on your computer The necessary device drivers are installed The application works when it is run on some o...

Page 119: ...hen you try to turn it on and does not respond when you try to resume operation Solution Make sure that The ac power adapter is connected to the docking station The computer is securely attached to the docking station Chapter 8 Troubleshooting computer problems 103 ...

Page 120: ...104 ThinkPad X260 User Guide ...

Page 121: ...eating and using a recovery media You can use recovery media to restore the hard disk drive or hybrid drive to the factory default settings Recovery media are useful if you transfer the computer to another area sell the computer recycle the computer or put the computer in an operational state after all other methods of recovery have failed As a precautionary measure it is important to create recov...

Page 122: ...e preinstalled If you need to recover or reinstall your Microsoft Office program you must use the Microsoft Office CD This disc is provided only with computers preinstalled with Microsoft Office Performing backup and recovery operations The Rescue and Recovery program enables you to back up all your storage drive contents including the operating system data files software programs and personal set...

Page 123: ...rage drive from a Rescue and Recovery backup If you have backed up your storage drive using the Rescue and Recovery program you can restore the storage drive from a Rescue and Recovery backup even if you cannot start the Windows operating system Restore your storage drive to the factory default settings The Rescue and Recovery workspace enables you to restore the complete contents of your storage ...

Page 124: ...dows 7 operating system do the following 1 From the Windows desktop click Start All Programs Lenovo PC Experience Lenovo Tools Enhanced Backup and Restore The Rescue and Recovery program opens 2 In the Rescue and Recovery main window click the Launch advanced Rescue and Recovery arrow 3 Click the Create Rescue Media icon The Create Rescue and Recovery Media window opens 4 In the Rescue Media area ...

Page 125: ...ce drivers only when it is necessary to correct a problem with your computer To reinstall a device driver for a factory installed device do the following 1 Turn on your computer 2 Go to the C SWTOOLS directory 3 Open the DRIVERS folder The folder contains several subfolders named for the various devices installed in your computer for example AUDIO and VIDEO 4 Open the subfolder for the device 5 Re...

Page 126: ...or use advanced startup options It is recommended that you create a recovery USB drive as early as possible Store the recovery USB drive as a backup or replacement for the Windows recovery programs For more information see Creating and using a recovery USB drive on page 111 Resetting your computer If your computer does not perform well you might consider resetting your computer In the resetting pr...

Page 127: ...ss make a backup copy of all the data that you want to keep To create a recovery USB drive do the following Note Ensure that your computer is connected to ac power during the following process 1 Connect a proper USB drive at least 16 GB of storage 2 Type recovery in the search box on the taskbar Then click Create a recovery drive 3 Click Yes in the User Account Control window to allow the Recovery...

Page 128: ...112 ThinkPad X260 User Guide ...

Page 129: ...itry Prevent others from touching components When you install a static sensitive option or CRU touch the static protective package that contains the part to a metal expansion slot cover or other unpainted metal surface on the computer for at least two seconds This reduces static electricity in the package and your body When possible remove the static sensitive part from the static protective packa...

Page 130: ...e computer or as part of the shipping contents If your computer does not come with a micro SIM card you can purchase one from the local service provider To install or replace the micro SIM card do the following 1 Turn off the computer and disconnect the ac power adapter and all cables from the computer 2 Locate the micro SIM card tray at the right side of the computer 3 Insert a straightened paper...

Page 131: ... this specific system and manufactured by Lenovo or an authorized builder The system does not support unauthorized batteries or batteries designed for other systems If an unauthorized battery or a battery designed for another system is installed the system will not charge Attention Lenovo has no responsibility for the performance or safety of unauthorized batteries and provides no warranties for f...

Page 132: ...it Do not drop crush or puncture the battery or make it subject to strong forces Battery abuse or mishandling can cause the battery to overheat which can cause gasses or flame to vent from the battery or coin cell battery To replace the removable battery do the following 1 Turn off the computer and disconnect the ac power adapter and all cables from the computer 2 Close the computer display and tu...

Page 133: ...4 Slide the other battery latch 1 to the unlocked position and detach the battery 2 from the base cover on the right 5 Remove the battery Chapter 10 Replacing devices 117 ...

Page 134: ...mation first See Important safety information on page vi To replace the base cover assembly do the following 1 Disable the built in battery See Disabling the built in battery on page 113 2 Turn off the computer and disconnect the ac power adapter and all cables from the computer 3 Close the computer display and turn the computer over 4 Remove the battery pack See Replacing the removable battery on...

Page 135: ...6 Pry up the latches and then remove the base cover assembly 7 Install the new base cover assembly in place 8 Tighten the screws to secure the base cover assembly Chapter 10 Replacing devices 119 ...

Page 136: ... absorbs any physical shocks Do not apply pressure to the cover of the storage drive Do not touch the connector Before removing the storage drive make a backup copy of all the information on it and then turn off the computer Never remove the storage drive while the computer is operating in sleep mode or in hibernation mode To replace the internal storage drive do the following Note Depending on th...

Page 137: ...6 Remove the screw that secures the storage drive 7 Slightly lift the storage drive 8 Disconnect the drive cable from the storage drive Chapter 10 Replacing devices 121 ...

Page 138: ...new storage drive Note Your computer might come with a Serial Advanced Technology Attachment SATA or Peripheral Component Interconnect Express PCIe drive Ensure that the new storage drive is of the same type with the removed one Otherwise the new storage drive might not adapt to the drive cable 122 ThinkPad X260 User Guide ...

Page 139: ... drive 1 and pivot it downward 2 Ensure that the new storage drive is seated into place 13 Ensure that the cable is routed under the speaker hook a Install the screw to secure the storage drive Chapter 10 Replacing devices 123 ...

Page 140: ...l storage drive cable and cable bracket do the following Note Depending on the computer model the internal storage drive and drive cable that come with your computer might look different from the illustrations in this topic 1 Disable the built in battery See Disabling the built in battery on page 113 2 Turn off the computer and disconnect the ac power adapter and all cables from the computer 3 Clo...

Page 141: ...6 Remove the screw that secures the storage drive 7 Slightly lift the storage drive 8 Disconnect the drive cable from the storage drive Chapter 10 Replacing devices 125 ...

Page 142: ...9 Remove the screw that secures the cable bracket 10 Remove the cable bracket 11 Detach the connector of the drive cable 126 ThinkPad X260 User Guide ...

Page 143: ...12 Attach the connector of the new drive cable 13 Install the new cable bracket 14 Install the screw to secure the new cable bracket Chapter 10 Replacing devices 127 ...

Page 144: ...ATA or PCIe drive Ensure that the new drive cable is of the same type with the removed one Otherwise the new drive cable might not adapt to the storage drive 16 Insert the storage drive 1 and pivot it downward 2 Ensure that the storage drive is seated into place 128 ThinkPad X260 User Guide ...

Page 145: ...computer Replacing a memory module Before you start print these instructions Read the important safety information first See Important safety information on page vi Increasing memory capacity is an effective way to make programs run faster You can increase memory capacity by replacing or adding a memory module Note The operating speed of the memory module has dependency on the system configuration...

Page 146: ...ing the built in battery on page 113 2 Turn off the computer and disconnect the ac power adapter and all cables from the computer 3 Close the computer display and turn the computer over 4 Remove the removable battery See Replacing the removable battery on page 115 5 Loosen the screws that secure the base cover assembly 1 Then remove the base cover assembly 2 6 Open the latches on both sides of the...

Page 147: ...emovable battery See Replacing the removable battery on page 115 10 Turn the computer over again Connect the ac power adapter and all cables Replacing an M 2 wireless WAN card Before you start print these instructions Read the important safety information first See Important safety information on page vi Notes The following information is only for user installable modules Depending on the model yo...

Page 148: ...uter display and turn the computer over 4 Remove the removable battery See Replacing the removable battery on page 115 5 Loosen the screws that secure the base cover assembly 1 Then remove the base cover assembly 2 6 If a tool is provided with the new card to help you disconnect cables use the tool to disconnect the cables from the old card If no such a tool is provided hold the cable connector wi...

Page 149: ... secured position and pivots upward 2 8 Carefully remove the wireless WAN card out of the slot 9 Align the notched edge of the new wireless WAN card with the key in the slot Then carefully insert the card into the slot Chapter 10 Replacing devices 133 ...

Page 150: ...at you connect the red cable to the main connector on the card and the blue cable to the auxiliary connector on the card 12 Reinstall the base cover assembly 1 and tighten the screws 2 13 Reinstall the removable battery See Replacing the removable battery on page 115 14 Turn the computer over again Connect the ac power adapter and all cables 134 ThinkPad X260 User Guide ...

Page 151: ...ing problem symptoms and details Collect the answers to the questions below before you call for help Then you will be able to get help as quickly as possible What is the problem Is it continuous or intermittent Is there an error message What is the error code if any What operating system are you using Which version Which software programs were running at the time of the problem Can the problem be ...

Page 152: ...oubleshooting information or the diagnostic programs might tell you that you need additional or updated device drivers or other software You can get the latest technical information and download device drivers and updates from the Lenovo Web site at http www lenovo com support Lenovo Support Web site Technical support information is available on the Lenovo Support Web site at http www lenovo com s...

Page 153: ...and model Serial numbers of your computer monitor and other components or your proof of purchase Description of the problem Exact wording of any error messages Hardware and software configuration information for your system Telephone numbers For a list of the Lenovo Support phone numbers for your country or region go to http www lenovo com support phone or refer to the Safety Warranty and Setup Gu...

Page 154: ...138 ThinkPad X260 User Guide ...

Page 155: ...ormation about how to use the Ubuntu operating system To access the help system from the Unity move your cursor to the Launch bar and then click the Help icon If you cannot find the Help icon from the Launch bar click the Search icon and type Help to search it To learn more about the Ubuntu operating system go to http www ubuntu com Supporting information If you need help service technical assista...

Page 156: ...x row keyboard Trackpad TrackPoint TrackPoint buttons Wireless feature Integrated wireless local area network LAN The following list provides information about components and features partly supported by Lenovo Note Depending on the model some of the components and features might not be available on your computer Bluetooth audio profiles Display 3D graphics Multiple display Keyboard Function keys ...

Page 157: ...ilable on your computer Accelerometer Docking station connector Fingerprint reader HDMI 5 1 channel Hybrid Graphic card Integrated wireless Wide Area Network WAN Modems Surround audio Smart card reader WiGig Appendix A Supplemental information about the Ubuntu operating system 141 ...

Page 158: ...142 ThinkPad X260 User Guide ...

Page 159: ... Sequence Spread Spectrum DSSS Complementary Code Keying CCK and or Orthogonal Frequency Division Multiplexing OFDM radio technology and is compliant to The 802 11b g Standard 802 11a b g or 802 11n or 802 11ac on Wireless LANs as defined and approved by the Institute of Electrical and Electronics Engineers The Wireless Fidelity WiFi certification as defined by the Wi Fi Alliance Your Bluetooth ca...

Page 160: ...etic energy emitted by wireless devices like for example mobile phones Due to the fact that integrated wireless cards operate within the guidelines found in radio frequency safety standards and recommendations Lenovo believes they are safe for use by consumers These standards and recommendations reflect the consensus of the scientific community and result from deliberations of panels and committee...

Page 161: ...vo no cause interferencia perjudicial y 2 este equipo o dispositivo debe aceptar cualquier interferencia incluyendo la que pueda causar su operación no deseada Locating wireless regulatory notices For more information about the wireless regulatory notices refer to the Regulatory Notice shipped with the computer If the computer is shipped without the Regulatory Notice you can find it on the Web sit...

Page 162: ...s Operation is subject to the following two conditions 1 this device may not cause harmful interference and 2 this device must accept any interference received including interference that may cause undesired operation Responsible Party Lenovo United States Incorporated 1009 Think Place Building One Morrisville NC 27560 Phone Number 919 294 5900 Industry Canada Class B emission compliance statement...

Page 163: ...romagnetische Verträglichkeit von Geräten Dies ist die Umsetzung der EU Richtlinie 2004 108 EG früher 89 336 EWG in der Bundesrepublik Deutschland Zulassungsbescheinigung laut dem Deutschen Gesetz über die elektromagnetische Verträglichkeit von Betriebsmitteln EMVG vom 20 Juli 2007 früher Gesetz über die elektromagnetische Verträglichkeit von Geräten bzw der EMV EG Richtlinie 2004 108 EC früher 89...

Page 164: ... product service information for Taiwan Eurasian compliance mark Brazil audio notice Ouvir sons com mais de 85 decibéis por longos períodos pode provocar danos ao sistema auditivo 148 ThinkPad X260 User Guide ...

Page 165: ...ather put in the established collection systems for reclaiming these end of life products Users of electrical and electronic equipment EEE with the WEEE marking must not dispose of end of life EEE as unsorted municipal waste but use the collection framework available to them for the return recycle and recovery of WEEE and to minimize any potential effects of EEE on the environment and human health...

Page 166: ...ons Disposal of a lithium battery must comply with local ordinances and regulations Disposing of a disused battery from Lenovo notebook computers Your Lenovo notebook computer has a lithium ion battery or a nickel metal hydride battery If you are a company employee who uses a Lenovo notebook computer and need to dispose of a battery contact the proper person in Lenovo sales service or marketing an...

Page 167: ...6 66 EC batteries and accumulators are labeled to indicate that they are to be collected separately and recycled at end of life The label on the battery may also include a chemical symbol for the metal concerned in the battery Pb for lead Hg for mercury and Cd for cadmium Users of batteries and accumulators must not dispose of batteries and accumulators as unsorted municipal waste but use the coll...

Page 168: ...152 ThinkPad X260 User Guide ...

Page 169: ...ous substances in electrical and electronic equipment RoHS recast or RoHS 2 For more information about Lenovo worldwide compliance on RoHS go to http www lenovo com social_responsibility us en RoHS_Communication pdf Turkish RoHS The Lenovo product meets the requirements of the Republic of Turkey Directive on the Restriction of the Use of Certain Hazardous Substances in Waste Electrical and Electro...

Page 170: ...China RoHS 154 ThinkPad X260 User Guide ...

Page 171: ...v Lenovo encourages you to make efficient use of energy an integral part of your day to day operations To help in this endeavor Lenovo has preset the following power management features to take effect when the computer has been inactive for a specified length of time Power plan Default Turn off the display After 10 minutes Put the computer into sleep After 20 minutes To awaken the computer from sl...

Page 172: ...5 Clear the Allow this device to wake the computer check box 6 Click OK 156 ThinkPad X260 User Guide ...

Page 173: ...e publication Lenovo may make improvements and or changes in the product s and or the program s described in this publication at any time without notice The products described in this document are not intended for use in implantation or other life support applications where malfunction may result in injury or death to persons The information contained in this document does not affect or change Len...

Page 174: ...ystem Lenovo Lenovo logo Rescue and Recovery Secure Data Disposal ThinkPad ThinkPad logo TrackPoint UltraConnect Intel and Intel SpeedStep are trademarks of Intel Corporation in the U S and or other countries BitLocker Cortana Direct3D Microsoft and Windows are trademarks of the Microsoft group of companies Mini DisplayPort mDP is a trademark of the Video Electronics Standards Association The term...

Page 175: ......

Page 176: ......

Reviews: