000000
000000
000000
000000
000000
0
0
0
000000
000000
000000
000000
000000
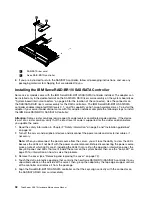
Attention:
To ensure proper operation, replace a failed fan as soon as possible.
5. If you are instructed to return the fan, follow all of the packaging instructions, and use any packaging
materials for shipping that are supplied to you.
Installing a hot-swap fan assembly
To install an additional hot-swap fan, complete the following steps:
1. Read the safety information in Chapter 2 “Safety information” on page 3 and “Installation guidelines”
on page 67.
2. Remove the cover (see “Removing and replacing the cover” on page 72).
3. Touch the static-protective package that contains the new fan to any unpainted metal surface on the
server. Then, remove the new fan from the package.
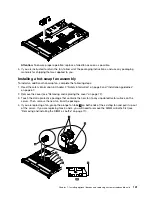
4. If you are replacing a fan, grasp the orange fan tabs
1
on both ends of the existing fan and pull it up out
of the server. If you are replacing fans 3 and 4, you will need to remove the DIMM air baffle first (see
“Removing and installing the DIMM air baffle” on page 77).
Chapter 7
.
Installing optional devices and replacing customer replaceable units
101
Summary of Contents for ThinkServer RD210
Page 1: ...ThinkServer RD210 Hardware Maintenance Manual ThinkServer RD210 Types 3795 3796 3818 and 3819 ...
Page 2: ......
Page 3: ...ThinkServer RD210 Hardware Maintenance Manual ThinkServer RD210 Types 3795 3796 3818 and 3819 ...
Page 7: ...Korean Class A warning statement 172 Copyright Lenovo 2005 2010 vii ...
Page 8: ...viii ThinkServer RD210 Hardware Maintenance Manual ...
Page 22: ...14 ThinkServer RD210 Hardware Maintenance Manual ...
Page 26: ...18 ThinkServer RD210 Hardware Maintenance Manual ...
Page 70: ...62 ThinkServer RD210 Hardware Maintenance Manual ...
Page 74: ...66 ThinkServer RD210 Hardware Maintenance Manual ...
Page 142: ...134 ThinkServer RD210 Hardware Maintenance Manual ...
Page 172: ...164 ThinkServer RD210 Hardware Maintenance Manual ...
Page 181: ......
Page 182: ...Part Number 40M2493 Printed in USA 1P P N 40M2493 40M2493 ...


