background image

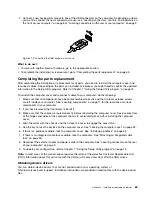
• To complete the installation or replacement, go to “Completing the parts replacement” on page 65.

Installing or replacing a hard disk drive
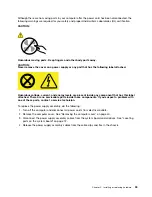
Attention:

Do not open your computer or attempt any repair before reading and understanding the “Important safety information”
on page v.

This section provides instructions on how to install or replace a hard disk drive.

Note:

If you are installing a SAS hard disk drive, you must ensure that the SAS hard disk drive enablement

module (one to three hard disk drives) or the LSI MegaRAID SAS adapter card is installed.

To install or replace a hard disk drive, do the following:

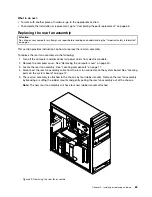
1. Turn off the computer and disconnect all power cords from electrical outlets.

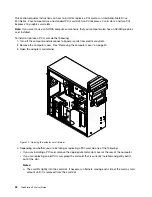
2. Remove the computer cover. See “Removing the computer cover” on page 40.

3. Locate the hard disk drive. See “Locating internal drives” on page 14.

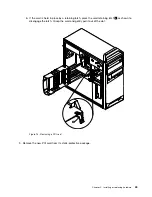
4. Disconnect the signal cable and the power cable from the hard disk drive.

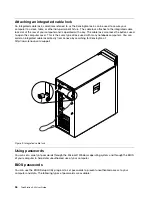
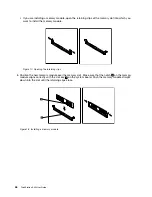
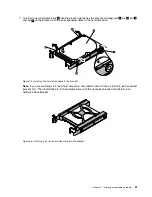
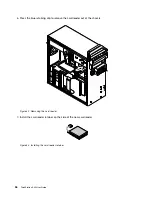
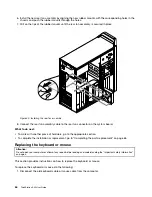
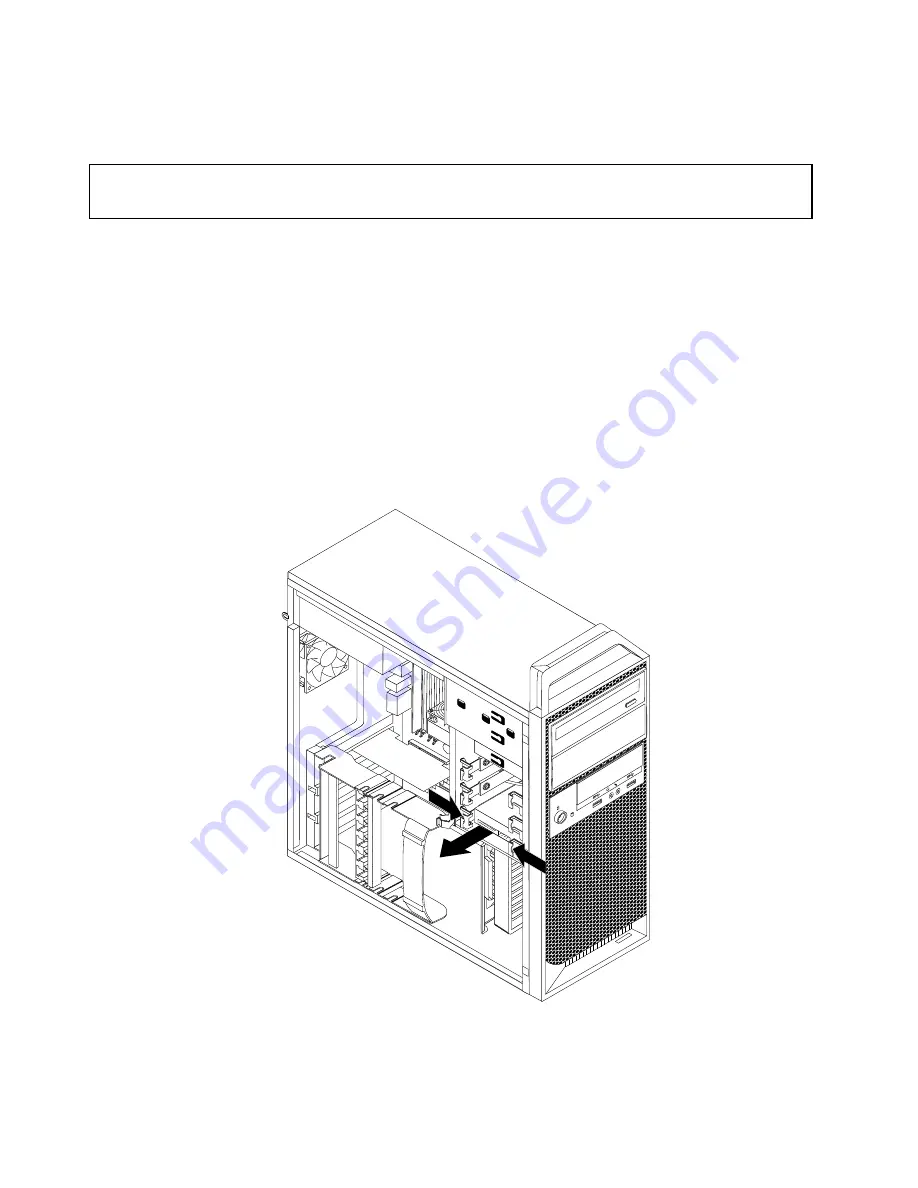
5. Gently press the two tabs of the hard disk drive bracket toward each other and then pull the bracket

handle out to remove the hard disk drive from the chassis.

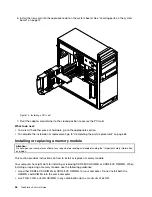
Figure 24. Removing a hard disk drive

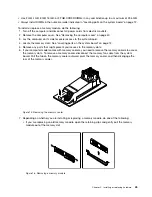
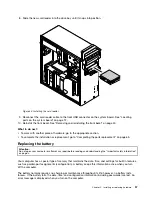
6. Gently flex the sides of the bracket to remove the hard disk drive from the bracket.

50

ThinkStation S30 User Guide

Summary of Contents for ThinkStation S30

Page 1: ...ThinkStation S30 User Guide ...

Page 2: ...tion on page v and Appendix B Notices on page 119 Sixth Edition March 2014 Copyright Lenovo 2011 2014 LIMITED AND RESTRICTED RIGHTS NOTICE If data or software is delivered pursuant a General Services Administration GSA contract use reproduction or disclosure is subject to restrictions set forth in Contract No GS 35F 05925 ...

Page 3: ...22 Setting the volume from Control Panel 22 Using CDs and DVDs 23 Handling and storing CD and DVD media 23 Playing a CD or DVD 23 Recording a CD or DVD 24 Chapter 3 You and your computer 25 Accessibility and comfort 25 Arranging your workspace 25 Comfort 25 Glare and lighting 26 Air circulation 26 Electrical outlets and cable lengths 26 Accessibility information 26 Register your computer with Leno...

Page 4: ...rd disk drives 81 Configuring SATA or SAS RAID functionality with Intel RSTe configuration utility 82 Entering the Intel RSTe configuration utility 82 Quick RAID setup using the LSI MegaRAID BIOS configuration utility 83 Installing SATA or SAS hard disk drives 84 Entering the LSI MegaRAID BIOS configuration utility 84 Creating RAID volumes using the LSI MegaRAID BIOS configuration utility 85 Delet...

Page 5: ...ectronic emissions notices 121 Federal Communications Commission Declaration of Conformity 121 Eurasian compliance mark 123 Brazil regulatory notice 123 Mexico regulatory notice 123 Appendix D WEEE and recycling information 125 Important WEEE Information 125 Recycling information for Japan 125 Recycling information for Brazil 126 Battery recycling information for Taiwan 126 Battery recycling infor...

Page 6: ...iv ThinkStation S30 User Guide ...

Page 7: ...re referred to as Customer Replaceable Units or CRUs Lenovo provides documentation with instructions when it is appropriate for customers to install options or replace CRUs You must closely follow all instructions when installing or replacing parts The Off state of a power indicator does not necessarily mean that voltage levels inside a product are zero Before you remove the covers from a product ...

Page 8: ...so can stress the cord in ways that can cause the cord to fray crack or crimp This can present a safety hazard Always route power cords so that they will not be walked on tripped over or pinched by objects Protect power cord and power adapters from liquids For instance do not leave your power cord or power adapter near sinks tubs toilets or on floors that are cleaned with liquid cleansers Liquids ...

Page 9: ...ou might damage your computer To avoid possible damage to attached devices wait at least five seconds after the computer is shut down to disconnect external devices Heat and product ventilation Computers power adapters and many accessories can generate heat when turned on and when batteries are charging Always follow these basic precautions Do not leave your computer power adapter or accessories i...

Page 10: ... to your computer If possible place your computer in a well ventilated and dry area without direct exposure to sunshine Keep electrical appliances such as an electric fan radio high powered speakers air conditioner and microwave oven away from your computer because the strong magnetic fields generated by these appliances can damage the monitor and data on the hard disk drive Do not place any bever...

Page 11: ...onents If you suspect a problem with one of these parts contact a service technician Cleaning and maintenance Keep your computer and workspace clean Shut down the computer and then disconnect the power cord before cleaning the computer Do not spray any liquid detergent directly on the computer or use any detergent containing flammable material to clean the computer Spray the detergent on a soft cl...

Page 12: ...x ThinkStation S30 User Guide ...

Page 13: ...n Microprocessor Your computer comes with an Intel Xeon microprocessor The processor speed the number of the available processor cores and the internal cache vary by machine type Memory Your computer supports up to eight DDR3 ECC UDIMMs double data rate 3 error correction code unbuffered dual inline memory modules or DDR3 ECC RDIMMs double data rate 3 error correction code registered dual inline m...

Page 14: ...or businesses to monitor maintain update upgrade and repair Intel Rapid Storage Technology enterprise RSTe Intel RSTe is a device driver and software solution that provides support for SATA RAID 0 1 and 5 arrays or SAS RAID 0 and 1 arrays the hard disk drive enablement module is required on specific Intel chipset system boards to enhance hard disk drive performance Preboot Execution Environment PX...

Page 15: ...e slot is x16 mechanical Two PCI Express x16 graphics card slots For detailed information see Locating internal drives on page 14 Power supply Your computer comes with a 610 watt automatic voltage sensing power supply Security features Cover presence switch also called intrusion switch available in some models Ability to enable or disable a device Ability to enable and disable USB 2 0 connectors i...

Page 16: ...terprise Linux Microsoft Windows XP Professional SP 3 1 The operating system s listed here are being certified or tested for compatibility at the time this publication goes to press Additional operating systems might be identified by Lenovo as compatible with your computer following the publication of this manual This list is subject to change To determine if an operating system has been certified...

Page 17: ...a level Humidity Operating 10 to 80 non condensing Storage 10 to 90 non condensing Altitude Operating 15 2 to 3 048 m 50 to 10 000 ft Electrical input Input voltage Low range Minimum 100 V ac Maximum 127 V ac Input frequency range 50 to 60 Hz High range Minimum 200 V ac Maximum 240 V ac Input frequency range 50 to 60 Hz Lenovo programs Your computer comes with Lenovo programs to help you work more...

Page 18: ...the dimmed icon to install the program you need Then follow the instructions on the screen When the installation process completes the program icon will be activated and you can find the program in Control Panel The programs and the corresponding sections and green texts in Control Panel are listed in the following table Table 2 Programs in Control Panel Program Control Panel section Green text in...

Page 19: ...cted at all times and enables you to access all your favorite items from personal computers smartphones or tablets With Lenovo Reach you can add your favorite Web services to your cloud desktop stay logged in to Web sites with the cloud password manager and access edit and share your files from anywhere Lenovo Solution Center The Lenovo Solution Center program enables you to troubleshoot and resol...

Page 20: ...f your computer parts on the system board and components and internal drives in your computer Locating connectors controls and indicators on the front of your computer The following figure shows the locations of the connectors controls and indicators on the front of your computer Figure 1 Front connector control and indicator locations 1 Optical drive eject close button 2 USB 3 0 connector 3 Micro...

Page 21: ... USB 3 0 connectors 2 9 USB 2 0 connectors 8 10 Serial connector Serial connector 1 Note If your computer is installed with a graphics card ensure that you use the monitor connectors on the graphics card Connector Description Audio line in connector Used to receive audio signals from an external audio device such as a stereo system When you attach an external audio device a cable is connected betw...

Page 22: ...f a DisplayPort connector PS 2 keyboard connector optional Used to attach a keyboard that uses a PS 2 keyboard connector This connector is available when you have an optional PS 2 keyboard and mouse adapter installed in your computer PS 2 mouse connector optional Used to attach a mouse a trackball or other pointing devices that use a PS 2 mouse connector This connector is available when you have a...

Page 23: ...r on page 40 Figure 3 Component locations 1 Heat sink and fan assembly 2 Optical drive bay 3 Card reader bay 4 Front bezel 5 Internal speaker 6 Adapter card guide 7 Hard disk drive or solid state drive 8 Adapter card retainer 9 PCI Express card installed in some models 10 Memory module s 11 Rear fan assembly 12 Power supply assembly Chapter 1 Product overview 11 ...

Page 24: ...tor 13 Front fan connector 14 Internal USB 2 0 connector 15 SATA connectors 1 and 2 SATA 3 0 connectors 16 SATA connectors 3 and 4 SATA 2 0 connectors 17 SATA SAS connectors for the hard disk drive 3 18 Hard disk drive LED LSI 19 Cover presence switch connector Intrusion switch connector 20 Front USB 2 0 connector for connecting the front USB 2 0 ports if applicable 21 Clear CMOS Recovery jumper 2...

Page 25: ...CI card slot 32 PCI Express x16 graphics card slot 33 PCI Express x4 card slot x16 mechanical 34 PCI Express x16 graphics card slot also supporting 400 GB Intel Solid State Drive 910 Series 35 Rear fan connector 36 4 pin power connector 37 Battery 38 Memory slot 1 DIMM1 39 Memory slot 5 DIMM5 40 Memory slot 2 DIMM2 41 Memory slot 6 DIMM6 Chapter 1 Product overview 13 ...

Page 26: ...each bay and correctly connect the cables to the drive installed Refer to the appropriate section in Installing or replacing hardware on page 39 for instructions on how to install or replace internal drives for your computer The following figure shows the locations of the drive bays Figure 5 Drive bay locations 1 Optical drive bay with an optical drive installed in some models 2 Optical drive bay ...

Page 27: ...act Lenovo for help the machine type and model information helps support technicians to identify your computer and provide faster service The following is a sample of the machine type and model label Machine Type XXXX Model Number XXX Figure 6 Machine type and model label Chapter 1 Product overview 15 ...

Page 28: ...16 ThinkStation S30 User Guide ...

Page 29: ...tem to help you get the most of your computer To access the Windows Help and Support information system do one of the following On the Windows 7 operating system click Start Help and Support On the Windows 8 or Windows 8 1 operating system move your pointer to the top right or bottom right corner of the screen to display the charms Then click Settings Help Additionally the Windows 8 1 operating sy...

Page 30: ...o the Start screen Using a pointing device Move the pointer to the extreme bottom left corner of the screen until a small representation of the Start screen is displayed then click the representation Using a touch screen Do one of the following Swipe in and out on the left edge of the screen Representations of all available workspaces are displayed along the left edge of the screen Tap the represe...

Page 31: ...con Using a touch screen Swipe in and out on the left edge of the screen Representations of all available workspaces are displayed along the left edge of the screen Tap the Windows screen control icon at the bottom Note The Windows screen control icon is displayed only if you have at least one active workspace in the background of the system From the desktop or any other workspace that is opened f...

Page 32: ...cessed workspace application PC settings or desktop do one of the following Using a pointing device Move the pointer to the extreme top left corner of the screen until the Windows screen control icon is displayed then click the icon Using a touch screen Swipe in from the left edge of the screen For information about using other features of the Windows 8 1 operating system open the Help Tips applic...

Page 33: ...ight side of the Spacebar Pressing the context menu key opens the context menu for the active program icon or object Note You can use the mouse or the Up and Down arrow keys to highlight menu selections On the Windows 7 operating system you can close the Start menu or the context menu by clicking the mouse or pressing Esc Using the wheel mouse The wheel mouse has the following controls 1 Primary m...

Page 34: ...ntrol Panel Appearance and Personalization 2 In the Taskbar and Start Menu section click Customize icons on the taskbar 3 Click Turn system icons on or off and change the volume behaviors from Off to On 4 Click OK to save the new settings To add the volume icon to the taskbar on the Windows 8 or Windows 8 1 operating system do the following 1 Open Control Panel and click Appearance and Personaliza...

Page 35: ... storing a CD or DVD follow these guidelines Hold the disc by its edges Do not touch the surface of the side that is not labeled To remove dust or fingerprints wipe the disc with a clean soft cloth from the center to the outside Wiping the disc in a circular direction might cause loss of data Do not write or stick paper on the disc Do not scratch or mark the disc Do not place or store the disc in ...

Page 36: ... the Corel DVD MovieFactory Lenovo Edition program click Start All Programs Corel DVD MovieFactory Lenovo Edition Corel DVD MovieFactory Lenovo Edition Follow the instructions on the screen To run the Power2Go program click Start All Programs PowerDVD Create Power2Go Follow the instructions on the screen On the Windows 8 operating system run the Power2Go program by doing the following 1 Move the p...

Page 37: ...u arrange your workspace Comfort Although no single working position is ideal for everyone here are a few guidelines to help you find a position that suits you best Sitting in the same position for a long time can cause fatigue The backrest and seat of your chair should adjust independently and provide good support The seat should have a curved front to relieve pressure on the thighs Adjust the se...

Page 38: ...hs The location of electrical outlets the length of power cords and cables that connect to the monitor printer and other devices might determine the final placement of your computer When arranging your workspace Avoid the use of extension cords When possible plug the computer power cord directly into an electrical outlet Keep power cords and cables neatly routed away from walkways and other areas ...

Page 39: ...technologies are primarily focused on software program interfaces help information systems and a variety of online documents For additional information about screen readers see the following Using PDFs with screen readers http www adobe com accessibility html promoid DJGVE Using the JAWS screen reader http www freedomscientific com jaws hq asp Using the NVDA screen reader http www nvaccess org Spe...

Page 40: ...to use and configure Magnifier see the Windows Help and Support information system Note For touch screen computer models you also can zoom in and zoom out by using touch gestures instead of the keyboard See Zoom on page 28 Zoom You can use the zoom feature to enlarge or reduce the size of text pictures maps or other objects From the keyboard Zoom in Press the Windows logo key the plus sign key to ...

Page 41: ...s You can select keys using the mouse or another pointing device or you can tap to select the keys if your computer supports multi touch screen To open On Screen Keyboard do the following For Windows 7 Click the Start button Then type On Screen Keyboard into the search field In the list of results click On Screen Keyboard For Windows 8 and Windows 8 1 Move your pointer to the top right or bottom r...

Page 42: ...lly after you have used your computer for a time Follow the instructions on the screen to register your computer For Windows 8 or Windows 8 1 On the Start screen open the Lenovo Support program Then click Registration and follow the instructions on the screen to register your computer Moving your computer to another country or region When you move your computer to another country or region you mus...

Page 43: ...e voltage rating label shows a dual range of 100 127 V and 200 240 V this signifies that the computer is suitable for worldwide operation and the computer will automatically adjust to the voltage at the electrical outlet regardless of the country or region where the computer is being connected Replacement power cords If you relocate your computer to a country or region that uses an electrical outl...

Page 44: ...32 ThinkStation S30 User Guide ...

Page 45: ...ence switch detects that your computer cover is not properly installed or closed when you turn on the computer an error message will be displayed To bypass the error message and log in to the operating system do the following 1 Properly install or close your computer cover See Completing the parts replacement on page 65 2 Press F1 to enter the Setup Utility program Then press F10 to save and exit ...

Page 46: ... of your computer There is a keylock 1 on the computer cover The keys 2 are attached to the rear of the computer For security store the keys in a secure place when you are not using them Note The keylock is only available in some models Figure 7 Locking the computer cover 34 ThinkStation S30 User Guide ...

Page 47: ...Installing a padlock Your computer comes with a padlock loop so that the computer cover cannot be removed when a padlock is installed Figure 8 Installing a padlock Chapter 4 Security 35 ...

Page 48: ...type of lock used with many notebook computers You can order an integrated cable lock directly from Lenovo by searching for Kensington at http www lenovo com support Figure 9 Integrated cable lock Using passwords You can set a variety of passwords through the Microsoft Windows operating system and through the BIOS of your computer to help deter unauthorized use of your computer BIOS passwords You ...

Page 49: ...cess and individual user settings For more information see Help and Support on page 113 Using and understanding firewalls A firewall can be hardware software or a combination of both depending on the level of security required Firewalls work on a set of rules to determine which inbound and outbound connections are authorized If your computer is preinstalled with a firewall program it helps protect...

Page 50: ...38 ThinkStation S30 User Guide ...

Page 51: ... setting the part down When this is not possible place the static protective package that the part came in on a smooth level surface and place the part on it Do not place the part on the computer cover or other metal surface Installing or replacing hardware This section provides instructions on how to install or replace hardware for your computer You can expand the capabilities of your computer an...

Page 52: ...sconnect the power cords Input Output cables and any other cables that are connected to the computer See Locating connectors controls and indicators on the front of your computer on page 8 and Locating connectors on the rear of your computer on page 9 4 Remove any locking device that secures the computer cover such as a padlock or an integrated cable lock See Locking the computer cover on page 34 ...

Page 53: ... front bezel 4 To reinstall the front bezel align the three plastic tabs on the right side of the front bezel with the corresponding holes in the chassis then pivot the front bezel inwards until it snaps into position on the left side What to do next To work with another piece of hardware go to the appropriate section To complete the installation or replacement go to Completing the parts replaceme...

Page 54: ...electrical outlets 2 Remove the computer cover See Removing the computer cover on page 40 3 Open the adapter card retainer Figure 12 Opening the adapter card retainer 4 Depending on whether you are installing or replacing a PCI card do one of the following If you are installing a PCI card remove the appropriate metal slot cover at the rear of the computer If you are replacing an old PCI card grasp...

Page 55: ... press the card retaining latch 1 as shown to disengage the latch Grasp the card and gently pull it out of the slot Figure 13 Removing a PCI card 5 Remove the new PCI card from its static protective package Chapter 5 Installing or replacing hardware 43 ...

Page 56: ...ng a memory module Attention Do not open your computer or attempt any repair before reading and understanding the Important safety information on page v This section provides instructions on how to install or replace a memory module Your computer has eight slots for installing or replacing DDR3 ECC UDIMMs or DDR3 ECC RDIMMs When installing or replacing a memory module use the following guidelines ...

Page 57: ...ard on page 12 5 Remove any parts that might prevent your access to the memory slots 6 If your computer model comes with memory coolers you need to remove the memory coolers to access the memory slots To remove a memory cooler disconnect the memory fan cable from the system board Pull the tab on the memory cooler outward pivot the memory cooler and then disengage the rear of the memory cooler Figu...

Page 58: ...17 Opening the retaining clips 8 Position the new memory module over the memory slot Make sure that the notch 1 on the memory module aligns correctly with the slot key 2 on the system board Push the memory module straight down into the slot until the retaining clips close Figure 18 Installing a memory module 46 ThinkStation S30 User Guide ...

Page 59: ...before reading and understanding the Important safety information on page v This section provides instructions on how to install or replace the optical drive To install or replace an optical drive do the following 1 Turn off the computer and disconnect all power cords from electrical outlets 2 Remove the computer cover See Removing the computer cover on page 40 3 Remove the front bezel See Removin...

Page 60: ... the optical drive press the blue release button and then slide the optical drive out of the front of the computer Figure 20 Removing the optical drive 5 Install the optical drive retainer on the side of the new optical drive Figure 21 Installing the optical drive retainer 48 ThinkStation S30 User Guide ...

Page 61: ... the optical drive 7 Connect the signal cable and the power cable to the new optical drive Figure 23 Connecting the optical drive 8 Reinstall the front bezel See Removing and reinstalling the front bezel on page 40 What to do next To work with another piece of hardware go to the appropriate section Chapter 5 Installing or replacing hardware 49 ...

Page 62: ...I MegaRAID SAS adapter card is installed To install or replace a hard disk drive do the following 1 Turn off the computer and disconnect all power cords from electrical outlets 2 Remove the computer cover See Removing the computer cover on page 40 3 Locate the hard disk drive See Locating internal drives on page 14 4 Disconnect the signal cable and the power cable from the hard disk drive 5 Gently...

Page 63: ... Installing the hard disk drive into the bracket Note If you are installing a 2 5 inch hard disk drive you need to install it into a 2 5 to 3 5 inch converter bracket first Then install the 2 5 inch hard disk drive with the converter bracket into the 3 5 inch hard disk drive bracket Figure 26 Installing a 2 5 inch hard disk drive into the bracket Chapter 5 Installing or replacing hardware 51 ...

Page 64: ...into the hard disk drive bay until it snaps into position Figure 27 Installing a hard disk drive 9 Connect the signal cable and the power cable to the new hard disk drive Figure 28 Connecting a SATA hard disk drive 52 ThinkStation S30 User Guide ...

Page 65: ...portant safety information on page v This section provides instructions on how to install or replace a hard disk drive enablement module To install or replace a hard disk drive enablement module do the following 1 Turn off the computer and disconnect all power cords from electrical outlets 2 Remove the computer cover See Removing the computer cover on page 40 3 Open the adapter card retainer See F...

Page 66: ...Removing the hard disk drive enablement module 7 To install a new hard disk drive enablement module align the hole in the module with the plastic standoff on the system board and then position the module on the corresponding connector on the system board Press the hard disk drive enablement module downward until it is secured in place Figure 31 Installing a new hard disk drive enablement module 54...

Page 67: ... replace the card reader Note The card reader is only available in some models To replace the card reader do the following 1 Remove all media from the drives and turn off all attached devices and the computer Then disconnect all power cords from electrical outlets and disconnect all cables that are connected to the computer 2 Remove the computer cover See Removing the computer cover on page 40 3 R...

Page 68: ...lip to remove the card reader out of the chassis Figure 32 Removing the card reader 7 Install the card reader retainer on the side of the new card reader Figure 33 Installing the card reader retainer 56 ThinkStation S30 User Guide ...

Page 69: ...n page 65 Replacing the battery Attention Do not open your computer or attempt any repair before reading and understanding the Important safety information on page v Your computer has a special type of memory that maintains the date time and settings for built in features such as parallel port assignments configuration A battery keeps this information active when you turn off the computer The batt...

Page 70: ... on page 65 Note When the computer is turned on for the first time after replacing the battery an error message might be displayed This is normal after replacing the battery 7 Turn on the computer and all attached devices 8 Use the Setup Utility program to set the date time and any passwords See Chapter 7 Using the Setup Utility program on page 75 What to do next To work with another piece of hard...

Page 71: ...mponent that has this label attached There are no serviceable parts inside these components If you suspect a problem with one of these parts contact a service technician To replace the power supply assembly do the following 1 Turn off the computer and disconnect all power cords from electrical outlets 2 Remove the computer cover See Removing the computer cover on page 40 3 Disconnect the power sup...

Page 72: ...y assembly Figure 37 Removing the screws for the power supply assembly 6 Depress the power supply assembly latch 1 Slide the power supply assembly to the front of the computer and then lift it out of the chassis 7 Ensure that the new power supply assembly is the correct replacement 60 ThinkStation S30 User Guide ...

Page 73: ...epair before reading and understanding the Important safety information on page v This section provides instructions on how to replace the heat sink and fan assembly CAUTION The heat sink and fan assembly might be very hot Turn off the computer and wait three to five minutes to let the computer cool before removing the computer cover To replace the heat sink and fan assembly do the following 1 Tur...

Page 74: ...ocessor b Do not touch the thermal grease while handling the heat sink and fan assembly 8 Position the new heat sink and fan assembly on the system board so that the four screws are aligned with the holes on the system board Note Position the new heat sink and fan assembly so that the heat sink and fan assembly cable is toward the microprocessor fan connector on the system board 9 Follow the follo...

Page 75: ... and disconnect all power cords from electrical outlets 2 Remove the computer cover See Removing the computer cover on page 40 3 Locate the rear fan assembly See Locating components on page 11 4 Disconnect the rear fan assembly cable from the rear fan connector on the system board See Locating parts on the system board on page 12 5 The rear fan assembly is attached to the chassis by four rubber mo...

Page 76: ...rd What to do next To work with another piece of hardware go to the appropriate section To complete the installation or replacement go to Completing the parts replacement on page 65 Replacing the keyboard or mouse Attention Do not open your computer or attempt any repair before reading and understanding the Important safety information on page v This section provides instructions on how to replace...

Page 77: ...in your computer 2 If you have removed the front bezel reinstall it 3 Make sure that the cables are routed correctly before reinstalling the computer cover Keep cables clear of the hinges and sides of the computer chassis to avoid interference with reinstalling the computer cover 4 Align the cover with the chassis and then close the cover to engage the cover latch 5 Use the key to lock the keylock...

Page 78: ...66 ThinkStation S30 User Guide ...

Page 79: ... screen c When the installation process completes the Enhanced Backup and Restore icon is activated 2 There are a variety of methods to choose from when considering how to recover in the event of a software or hardware related problem Some methods vary depending on the type of operating system that is installed 3 The product on the recovery media may be used only for the following purposes Restore...

Page 80: ...ect boot device window opens release the F12 key 3 Select the desired startup device and press Enter The restore process begins 4 Follow the instructions on the screen to complete the operation Note After restoring your computer hard disk drive to the factory default state you might have to reinstall device drivers for some devices See Reinstalling device drivers on page 72 Performing backup and r...

Page 81: ...es you to locate files on your hard disk drive and transfer them to a network drive or other recordable media such as a USB device or a disc This solution is available even if you did not back up your files or if changes were made to the files since your last backup operation You can also rescue individual files from a Rescue and Recovery backup located on your local hard disk drive a USB device o...

Page 82: ...s Creating a rescue medium This section provides instructions on how to create a rescue medium To create a rescue medium on the Windows 7 operating system do the following 1 From the Windows desktop click Start All Programs Lenovo ThinkVantage Tools Enhanced Backup and Restore The Rescue and Recovery program opens 2 In the Rescue and Recovery main window click the Launch advanced Rescue and Recove...

Page 83: ...n Reinstalling preinstalled device drivers This section provides instructions on how to reinstall preinstalled device drivers Attention When you reinstall device drivers you are changing the current configuration of your computer Reinstall device drivers only when it is necessary to correct a problem with your computer To reinstall the device driver for a factory installed device do the following ...

Page 84: ... you are changing the current configuration of your computer Reinstall device drivers only when it is necessary to correct a problem with your computer For more information about reinstalling device drivers that came with your computer see Reinstalling preinstalled applications and device drivers on page 71 Solving recovery problems If you are unable to access the Rescue and Recovery workspace or ...

Page 85: ... affecting your files section click Get started Resetting your computer to the factory default settings You can reset your computer to the factory default settings Resetting the computer will reinstall the operating system and reinstall all the programs and settings that came with your computer Attention If you reset your computer all your personal files and settings will be deleted To avoid data ...

Page 86: ...tem if Windows 8 or Windows 8 1 fails to start The Windows recovery environment on your computer is capable of operating independently from the Windows 8 or Windows 8 1 operating system This enables you to recover or repair the operating system even if the Windows 8 or Windows 8 1 operating system fails to start After two consecutive failed boot attempts the Windows recovery environment starts aut...

Page 87: ...e prompted to do one of the following Press F1 to enter the Setup Utility program Note After you enter the Setup Utility program select Save Changes and Exit at the bottom of the screen The error message will not be displayed again Press F2 to bypass the error message and log in to the operating system Viewing and changing settings The Setup Utility program menu lists various items about the syste...

Page 88: ...m The Setup Utility program cannot be accessed until a valid password is typed in If both the Power On Password and Administrator Password are set you can type either password However you must use your Administrator Password to change any configuration settings Hard Disk Password Setting a Hard Disk Password prevents unauthorized access to the data on the hard disk drive When a Hard Disk Password ...

Page 89: ...tandard position pin 1 and pin 2 9 Reinstall the computer cover and connect the power cord See Completing the parts replacement on page 65 Enabling or disabling a device This section provides information on how to enable or disable user access to the following devices USB Configuration Use this option to enable or disable a USB connector When a USB connector is disabled the device connected to the...

Page 90: ...e mode and Deep Sx You can enable the ErP compliance mode and Deep Sx through the Devices menu in the Setup Utility program to reduce the consumption of electricity when your computer is in standby or off mode To enable ErP compliance mode and Deep Sx in the Setup Utility program do the following 1 Start the Setup Utility program See Starting the Setup Utility program on page 75 2 From the Setup U...

Page 91: ... program After you finish viewing or changing settings press Esc to return to the Setup Utility program main menu You might have to press Esc several times Do one of the following If you want to save the new settings press F10 to save changes and exit the Setup Utility program If you do not want to save the settings select Exit Discard Changes and Exit and then press Enter When the Reset Without S...

Page 92: ...80 ThinkStation S30 User Guide ...

Page 93: ...n page 82 Installing SATA or SAS hard disk drives Ensure that your computer has the minimum number of SATA or SAS hard disk drives installed for the following supported levels of RAID RAID Level 0 Striped disk array A RAID Level 0 hard disk drive group consisting of at least two hard disk drives Supported strip size 4 KB 8 KB 16 KB 32 KB 64 KB or 128 KB Better performance without fault tolerance R...

Page 94: ...ing the computer startup follow the instructions on the screen Press Ctrl I to enter the Intel RSTe configuration utility The following four options are displayed after you enter the Intel RSTe configuration utility 1 Create RAID Volume 2 Delete RAID Volume 3 Reset Disks to Non RAID 4 Exit Press the up and down arrow keys to select an option Press Enter to enter the selected menu Press Esc to exit...

Page 95: ...ME MENU window 3 Press the up and down arrow keys to select the RAID volume that is not needed Press Del to delete it from the RAID Volumes list 4 When prompted press Y to confirm the deletion of the selected RAID volume Resetting hard disk drives to non RAID This section provides instructions on how to reset hard disk drives to non RAID To reset hard disk drives to non RAID do the following 1 Ent...

Page 96: ...drive group with a series of RAID 0 hard disk drive groups A RAID Level 00 hard disk drive group consisting of two hard disk drives Supported strip sizes 8 KB to 1 MB Better performance without fault tolerance RAID Level 1 Mirrored disk array A RAID Level 1 hard disk drive group consisting of at least two hard disk drives Improved read performance and 100 redundancy RAID Level 5 Block level stripe...

Page 97: ...essing Ctrl while selecting more than one hard disk drive b Click Add To Array to move the selected hard disk drives to Drive Groups c Click Accept DG to create the hard disk drive group d Repeat the above steps if you want to create more than one hard disk drive group 5 Click Next The Span Definition window is displayed Select the hard disk drive group that you want to add to a span and then clic...

Page 98: ...ility See Entering the LSI MegaRAID BIOS configuration utility on page 84 2 Select the hard disk drive you want to set as the hot spare hard disk drive The Drive window is displayed 3 Select Make Global HSP or Make Dedicated HSP and then click Go 4 The main screen of the LSI MegaRAID BIOS configuration utility is displayed and the hard disk drive you selected is listed as a hot spare hard disk dri...

Page 99: ... in a TXT file that is included with the update files For most models you can download either an update program to create a system program update disc or an update program that can be run from the operating system Updating flashing the BIOS from a disc This section provides instructions on how to update flash the BIOS from a disc Note You can download a self starting bootable disc image known as a...

Page 100: ...However if you do want to change the serial number press Y then type in the serial number and press Enter 5 When prompted to change the machine type and model it is suggested that you do not make this change by pressing N However if you do want to change the machine type and model press Y then type in the machine type and model and press Enter 6 Follow the instructions on the screen to complete th...

Page 101: ...ance position pin 2 and pin 3 6 Reconnect any cables that were disconnected and reinstall the PCI card if removed 7 Reinstall the computer cover and reconnect the power cords for the computer and monitor to electrical outlets See Completing the parts replacement on page 65 8 Turn on the computer and then insert the POST and BIOS update flash update disc into the optical drive Wait a few minutes Th...

Page 102: ...90 ThinkStation S30 User Guide ...

Page 103: ...roblems Obtain updated device drivers from Lenovo 1 Go to http www lenovo com support 2 Click Download Drivers 3 Select the machine type of your computer from the machine type list 4 Click the category of device for which you need the device driver 5 Click the appropriate device driver 6 Download and install the device driver Updating your operating system Microsoft makes updates available for the...

Page 104: ...pdates critical and recommended updates or all updates so the list you choose from contains only those update types that are of interest to you To open the System Update program see Accessing Lenovo programs on the Windows 7 operating system on page 5 or Accessing Lenovo programs on the Windows 8 or Windows 8 1 operating system on page 6 If the System Update program is not currently installed on y...

Page 105: ... on the screen does not move smoothly with the optical mouse you might need to clean the mouse To clean an optical mouse do the following 1 Turn off your computer 2 Disconnect the mouse cable from the computer 3 Turn the mouse upside down to check the lens a If there is a smudge on the lens gently clean the area with a plain cotton tipped swab b If there is debris in the lens gently blow the debri...

Page 106: ...and any minor issues you might have experienced A log book can help you or a Lenovo technician determine if a problem is related to change in hardware change in software or some other action that might have taken place Create Product Recovery discs See Creating and using recovery media on page 67 for more information about using Product Recovery discs to restore the hard disk drive to the factory ...

Page 107: ...e sure that it is switched on The power indicator on the front of the computer is on The computer voltage matches the voltage available at the electrical outlet for your country or region The monitor screen is blank Verify that The monitor signal cable is correctly connected to the monitor and to the appropriate monitor connector on the computer The monitor power cord is correctly connected to the...

Page 108: ...lder configuration settings do not solve the problem or have adverse effects To restore a captured configuration do the following For Windows 7 Click Start Control Panel System and Security System System Protection System Restore For Windows 8 or Windows 8 1 Open Control Panel and then click System and Security System System Protection System Restore Note For detailed information on how to open Co...

Page 109: ...ockup problems on page 108 Printer problems on page 110 Serial connector problems on page 110 Software problems on page 110 USB problems on page 111 Audio problems Select your symptom from the following list No audio in Windows on page 97 An audio disc or AutoPlay enabled disc does not automatically play when it is inserted into a drive on page 98 Sound comes from one external speaker only on page...

Page 110: ... it is inserted into a drive Action See CD problems on page 98 Sound comes from one external speaker only Symptom Sound comes from one external speaker only Actions Ensure that the speaker cable is inserted completely into the connector on the computer Make sure the cable that attaches the left speaker to the right speaker is securely connected Double click the speaker icon in the Windows notifica...

Page 111: ... damaged Try inserting another disc that you know is good If you cannot read from a known good disc you might have a problem with your CD or DVD drive or the cabling to your CD or DVD drive Make sure that the power cable and signal cable are securely connected to the drive Unable to use a startable bootable recovery medium such as the Product Recovery CD to start your computer Symptom Unable to us...

Page 112: ...udio or intermittent audio while playing DVD movie Symptom No audio or intermittent audio while playing DVD movie Actions Check the volume control settings on your computer and on your speakers Make sure that the disc surface is clean and not scratched Check all cable connections to and from the speakers Use the DVD menu for the video to select a different audio track If these actions do not corre...

Page 113: ... program If you need technical assistance see Chapter 12 Getting information help and service on page 113 No Operating System Found message or the system not starting from the correct hard disk drive Symptom No Operating System Found message or the system not starting from the correct hard disk drive Actions Ensure that all hard disk drive signal cables and power cables are connected correctly See...

Page 114: ...n the computer If you are using an Enhanced Performance USB keyboard and one or more of the Rapid Access buttons are the only keys that are not working these buttons might have been disabled or have not been assigned to a function Use the help system in the Enhanced Performance Customization Keyboard program to help diagnose problems with the Rapid Access buttons To open the Enhanced Performance C...

Page 115: ... The wireless keyboard does not work Symptom The wireless keyboard does not work Action If the Transceiver Communications LED is on and the wireless Keyboard does not work restart your computer If restarting your computer does not solve the problem verify that the following conditions are met The batteries are properly installed The batteries still retain their current The wireless Keyboard is loc...

Page 116: ...d Refer to the documentation for the affected application program to see if device drivers are required If these actions do not correct the problem run the Lenovo Solution Center program If you need technical assistance see Chapter 12 Getting information help and service on page 113 The image appears to be flickering Symptom The image appears to be flickering Actions The monitor might be operating...

Page 117: ...oving a color monitor while it is turned on might cause screen discoloration 2 Adjust the placement of the monitor and other devices so that they are at least 305 mm 12 inches apart 3 Turn on the monitor If these actions do not correct the problem your monitor might need service See Chapter 12 Getting information help and service on page 113 for details Ethernet problems For Ethernet problems sele...

Page 118: ...e screen The switch port and the adapter have the same duplex setting If you configured the adapter for full duplex ensure that the switch port is also configured for full duplex Setting the wrong duplex mode can degrade performance cause data loss or result in lost connections You have installed all networking software that is necessary for your network environment Check with your LAN administrat...

Page 119: ...ectly You have not loosened other installed options or cables If the option is an adapter you have provided enough hardware resources for the adapter to function correctly See the documentation supplied with the adapter as well as the documentation for any other installed adapters to determine the resources required for each adapter If these actions do not correct the problem run the Lenovo Soluti...

Page 120: ...hen click Properties The amount of free disk space is displayed To check the amount of free space on the Windows 8 1 operating system do the following 1 Open File Explorer 2 Right click your C drive entry and then click Properties The amount of free disk space is displayed To free up disk space do any of the following Method 1 1 On the Windows 7 operating system click Start Computer On the Windows...

Page 121: ...click your C drive entry and then click Properties 4 Click the Tools tab 5 Click Defragment Now then click Continue 6 Click Defragment Now again to start a disk defragmentation process On the Windows 8 or Windows 8 1 operating system do the following 1 Close any programs that are currently running and close any open windows 2 On Windows 8 open File Explorer and click Computer On Windows 8 1 open F...

Page 122: ... serial device If the serial device has its own power cord ensure that it is attached to a properly grounded electrical outlet If the serial device has its own On Off switch ensure that it is in the On position If the serial device has an Online switch ensure that it is in the Online position If the serial device is a printer ensure that paper is loaded correctly Verify that any software supplied ...

Page 123: ...e messages and solutions to the problem Check with your software manufacturer to see if any updates are available Many software manufacturers make updates available from the World Wide Web If the software program used to work correctly but does not work correctly now do the following On the Windows 7 operating system click Start Control Panel System and Security System System Protection System Res...

Page 124: ...ram enables you to troubleshoot and resolve computer problems It combines diagnostic tests system information collection security status and support information along with hints and tips for maximum system performance Notes The Lenovo Solution Center program can be downloaded from http www lenovo com diags If you are using a Windows operating system other than Windows 7 Windows 8 or Windows 8 1 go...

Page 125: ... Help and Support information system do one of the following On the Windows 7 operating system click Start Help and Support On the Windows 8 or Windows 8 1 operating system move the pointer to the top right or bottom right corner of the screen to display the charms Then click Settings Help Safety and Warranty The Safety Warranty and Setup Guide that is provided with your computer contains informat...

Page 126: ... documentation that comes with the operating system or software program including readme files and online help Most computers come with a set of diagnostic programs that help you identify hardware problems For instructions on using the diagnostic programs see Lenovo Solution Center on page 112 You can also get the latest technical information and download device drivers and updates from Lenovo Sup...

Page 127: ...entitles you to obtain warranty service throughout the warranty period Service will be performed by service providers authorized to perform warranty service Service methods and procedures vary by country and some services might not be available in all countries International Warranty Service is delivered through the method of service such as depot carry in or on site service that is provided in th...

Page 128: ...116 ThinkStation S30 User Guide ...

Page 129: ... E5 2650 2650L E5 2660 E5 2665 E5 2667 E5 2670 E5 2680 E5 2690 1333 MHz Table 4 DIMM type and speed PC3 10600R DIMM operating voltage Microprocessor model Memory frequency 1 5 V Intel Xeon E5 1603 E5 1607 1 35 V 1 5 V Intel Xeon E5 2603 E5 2609 1066 MHz 1 5 V Intel Xeon E5 1620 E5 1650 E5 1660 1 35 V 1 5 V Intel Xeon E5 2620 E5 2630 2630L E5 2637 E5 2640 E5 2643 E5 2650 2650L E5 2660 E5 2665 E5 26...

Page 130: ...5 2603V2 1333 MHz Table 7 DIMM type and speed PC3 14900R DIMM operating voltage Microprocessor model Memory frequency Intel Xeon E5 2690V2 E5 2680V2 E5 2670V2 E5 2660 E5 2650V2 Intel Xeon E5 2697V2 E5 2695V2 E5 2687V2 E5 2667V2 E5 2643V2 E5 2637V2 Intel Xeon E5 1660V2 E5 1650V2 E5 1620V2 E5 2660V2 1866 MHz Intel Xeon E5 2640V2 E5 2630V2 E5 2620V2 Intel Xeon E5 2650L E5 2630L Intel Xeon E5 1607V2 1...

Page 131: ...ublication Lenovo may make improvements and or changes in the product s and or the program s described in this publication at any time without notice The products described in this document are not intended for use in implantation or other life support applications where malfunction may result in injury or death to persons The information contained in this document does not affect or change Lenovo...

Page 132: ... trademarks of the Microsoft group of companies Intel and Intel Xeon are trademarks of Intel Corporation in the United States other countries or both Linux is a registered trademark of Linus Torvalds DisplayPort and mini DisplayPort are Trademarks of the Video Electronics Standards Association Other company product or service names may be trademarks or service marks of others 120 ThinkStation S30 ...

Page 133: ...user is encouraged to try to correct the interference by one or more of the following measures Reorient or relocate the receiving antenna Increase the separation between the equipment and receiver Connect the equipment into an outlet on a circuit different from that to which the receiver is connected Consult an authorized dealer or service representative for help Lenovo is not responsible for any ...

Page 134: ... zu betreiben Des Weiteren dürfen auch nur von der Lenovo empfohlene Kabel angeschlossen werden Lenovo übernimmt keine Verantwortung für die Einhaltung der Schutzanforderungen wenn das Produkt ohne Zustimmung der Lenovo verändert bzw wenn Erweiterungskomponenten von Fremdherstellern ohne Empfehlung der Lenovo gesteckt eingebaut werden Deutschland Einhaltung des Gesetzes über die elektromagnetische...

Page 135: ...ce mark Brazil regulatory notice Ouvir sons com mais de 85 decibéis por longos períodos pode provocar danos ao sistema auditivo Mexico regulatory notice Advertencia En Mexico la operación de este equipo estásujeta a las siguientes dos condiciones 1 es posible que este equipo o dispositivo no cause interferencia perjudicial y 2 este equipo o dispositivo debe aceptar cualquier interferencia incluyen...

Page 136: ...124 ThinkStation S30 User Guide ...

Page 137: ...and recovery of WEEE and to minimize any potential effects of EEE on the environment and human health due to the presence of hazardous substances For additional WEEE information go to http www lenovo com recycling Recycling information for Japan Collecting and recycling a disused Lenovo computer or monitor If you are a company employee and need to dispose of a Lenovo computer or monitor that is th...

Page 138: ... a lithium battery must comply with local ordinances and regulations Recycling information for Brazil Declarações de Reciclagem no Brasil Descarte de um Produto Lenovo Fora de Uso Equipamentos elétricos e eletrônicos não devem ser descartados em lixo comum mas enviados à pontos de coleta autorizados pelo fabricante do produto para que sejam encaminhados e processados por empresas especializadas no...

Page 139: ...dicate that they are to be collected separately and recycled at end of life The label on the battery may also include a chemical symbol for the metal concerned in the battery Pb for lead Hg for mercury and Cd for cadmium Users of batteries and accumulators must not dispose of batteries and accumulators as unsorted municipal waste but use the collection framework available to customers for the retu...

Page 140: ...128 ThinkStation S30 User Guide ...

Page 141: ...ardous substances in electrical and electronic equipment RoHS recast or RoHS 2 For more information about Lenovo progress on RoHS go to http www lenovo com social_responsibility us en RoHS_Communication pdf China RoHS Turkish RoHS The Lenovo product meets the requirements of the Republic of Turkey Directive on the Restriction of the Use of Certain Hazardous Substances in Electrical and Electronic ...

Page 142: ...Ukraine RoHS India RoHS RoHS compliant as per E Waste Management Handling Rules 2011 130 ThinkStation S30 User Guide ...

Page 143: ...Reduced electrical consumption contributes to potential financial savings a cleaner environment and the reduction of greenhouse gas emissions For more information about ENERGY STAR go to http www energystar gov Lenovo encourages you to make efficient use of energy an integral part of your day to day operations To help in this endeavor set the following power management features to take effect when...

Page 144: ...132 ThinkStation S30 User Guide ...

Page 145: ...ers 65 devices handling static sensitive 39 diagnostics programs using 114 diagnostics troubleshooting 95 DisplayPort connector 10 documentation using 114 drivers device 65 drives bays 14 specifications 14 DVI monitor connector 10 E environment operating 5 Ethernet 2 Ethernet connector 10 exiting Setup Utility 79 expansion 3 external options installing 39 F failure recovering from POST BIOS 89 fea...

Page 146: ...9 rear fan assembly replacing 63 recovering from a POST BIOS update failure 89 software 67 recovery boot block 89 operations backup and 68 problems solving 72 recovery media creating and using 67 removing computer cover 40 replacing battery 57 hard disk drive enablement module 53 heat sink and fan assembly 61 Rescue and Recovery 67 workspace Rescue and Recovery 69 Rescue and Recovery workspace 69 ...

Page 147: ... U updating flashing the BIOS 87 system programs 87 updating flashing the BIOS 88 USB 2 0 connector 10 USB 3 0 connector 10 using a rescue medium creating and 70 diagnostic programs 114 documentation 114 other services 115 passwords 75 Setup Utility 75 V video subsystem 1 viewing and changing settings 75 W warranty information 113 workspace backup and recovery 69 Copyright Lenovo 2011 2014 135 ...

Page 148: ...136 ThinkStation S30 User Guide ...

Page 149: ......

Page 150: ......

Reviews: