background image

52     

NE1064TO Installation Guide

Installing a Transceiver

Note:

To avoid damage to a transceiver, do not connect the cable before you install 

the transceiver.

Statement 3


CAUTION:

When laser products (such as CD-ROMs, DVD drives, fiber optic devices, or 
transmitters) are installed, note the following:

Do not remove the covers. Removing the covers of the laser product could result 
in exposure to hazardous laser radiation. There are no serviceable parts inside 
the device.

Use of controls or adjustments or performance of procedures other than those 
specified herein might result in hazardous radiation exposure.


DANGER  


Class 1 Laser Product

Laser Klasse 1

Laser Klass 1

Luokan 1 Laserlaite

Appareil À Laser de Classe 1

To install a transceiver in a SFP+, QSFP+, SFP28, or QSFP28 port slot on the switch, 
complete the following steps:

1.

Remove the port slot’s safety cap.

2.

Remove the transceiver’s safety cap and pull its bail clasp, if any, into the up 
position.

3.

Insert the transceiver into the port slot until it clicks into place. Use minimal 
pressure when you insert the transceiver. Do not use excessive force when you 
insert the transceiver or you might damage the transceiver or the slot.

Note:

The transceiver has a mechanical guide key to prevent you from inserting 

the transceiver in an incorrect orientation.

Some laser products contain an embedded Class 3A or Class 3B laser diode. 
Note the following.

Laser radiation when open. Do not stare into the beam, do not view directly 
with optical instruments, and avoid direct exposure to the beam.

Summary of Contents for ThinkSystem NE1064TO RackSwitch

Page 1: ...Lenovo ThinkSystem NE1064TO RackSwitch Installation Guide For Network Operating System ...

Page 2: ...ith the product Second Edition February 2020 Copyright Lenovo 2020 Portions Copyright IBM Corporation 2014 LIMITED AND RESTRICTED RIGHTS NOTICE If data or software is delivered pursuant a General Services Administration GSA contract use reproduction or disclosure is subject to restrictions set forth in Contract No GS 35F 05925 Lenovo and the Lenovo logo are trademarks of Lenovo in the United State...

Page 3: ...Reset Button 21 USB 2 0 Port 21 Service LEDs 22 Switching Ports 24 10G Base T Ports 24 10G Base T Port LEDs 24 QSFP28 Ports 25 QSFP28 Port LEDs 25 Rear Panel 26 Fans 27 Power Supply Units 28 Installing NE1064TO Hardware and Options 31 Before Installing the NE1064TO 32 Required Tools 33 Package Contents 33 Environmental Requirements 34 Preventing Electric Shock 34 Handling Static Sensitive Devices ...

Page 4: ...O 69 Preparing and Returning the NE1064TO 69 Initializing the NE1064TO 71 Connecting to the Switch 72 Using Telnet 72 Using the Serial Console Port 72 Using the Management Port 72 Updating Firmware 73 The GRUB Menu 74 Getting Help and Technical Assistance 75 Notices 77 Trademarks 78 Important Notes 79 Recycling Information 80 Particulate Contamination 81 Telecommunication Regulatory Statement 82 E...

Page 5: ...ia Electromagnetic Interference EMI Class A statement 86 People s Republic of China Class A electronic emission statement 86 Taiwan Class A compliance statement 86 Taiwan BSMI RoHS declaration 87 Technical Specifications 89 Physical Characteristics 90 Environmental Specifications 91 Power Specifications 92 ...

Page 6: ...6 Lenovo NE1064TO Installation Guide ...

Page 7: ...installer ce produit lisez les consignes de sécurité Vor der Installation dieses Produkts die Sicherheitshinweise lesen Πριν εγκαταστήσετε το προϊόν αυτό διαβάστε τις Πληροφορίες ασφαλείας safety information A termék telepítés előtt olvassa el a Biztonsági előírásokat Prima di installare questo prodotto leggere le Informazioni sulla Sicurezza Πред да инсталира овој продукт прочитајте информацијата...

Page 8: ...roizvoda preberite Varnostne informacije Antes de instalar este producto lea la información de seguridad Läs säkerhetsinformationen innan du installerar den här produkten Bu ürünü kurmadan önce güvenlik bilgilerini okuyun Youq mwngz yungh canjbinj neix gaxgonq itdingh aeu doeg aen canjbinj soengq cungj vahgangj ancien suisik ...

Page 9: ...ore you install the device Following is a compilation of the statements found throughout this manual Statement 3 CAUTION When laser products such as CD ROMs DVD drives fiber optic devices or transmitters are installed note the following Do not remove the covers Removing the covers of the laser product could result in exposure to hazardous laser radiation There are no serviceable parts inside the d...

Page 10: ... any part that has the following label attached Hazardous voltage current and energy levels are present inside any component that has this label attached There are no serviceable parts inside these components If you suspect a problem with one of these parts contact a service technician Statement 13 DANGER 1 2 Overloading a branch circuit is potentially a fire hazard and a shock hazard under certai...

Page 11: ...Connect all power cords to a properly wired and grounded power source Connect to properly wired power sources any equipment that will be attached to this product When possible use one hand only to connect or disconnect signal cables Never turn on any equipment when there is evidence of fire water or structural damage Disconnect the attached ac power cords dc power sources network connections telec...

Page 12: ...wer at the ac power distribution unit For dc systems disconnect dc power sources at the breaker panel or by turning off the power source Then remove the dc cables 2 Remove the signal cables from the connectors 3 Remove all cables from the devices When you populate a rack cabinet adhere to the following guidelines Always lower the leveling pads on the rack cabinet Always install the stabilizer brac...

Page 13: ...duct is also designed for IT power distribution systems with phase to phase voltage of 230V This product is not intended for use in the direct field of view at visual display workplaces Machinenlärminformations Verordnung 3 GPSGV der höchste Shalldruckpegel beträgt 70 dB A oder weniger ...

Page 14: ...14 NE1064TO Installation Guide ...

Page 15: ...S Note Only four out of the six QSFP28 ports can be used in breakout mode since the maximum number of supported ports is 64 Transceiver Configuration QSFP ports can be populated with optical QSFP modules or passive Direct Attach Cables DACs including those that allow the port to be used as four 25 GbE SFP28 10 GbE SFP ports two 50 GbE QSFP28 ports or as a single 40 GbE QSPF port Orientation Airflo...

Page 16: ...uations Attention These notices indicate potential damage to programs devices or data An attention notice is placed just before the instruction or situation in which damage could occur Caution These statements indicate situations that can be potentially hazardous to you A caution statement is placed just before the description of a potentially hazardous procedure step or situation Danger These sta...

Page 17: ... Copyright Lenovo 2020 17 Chapter 2 Switch Components This chapter describes the NE1064TO hardware components ...

Page 18: ...ont and rear of the switch Figure 1 ThinkSystem NE1064TO front panel Figure 2 ThinkSystem NE1064TO management panel detail Figure 3 ThinkSystem NE1064TO rear panel Management Panel 48x10 G Base T ports 6x100 G QSFP28 ports Service LEDs Reset Button RS 232 Mini USB Console Port USB 2 0 Port RJ45 Management Port Power Supply Module 2 Power Supply Module 1 Fan Module 5 Fan Module 4 Fan Module 3 Fan M...

Page 19: ...nect the console cable to the mini USB serial console port on the front panel Connect one end of the RJ45 to DB9 adapter to the RJ45 port on the console cable and the other end of the adapter to the computer or terminal see the following illustration Figure 5 Mini USB console cable connections If using cables other than those from the included cable kit ensure that they are compatible with the por...

Page 20: ... gently pull the cable connector out of the switch connector Management LEDs The RJ45 management port LEDs are oriented as shown in the following figure Figure 6 RJ45 management port LEDs Status LEDs for the RJ45 management port are described in the following table Table 2 RJ45 status LEDs behavior LED State Functional Meaning Link Steady Green Link up Flashing Green Packet transmitting or receivi...

Page 21: ... This action is intended for when the switch is unresponsive and needs to be restarted to resume its normal functions Factory reset the switch reloads and reverts all its configuration settings to the factory defaults Note The preceding functions depend on the installed OS USB 2 0 Port The USB 2 0 port enables you to connect a USB drive to the switch You can copy files from the switch to the USB d...

Page 22: ...tack backup member or Operations command Flashing blue Single power supply failure or AC cable unplugged from a PSU or Fan failure or Stack error Light off Power supply normal operation or Fans normal operation or Stack master or Non stack member or AC cables unplugged or damaged on all PSUs Power Supply Steady green Power supply normal operation Flashing green once per second Not all power supply...

Page 23: ...nce per second Not all fans are plugged in Flashing green twice per second Fan failure Light off AC cables unplugged or damaged on all PSUs Stacking Steady green Stack backup member Flashing green Stack mater Light off Non stack member Table 3 Front side panel status LEDs behavior LED State Functional Meaning ...

Page 24: ...E SFP ports two 50 GbE QSFP28 ports or as a single 40 GbE QSFP port SFP ports can be populated with optical or copper transceiver modules or DACs 10G Base T Ports Forty eight 10G Base T ports are located on the front panel 10G Base T Port LEDs The Base T LEDs for the NE1064TO are shown in the following illustration Figure 10 Base T Port LEDs Status LEDs for the 10G Base T ports are described in th...

Page 25: ...GbE port QSFP28 Port LEDs The QSFP28 LEDs for the NE1064TO are shown in the following illustration Figure 11 QSFP28 Port LEDs Status LEDs for the QSFP28 ports are described in the following table Note Amber refers to both green and red LEDs being lit simultaneously Table 5 QSFP28 port status LED behavior LED Port Mode State Functional Meaning Status LED for QSFP28 100G 4x25G Steady green Secure 10...

Page 26: ...anel includes the following components two hot swap power supply modules five hot swap fan modules Figure 12 NE1064TO Rear Side Panel Components Power Supply Module 2 Power Supply Module 1 Fan Module 5 Fan Module 4 Fan Module 3 Fan Module 2 Fan Module 1 ...

Page 27: ... fails the switch reports the condition and shuts down to prevent overheating Note On the rear side of the box there are fault LEDs for each of the fan modules When the fan works abnormally the red LED is lit When the fan is under normal operation the green LED is lit Compatible fan options are listed in the Lenovo Networking Catalog Fan operation and internal temperatures are monitored If the air...

Page 28: ...om power telephone and communication cables is hazardous To avoid a shock hazard Do not connect or disconnect any cables or perform installation maintenance or reconfiguration of this product during an electrical storm Connect all power cords to a properly wired and grounded power source Connect to properly wired power sources any equipment that will be attached to this product When possible use o...

Page 29: ...r cord to one or both power supplies To Connect 1 Turn OFF all power sources and equipment that is to be attached to this product 2 Attach signal cables to the product 3 Attach power cords to the product For ac systems use appliance inlets For dc systems ensure correct polarity of 48 V dc connections RTN is and 48 V dc is Earth ground should use a two hole lug for safety 4 Attach signal cables to ...

Page 30: ... LED State Functional Meaning Power supply Steady green Power supply normal operation Flashing green once per second Power supply in standby mode Flashing green twice per second Firmware update in progress Steady amber AC cable unplugged or Power supply shutdown caused by a critical event Flashing amber Power supply warning event power supply continues its operation ...

Page 31: ...d in the package Environmental requirements Vital safety information Installing the switch in one of the supported rack types Installing the NE1064TO in a Standard Equipment Rack on page 37 Installing the NE1064TO in a Lenovo System x or Power Rack on page 40 Installing the NE1064TO in a Lenovo iDataPlex Rack on page 44 Installing the Air Duct Option on page 47 Installing Port Connectors on page 5...

Page 32: ...wn on Table 8 prior to installation Figure 15 contains examples of product information labels Figure 15 Sample product labels from the switch Note These examples are to help locate and identify the information labels The actual labels and information for your specific switch may differ The identification labels on the front rear and or bottom of the NE1064TO contain the Machine Type Model MTM numb...

Page 33: ...e ThinkSystem NE1064TO unit with rear to front airflow One two post mounting kit for standard 19 equipment racks Two mounting brackets Screws to attach brackets to the switch unit Screws to attach the switch unit to the equipment rack One console cable kit that includes One Mini USB to RJ45 console cable One RJ45 to DB9 adapter One Important Notices document One Warranty Information document For a...

Page 34: ...d plug with a properly grounded outlet Power cords for this product that are used in the United States and Canada are listed by Underwriter s Laboratories UL and certified by the Canadian Standards Association CSA For units intended to be operated at 115 volts Use a UL listed and CSA certified cord set consisting of a minimum of 18 AWG Type SVT or SJT three conductor cord a maximum of 15 feet in l...

Page 35: ...lation and configuration procedures Connect and disconnect cables as described in the following table when you install move or open covers on this product or attached devices To Connect 1 Turn OFF all power sources and equipment that is to be attached to this product 2 Attach signal cables to the product 3 Attach power cords to the product For ac systems use appliance inlets For dc systems ensure ...

Page 36: ...evice from its package and install it directly into the switch without setting it down If it is necessary to set down the device put it back into its static protective package Do not place the device on a switch cover or on a metal surface Take additional care when you handle devices during cold weather Heating reduces indoor humidity and increases static electricity Cabling Guidelines Make sure t...

Page 37: ...in on page 44 Installing the NE1064TO in a Standard Equipment Rack This section describes how to install the NE1064TO in a standard 19 inch equipment rack using the mounting kit included with the switch For information about mounting the switch in other supported racks see the appropriate section in this chapter The following parts are included in the standard mounting kit Attention The rack mount...

Page 38: ...onfigure and register your product See Before Installing the NE1064TO on page 32 Note If this switch is a replacement switch copy the product information from the original switch onto the RID label that is shipped with replacement switch and affix the new label to the bottom of the new switch 2 Attach a mounting bracket Item 1 to each side of the switch with M4 screws Item 2 Torque the screws to a...

Page 39: ...ight 4 Secure the switch unit to the rack posts with M6 screws Item 3 and either clip nuts Item 4 or cage nuts Item 5 Torque the screws to approximately 5 7 Nm 0 1 Nm 50 inch pounds 5 Connect all external cables in accordance with the Cabling Guidelines on page 36 6 Initialize the switch See Chapter 5 Initializing the NE1064TO on page 71 3 4 ...

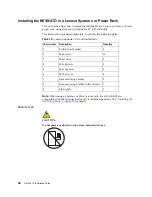
Page 40: ...ystem x or Power 4 post rack the 4 Post Rail Kit is compatible with the optional air duct kit available separately See Installing the Air Duct Option on page 47 for details Statement 26 CAUTION Do not place any object on top of rack mounted devices Table 10 Lenovo Adjustable 19 4 Post Rail Kit parts Item number Description Quantity 1 Switch front bracket 2 2 M4 screws 16 3 M6 screws 8 4 M6 clip nu...

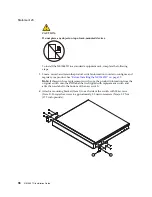
Page 41: ... your product See Before Installing the NE1064TO on page 32 Note If this switch is a replacement switch copy the product information from the original switch onto the RID label that is shipped with replacement switch and affix the new label to the bottom of the new switch 2 Attach the front mounting brackets Item 1 to each side of the switch with M4 screws Item 2 Torque the screws to approximately...

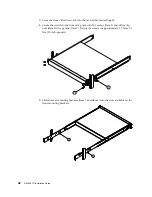
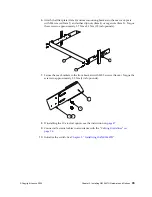
Page 42: ...ght 4 Secure the switch to the front rack posts with M6 screws Item 3 and either clip nuts Item 4 or cage nuts Item 5 Torque the screws to approximately 5 7 Nm 0 1 Nm 50 inch pounds 5 Slide the rear mounting brackets Item 7 and Item 8 into the slots available on the front mounting brackets 5 3 8 7 ...

Page 43: ...m 5 Torque the screws to approximately 5 7 Nm 0 1 Nm 50 inch pounds 7 Secure the rear brackets to the front brackets with M3 5 screws Item 6 Torque the screws to approximately 0 5 Nm 4 inch pounds 8 If installing the 1U air duct option see the instruction on page 47 9 Connect all external cables in accordance with the Cabling Guidelines on page 36 10 Initialize the switch See Chapter 5 Initializin...

Page 44: ... be able to support the weight of the networking switch with only the front post mounting brackets 2 post application If the switch has an undesirable amount of sag it is recommended to use a 4 post mounting kit Attention For earthquake stability mount the switch in a 4 post rack Statement 26 CAUTION Do not place any object on top of rack mounted devices Table 11 Lenovo Adjustable 19 4 Post Rail K...

Page 45: ...on from the original switch onto the RID label that is shipped with replacement switch and affix the new label to the bottom of the new switch 2 Attach front mounting brackets Item 1 and rear mounting brackets Item 5 to each side of the switch with M4 screws Item 2 Torque the screws to approximately 2 newton meters Nm 0 1 Nm 17 7 inch pounds 3 From the front slide the switch into the rack at the d...

Page 46: ...tem 3 and clip nuts Item 4 Torque the screws to approximately 5 7 Nm 0 1 Nm 50 inch pounds 6 If installing the 1U air duct option see the instruction on page 47 7 Connect all external cables in accordance with the Cabling Guidelines on page 36 8 Initialize the switch See Chapter 5 Initializing the NE1064TO 6 3 4 ...

Page 47: ...r duct option see Removing the Air Duct Option on page 68 The following table lists the parts included with the air duct option kit Attention The rack mounting frame may not be able to support the weight of the networking switch with only the front post mounting brackets 2 post application If the switch has an undesirable amount of sag it is recommended to use a 4 post mounting kit Attention For e...

Page 48: ... them aside to reuse for securing the foam carrier in the next step 2 Place the half shears on the rear side of the foam carriers and use the M3 5 mounting rail screws to secure the foam carrier assemblies snugly against the rear of the NE1064TO unit Torque the screws to approximately 1 1 Nm 0 1 Nm 10 inch pounds Note There are additional M3 5 screws in the air duct assembly kit Half shear Foam ca...

Page 49: ...mounting brackets to secure the air duct mounting brackets with 4 post mounting brackets together 4 Secure the air duct mounting bracket to the rack chassis with M3 5 screws Torque the screws to approximately 1 1 Nm 0 1 Nm 10 inch pounds 5 Plug the power cords into their respective NE1064TO power connectors and using tie wraps secure the power cords to the mounting rails M3 5 screws Air duct mount...

Page 50: ...ir duct unit side flanges into the card guides until the unit is seated firmly Make sure that the foam strip is oriented on top 7 Secure the air duct unit to the air duct brackets with the two M4 thumbscrews M4 thumbscrews Side flanges Card guides Foam ...

Page 51: ...NOS installed on the switch To install a supported transceiver see Installing a Transceiver on page 52 BASE T RJ45 Port Slots Approved RJ45 cables are supported in BASE T RJ45 port slots QSFP28 Port Slots Quad Small Form factor Pluggable 28 QSFP28 port slots support the following approved connector types 40 GbE QSFP or 100 GbE QSFP28 optical transceivers 40 GbE QSFP or 100 GbE QSFP28 DACs 40 GbE Q...

Page 52: ...kan 1 Laserlaite Appareil À Laser de Classe 1 To install a transceiver in a SFP QSFP SFP28 or QSFP28 port slot on the switch complete the following steps 1 Remove the port slot s safety cap 2 Remove the transceiver s safety cap and pull its bail clasp if any into the up position 3 Insert the transceiver into the port slot until it clicks into place Use minimal pressure when you insert the transcei...

Page 53: ...e following the Cabling Guidelines on page 36 and then insert the cable into the transceiver until it clicks into place To remove a transceiver disconnect the cable and pull down the bail clasp if any This releases the transceiver After you remove the transceiver cover it using its safety cap ...

Page 54: ...54 NE1064TO Installation Guide ...

Page 55: ... hot swap modules Removing and Replacing a Power Supply Module on page 57 Removing and Replacing a Fan Module on page 61 Removing the switch from one of the supported rack types Removing the NE1064TO from a Standard Equipment Rack on page 63 Removing the NE1064TO from a Lenovo System x or Power Rack on page 64 Removing the NE1064TO from a Lenovo iDataPlex Rack on page 66 Removing the Air Duct Opti...

Page 56: ...rdous radiation exposure DANGER Class 1 Laser Product Laser Klasse 1 Laser Klass 1 Luokan 1 Laserlaite Appareil À Laser de Classe 1 1 Disconnect the port cable from the transceiver 2 Pull down the locking lever to release the transceiver 3 Gently slide the transceiver out of the switch 4 After you remove the transceiver replace the safety cap To replace the transceiver module see the appropriate s...

Page 57: ...swap power supply modules Two active power supply modules are required for load sharing and redundancy If one power supply module fails you can replace it without powering off the switch or disrupting switch functions For proper airflow when operating the switch with only one power supply module the empty power supply bay must be closed by a blank power filler plate ...

Page 58: ... complete the following steps 1 Remove the power cord from the module s power connector 2 Press the release latch of the power supply module and slide the module out of the bay Attention Do not leave the power supply bay empty for more than 90 seconds while the switch is operating Either replace the power supply module or install a blank power filler plate To return the component to customer servi...

Page 59: ... source Connect to properly wired power sources any equipment that will be attached to this product When possible use one hand only to connect or disconnect signal cables Never turn on any equipment when there is evidence of fire water or structural damage Disconnect the attached ac power cords dc power sources network connections telecommunications systems and serial cables before you open the de...

Page 60: ...FF all power sources and equipment that is to be attached to this product 2 Attach signal cables to the product 3 Attach power cords to the product For ac systems use appliance inlets For dc systems ensure correct polarity of 48 V dc connections RTN is and 48 V dc is Earth ground should use a two hole lug for safety 4 Attach signal cables to other devices 5 Connect power cords to their sources 6 T...

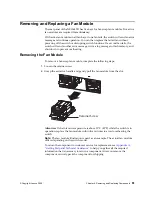
Page 61: ...nt overheating Removing the Fan Module To remove a hot swap fan module complete the following steps 1 Loosen the retainer screw 2 Grasp the extractor handle and gently pull the fan module from the slot Attention If the inlet air temperature is above 35 C 95 F while the switch is in operation replace the fan module within five minutes to avoid overheating the switch Note The fan module illustration...

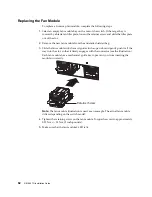
Page 62: ...d bag 3 Slide the fan module into the card guides in the open slot and gently push it all the way into the slot so that it firmly engages with the connector see the illustration Each fan module has a mechanical guide key to prevent you from inserting the module incorrectly Note The fan module illustration is used as an example The actual fan module differs depending on the switch model 4 Tighten t...

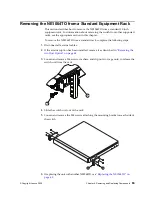
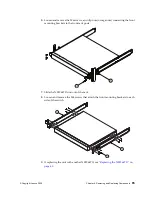
Page 63: ... the NE1064TO from a standard rack complete the following steps 1 Disconnect all external cables 2 If the air duct option has been installed remove it as described in Removing the Air Duct Option on page 68 3 Loosen and remove M6 screws washers and clip nuts or cage nuts to release the switch unit from the rack 4 Slide the switch unit out of the rack 5 Loosen and remove the M4 screws attaching the...

Page 64: ...ps 1 Disconnect all external cables 2 If the air duct option has been installed remove it as described in Removing the Air Duct Option on page 68 3 Loosen and remove M3 5 screws that secure the rear brackets to the front brackets 4 Loosen and remove the M6 screws and clip nuts or cage nuts that attach the filler plate and rear mounting brackets to the rear rack posts 5 Slide the rear mounting brac...

Page 65: ...uts or cage nuts connecting the front mounting brackets to the front rack posts 7 Slide the NE1064TO unit out of the rack 8 Loosen and remove the M4 screws that attach the front mounting brackets to each side of the switch 9 If replacing the unit with another NE1064TO see Replacing the NE1064TO on page 69 5 3 2 1 1 ...

Page 66: ...4TO from an iDataPlex rack complete the following steps 1 Disconnect all external cables 2 If the 1U air duct option has been installed remove it as described in Removing the Air Duct Option on page 68 3 Loosen and remove the M6 washers screws and clip nuts that attach the alignment plate 4 Loosen and remove the M6 washers and screws that mount the switch into the rack 6 3 4 3 4 ...

Page 67: ...lacing Components 67 5 Slide the switch out of the rack 6 Loosen and remove the M4 screws that attach front and rear mounting brackets to each side of the switch 7 If replacing the unit with another NE1064TO see Replacing the NE1064TO on page 69 1 2 6 ...

Page 68: ... Loosen the M4 thumbscrews securing the air duct unit to the mounting brackets 2 Slide the 1U air duct unit out of the rack To return the component to customer service for replacement see Appendix A Getting Help and Technical Assistance to help you gather all the required information After you remove the component securely pack it for shipping For instructions to install a replacement air duct opt...

Page 69: ...nd serial number to use for the replacement switch See Before Installing the NE1064TO on page 32 to locate the product information labels on the switch or through the switch firmware interface To return the chassis to customer service for replacement see Appendix A Getting Help and Technical Assistance to help you gather all the required information that is necessary to return a component After yo...

Page 70: ...70 NE1064TO Installation Guide ...

Page 71: ...ic functions Statement 5 CAUTION The power control button on the device and the power switch on the power supply do not turn off the electrical current supplied to the device The device also might have more than one power cord To remove all electrical current from the device ensure that all power cords are disconnected from the power source 1 2 ...

Page 72: ... is setup no password is required Use the following command to access the ONIE log file Using the Serial Console Port You can access the switch CLI through the serial console port on the front panel of the switch This port uses RS 232 serial communications Use the console cable kit to connect the serial console port to a terminal or a computer running a terminal emulation program The console port ...

Page 73: ...able you can download them from the Lenovo website To check for firmware and documentation updates go to the Lenovo website http support lenovo com Note Changes are made periodically to the Lenovo website Procedures for locating firmware and documentation might vary slightly from what is described in this document ...

Page 74: ...he NE1064TO ONIE User Guide GNU GRUB version 2 02 ONIE Install OS ONIE Rescue ONIE Uninstall OS ONIE Update ONIE ONIE Embed ONIE Use the and v keys to select which entry is highlighted Press enter to boot the selected OS e to edit the commands before booting or c for a command line The highlighted entry will be executed automatically in 4s ...

Page 75: ...conditions state that you the owner of the Lenovo product are responsible for maintaining and updating all software and firmware for the product unless it is covered by an additional maintenance contract Your service technician will request that you upgrade your software and firmware if the problem has a documented solution within a software upgrade If you have installed new hardware or software i...

Page 76: ...r in the Lenovo product documentation The Lenovo product documentation also describes the diagnostic tests that you can perform The documentation for most systems operating systems and programs contains troubleshooting procedures and explanations of error messages and error codes If you suspect a software problem see the documentation for the operating system or program ...

Page 77: ...ss or implied warranties in certain transactions therefore this statement may not apply to you This information could include technical inaccuracies or typographical errors Changes are periodically made to the information herein these changes will be incorporated in new editions of the publication Lenovo may make improvements and or changes in the product s and or the program s described in this p...

Page 78: ...rough extrapolation Actual results may vary Users of this document should verify the applicable data for their specific environment Trademarks Lenovo the Lenovo logo Flex System System x NeXtScale System and X Architecture are trademarks of Lenovo in the United States other countries or both Intel and Intel Xeon are trademarks of Intel Corporation in the United States other countries or both Inter...

Page 79: ... with the largest currently supported drives that are available from Lenovo Maximum memory might require replacement of the standard memory with an optional memory module Each solid state memory cell has an intrinsic finite number of write cycles that the cell can incur Therefore a solid state device has a maximum number of write cycles that it can be subjected to expressed as total bytes written ...

Page 80: ...rmation technology IT equipment to responsibly recycle their equipment when it is no longer needed Lenovo offers a variety of programs and services to assist equipment owners in recycling their IT products For information on recycling Lenovo products go to http www lenovo com recycling ...

Page 81: ... Lenovo may condition provision of repair or replacement of devices or parts on implementation of appropriate remedial measures to mitigate such environmental contamination Implementation of such remedial measures is a customer responsibility Contaminant Limits Particulate The room air must be continuously filtered with 40 atmospheric dust spot efficiency MERV 9 according to ASHRAE Standard 52 21 ...

Page 82: ...roduct may not be certified in your country for connection by any means whatsoever to interfaces of public telecommunications networks Further certification may be required by law prior to making any such connection Contact a Lenovo representative or reseller for any questions ...

Page 83: ... own expense Properly shielded and grounded cables and connectors must be used to meet FCC emission limits Lenovo is not responsible for any radio or television interference caused by using other than recommended cables and connectors or by unauthorized changes or modifications to this equipment Unauthorized changes or modifications could void the user s authority to operate the equipment This dev...

Page 84: ...Klasse A EU Richtlinie zur Elektromagnetischen Verträglichkeit Dieses Produkt entspricht den Schutzanforderungen der EU Richtlinie 2014 30 EU früher 2004 108 EC zur Angleichung der Rechtsvorschriften über die elektromagnetische Verträglichkeit in den EU Mitgliedsstaaten und hält die Grenzwerte der Klasse A der Norm gemäß Richtlinie Um dieses sicherzustellen sind die Geräte wie in den Handbüchern b...

Page 85: ...n Die Genehmigung wird erteilt wenn keine elektromagnetischen Störungen zu erwarten sind Auszug aus dem EMVG Paragraph 3 Abs 4 Dieses Genehmigungsverfahrenist nach Paragraph 9 EMVG in Verbindung mit der entsprechenden Kostenverordnung Amtsblatt 14 93 kostenpflichtig Anmerkung Um die Einhaltung des EMVG sicherzustellen sind die Geräte wie in den Handbüchern angegeben zu installieren und zu betreibe...

Page 86: ...netic wave compatibility equipment for business Type A Sellers and users need to pay attention to it This is for any areas other than home Russia Electromagnetic Interference EMI Class A statement People s Republic of China Class A electronic emission statement Taiwan Class A compliance statement ...

Page 87: ...diphenyl ethers PBDE 外殼 印刷電路板 電源供應器 線材 備考 1 超出 0 1 wt 及 超出 0 01 wt 係指限用物質之百分比含量超出百分比含量基 準值 Note 1 Exceeding 0 1 wt and exceeding 0 01 wt indicate that the percentage content of the restricted sub stance exceeds the reference percentage value of presence condition 備考 2 係指該項限用物質之百分比含量未超出百分比含量基準值 Note 2 indicates that the percentage content of the restricted substance does not exceed the reference pe...

Page 88: ...88 NE1064TO Installation Guide ...

Page 89: ... Copyright Lenovo 2020 89 Appendix C Technical Specifications The NE1064TO technical specifications are described in the following sections ...

Page 90: ...characteristics of the NE1064TO are listed in the following table Table 13 Physical characteristics Specification Physical characteristics Dimensions H x W x D 4 3 x 44 x 48 2 cm 1 7 x 17 32 x 19 in Weight 9 2 kg 20 lb maximum Airflow Available options for rear to front ...

Page 91: ...easurement Temperature ambient operating 0 C to 45 C 32 F to 113 F Temperature one fan failure operating 0 C to 45 C 32 F to 113 F Temperature storage 40 C to 75 C 40 F to 167 F Relative humidity non condensing operating 10 to 90 Relative humidity non condensing storage 5 to 95 Altitude operating 60 m to 2000 m 196 85 to 6561 7 ft Altitude storage N A Acoustic noise Less than 65 dB Heat dissipatio...

Page 92: ... frequency universal 50 60 Hz AC input voltage universal 100 240 VAC AC inrush current 8 34 A 120VAC typical 17 9 A 230VAC typical AC input current typical 1 78 A RMS 120 VAC 0 90 A RMS 230 VAC AC input current maximum 3 10 A RMS 120 VAC 1 58 A RMS 230 VAC Power supply rated output power 800 W each rear to front airflow System power dissipation typical 214 W System power dissipation maximum 372 W ...

Reviews: