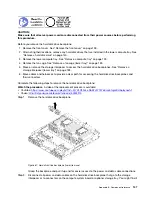


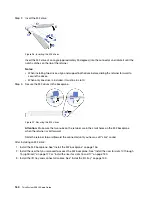


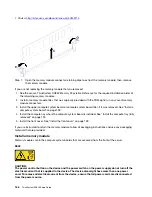


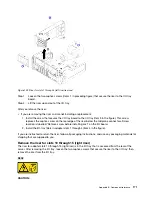


Step 2. Insert the M.2 drive.
Figure 96. Inserting the M.2 drives
Insert the M.2 drive at an angle (approximately 30 degrees) into the connector and rotate it until the
notch catches on the lip of the retainer
Notes:
• When installing two drives, align and support both drives before sliding the retainer forward to
secure the drives.
• When only one drive is installed, it must be in slot 0.
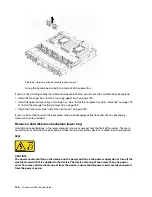
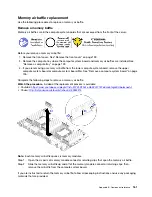
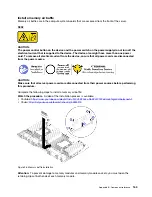
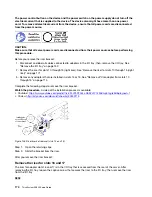
Step 3. Secure the M.2 drives in the backplane.
Figure 97. Securing the M.2 drives
Attention:
Make sure the two nubs on the retainer are in the small holes on the M.2 backplane
when the retainer is slid forward.
Slide the retainer forward (toward the connector) until you hear a soft “click” sound.
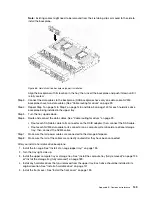
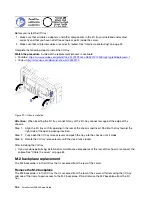
After installing an M.2 drive:
1. Install the M.2 backplane. See “Install the M.2 backplane” on page 156.
2. Install the riser that you removed to access the M.2 backplane. See “Install the riser for slots 10 through
15 (right riser)” on page 177 or “Install the riser for slots 16 and 17” on page 180.
3. Install the I/O tray and connect all cables. See “Install the I/O tray” on page 153.
160
ThinkSystem SR950 Setup Guide
Summary of Contents for ThinkSystem SR950 7X11
Page 1: ...ThinkSystem SR950 Setup Guide Machine Types 7X12 7X11 and 7X13 ...
Page 4: ...ii ThinkSystem SR950 Setup Guide ...
Page 18: ...14 ThinkSystem SR950 Setup Guide ...
Page 44: ...Figure 22 Server components 40 ThinkSystem SR950 Setup Guide ...
Page 48: ...44 ThinkSystem SR950 Setup Guide ...
Page 98: ...94 ThinkSystem SR950 Setup Guide ...
Page 106: ...102 ThinkSystem SR950 Setup Guide ...
Page 166: ...162 ThinkSystem SR950 Setup Guide ...
Page 199: ...X XCC management front USB configuration 87 Copyright Lenovo 2017 195 ...
Page 200: ...196 ThinkSystem SR950 Setup Guide ...
Page 201: ......
Page 202: ......


