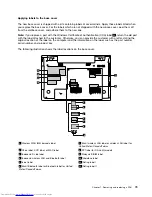
Applying labels to the base cover
The new base cover is shipped with a kit containing labels of several kinds. Apply those labels listed when
you replace the base cover. For the labels which are not shipped with the new base cover, peel them off
from the old base cover, and adhere them to the new one.
Note:
If you replace a part with the Windows Certificate of Authentication (COA) label
11
, return the old part
with the label attached to the customer. Otherwise, you can provide the customer with a letter, stating the
original location of the label on the computer and the information on the label, such as the part number,
serial number, and product key.
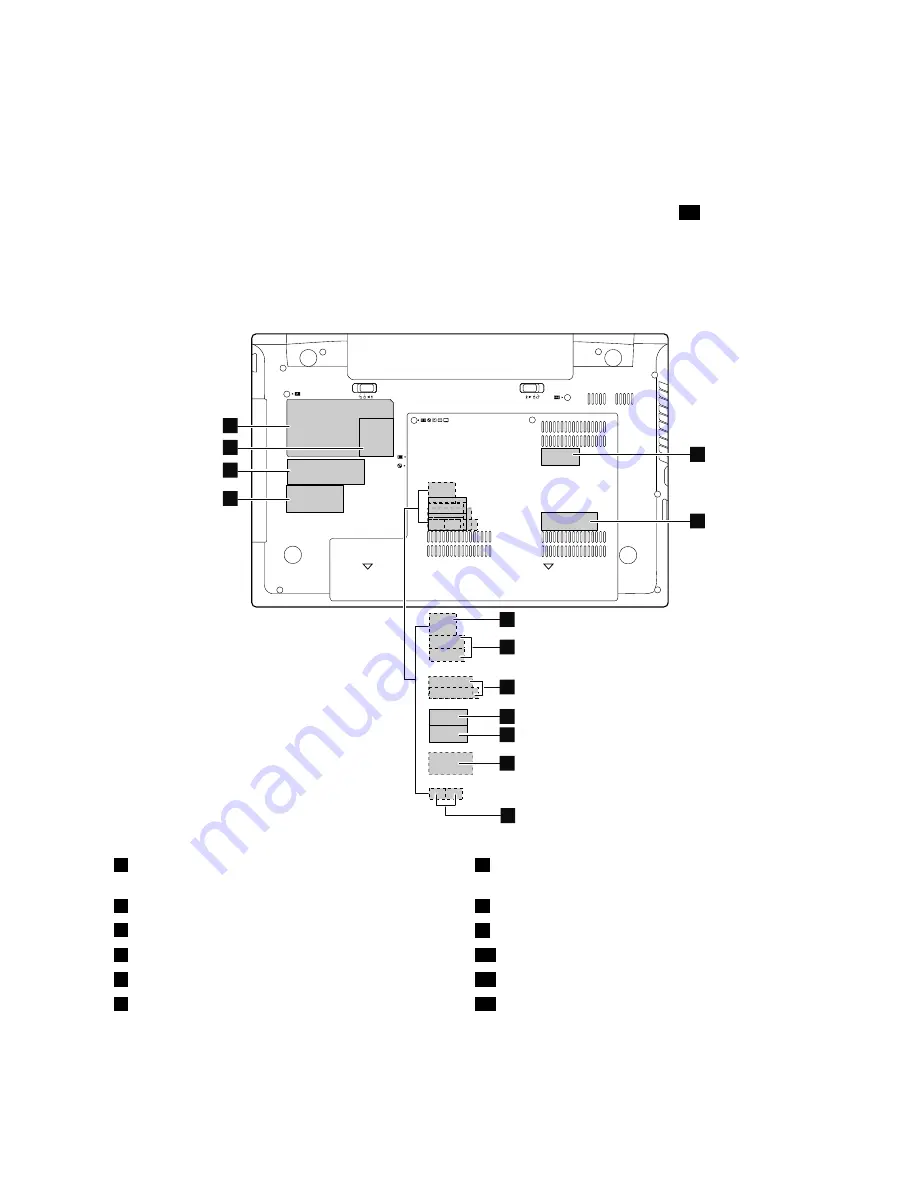
The following illustration shows the label locations on the base cover.
10
11
13
1
2
3
6
7
8
4
9
5
12
1
Wireless WAN IMEI barcode label
7
Brazil wireless LAN label or wireless LAN label for
United States/Canada/Taiwan
2
China label, KCC label, or MAC label
8
PPT label for China 3G models
3
Indonesia D side label
9
Malaysia SIRIM label
4
Indonesia wireless LAN and Bluetooth label
10
Vodafone label
5
Israel label
12
Rating label I
6
Brazil Bluetooth label or Bluetooth label for United
States/Canada/Taiwan
13
Rating label II
Chapter 7
.
Removing and replacing a FRU
79
Summary of Contents for V580
Page 1: ...Hardware Maintenance Manual Lenovo V580 and V580c ...
Page 4: ...ii Hardware Maintenance Manual ...
Page 6: ...iv Hardware Maintenance Manual ...
Page 11: ...DANGER DANGER DANGER DANGER DANGER Chapter 1 Safety information 5 ...
Page 12: ...DANGER 6 Hardware Maintenance Manual ...
Page 13: ...Chapter 1 Safety information 7 ...
Page 14: ...PERIGO PERIGO PERIGO PERIGO PERIGO PERIGO 8 Hardware Maintenance Manual ...
Page 15: ...PERIGO PERIGO DANGER DANGER DANGER Chapter 1 Safety information 9 ...
Page 16: ...DANGER DANGER DANGER DANGER DANGER VORSICHT 10 Hardware Maintenance Manual ...
Page 17: ...VORSICHT VORSICHT VORSICHT VORSICHT Chapter 1 Safety information 11 ...
Page 18: ...VORSICHT VORSICHT VORSICHT 12 Hardware Maintenance Manual ...
Page 19: ...Chapter 1 Safety information 13 ...
Page 20: ...14 Hardware Maintenance Manual ...
Page 21: ...Chapter 1 Safety information 15 ...
Page 22: ...16 Hardware Maintenance Manual ...
Page 23: ...Chapter 1 Safety information 17 ...
Page 24: ...18 Hardware Maintenance Manual ...
Page 26: ...20 Hardware Maintenance Manual ...
Page 27: ...Chapter 1 Safety information 21 ...
Page 28: ...22 Hardware Maintenance Manual ...
Page 29: ...Chapter 1 Safety information 23 ...
Page 30: ...24 Hardware Maintenance Manual ...
Page 31: ...Chapter 1 Safety information 25 ...
Page 32: ...26 Hardware Maintenance Manual ...
Page 38: ...32 Hardware Maintenance Manual ...
Page 42: ...36 Hardware Maintenance Manual ...
Page 48: ...42 Hardware Maintenance Manual ...
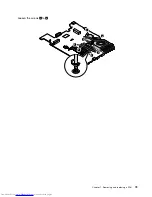
Page 79: ...Loosen the screws 2 to 8 2 3 4 5 7 6 8 Chapter 7 Removing and replacing a FRU 73 ...
Page 94: ...88 Hardware Maintenance Manual ...
Page 112: ...106 Hardware Maintenance Manual ...
Page 115: ......
Page 116: ......

