


• When one microprocessor is installed, the air baffle must be installed to provide proper system cooling.
• Do not remove the first microprocessor from the system board when you install the second
microprocessor.
• When you install the second microprocessor, you must also install additional memory and the fourth fan.
See “Installing a memory module” on page 171 for details about the installation sequence.
• To ensure proper server operation when you install an additional microprocessor, use microprocessors
that have the same QuickPath Interconnect (QPI) link speed, integrated memory controller frequency, core
frequency, power segment, internal cache size, and type.
• Mixing microprocessors of different stepping levels within the same server model is supported.
• When mixing microprocessors with different stepping levels within the same server model, you do not
have to install the microprocessor with lowest stepping level and features in microprocessor socket 1.
• Both microprocessor voltage regulator modules are integrated on the system board.
• Read the documentation that comes with the microprocessor to determine whether you have to update
the server firmware. To download the latest level of server firmware and other code updates for your
server, go to http://www.lenovo.com/support.
• The microprocessor speeds are automatically set for this server; therefore, you do not have to set any
microprocessor frequency-selection jumpers or switches.
• If the thermal-grease protective cover (for example, a plastic cap or tape liner) is removed from the heat
sink, do not touch the thermal grease on the bottom of the heat sink or set down the heat sink. For more
information about applying or working with thermal grease, see “Thermal grease” on page 289.
Note:
Removing the heat sink from the microprocessor destroys the even distribution of the thermal
grease and requires replacing the thermal grease.
• To order an additional optional microprocessor, contact your sales representative or reseller.
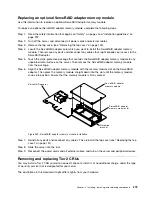
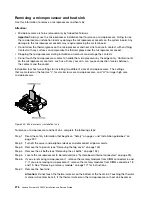
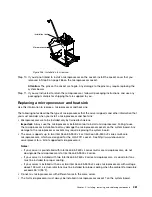
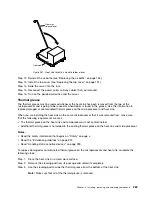
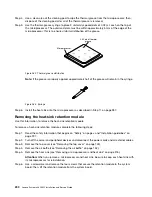
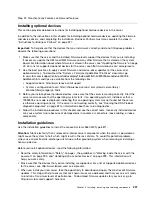
Installation tool has two settings for installing two different sizes of microprocessors. The settings
that are marked on the tool are “L” for smaller low core microprocessors, and “H” for larger high core
microprocessors.
H
Installation tool
Microprocessor
Figure 249. Microprocessor installation tools
To replace a microprocessor and heat sink, complete the following steps:
Step 1.
Read the safety information that begins on “Safety” on page v and “Installation guidelines” on
page 297.
Step 2.
Turn off the server and peripheral devices and disconnect the power cords and all external cables.
282
Lenovo System x3650 M5 Installation and Service Guide
Summary of Contents for x3650 M5
Page 1: ...Lenovo System x3650 M5 Installation and Service Guide Machine Type 8871 ...
Page 47: ...Figure 35 System board switches jumpers and buttons Chapter 1 The System x3650 M5 server 35 ...
Page 60: ...48 Lenovo System x3650 M5 Installation and Service Guide ...
Page 80: ...68 Lenovo System x3650 M5 Installation and Service Guide ...
Page 124: ...112 Lenovo System x3650 M5 Installation and Service Guide ...
Page 146: ...134 Lenovo System x3650 M5 Installation and Service Guide ...
Page 1322: ...1310 Lenovo System x3650 M5 Installation and Service Guide ...
Page 1330: ...Taiwan BSMI RoHS declaration 1318 Lenovo System x3650 M5 Installation and Service Guide ...
Page 1339: ......
Page 1340: ......


