


1
2
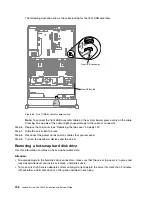
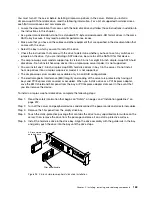
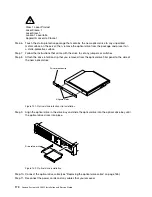
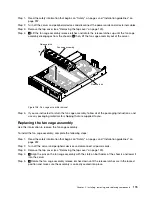
DVD drive cable
Cable connector latch
Optical drive
connector
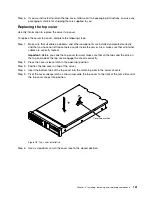
Figure 95. Optical drive cable connection
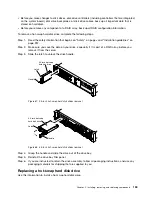
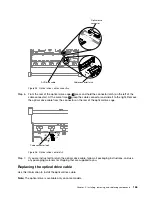
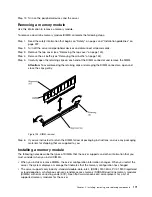
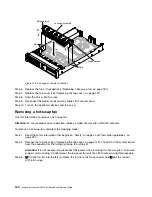
Step 6.
From the rear of the optical drive cage,
1
press and hold the connector latch (on the left of the
cable connector). At the same time,
2
grasp the cable connector and slide it to the right. Remove
the optical drive cable from the connector on the rear of the optical drive cage.
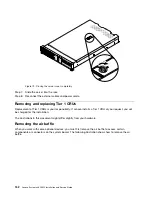
1
2
Cable connector latch
Figure 96. Optical drive cable latch
Step 7.
If you are instructed to return the optical drive cable, follow all packaging instructions, and use
any packaging materials for shipping that are supplied to you.
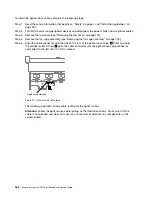
Replacing the optical drive cable
Use this information to install the optical drive cable.
Note:
The optical drive is available only on some models.
Installing, removing, and replacing components
165
Summary of Contents for x3650 M5
Page 1: ...Lenovo System x3650 M5 Installation and Service Guide Machine Type 8871 ...
Page 47: ...Figure 35 System board switches jumpers and buttons Chapter 1 The System x3650 M5 server 35 ...
Page 60: ...48 Lenovo System x3650 M5 Installation and Service Guide ...
Page 80: ...68 Lenovo System x3650 M5 Installation and Service Guide ...
Page 124: ...112 Lenovo System x3650 M5 Installation and Service Guide ...
Page 146: ...134 Lenovo System x3650 M5 Installation and Service Guide ...
Page 1322: ...1310 Lenovo System x3650 M5 Installation and Service Guide ...
Page 1330: ...Taiwan BSMI RoHS declaration 1318 Lenovo System x3650 M5 Installation and Service Guide ...
Page 1339: ......
Page 1340: ......


