background image

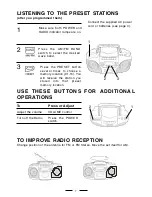
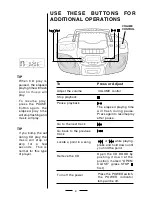
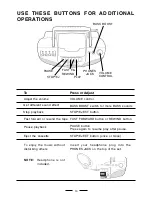
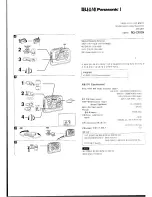
USE THESE BUTTONS FOR ADDITIONAL

OPERATIONS

To

Press or Adjust

Adjust the volume

VOLUME control

Turn off the Radio

Press the POWER

switch.

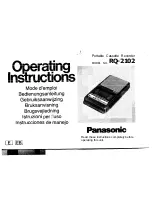
TO IMPROVE RADIO RECEPTION

Change position of the antenna for FM or FM Stereo. Move the set itself for AM.

7

1

2

LISTENING TO THE PRESET STATIONS

(after you programmed them)

Connect the supplied AC power

cord or batteries (see page 4).

2

Press the AM/FM BAND

switch to select the desired

wave band.

1

Make sure both POWER and

RADIO indicator lamps are on.

3

Press the PRESET button

several times to choose a

memory location (01-10). You

will receive the station you

stored into that preset

memory location.

1

2

3

BAND

Summary of Contents for CD-210

Page 1: ...READ CAREFULLY BEFORE USE PLAYS ALL MUSIC COMPACT DISCS DIGITAL TUNING WITH 20 RADIO PRESETS FULLY PROGRAMMABLE CD PLAYER WITH REPEAT RECEIVES AM FM STEREO BROADCASTS BASS BOOST SYSTEM RECORDS FROM CD RADIO OR BUILT IN MICROPHONE 2 WAY POWER AC DC REQUIRES 8 SIZE C BATTERIES CD 210SN021800 v 1 E ...

Page 2: ...mming pool and the like 6 Wall or Ceiling Mounting The appliance should not be mounted to a wall or ceiling 7 Ventilation The appliance should be situated so that its location or position does not interfere with its proper ventilation For example the appliance should not be situated on a bed sofa rug or similar surface that may block the ventilation openings or placed in a built in installation su...

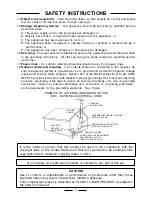
Page 3: ...o rain or D The appliance does not appear to operate normally or exhibits a marked change in performance or E The appliance has been dropped or the enclosure damaged 16 Servicing The user should not attempt to service the appliance beyond that described in the operating instructions All other servicing should be referred to qualified service personnel 17 Power lines An outdoor antenna should be lo...

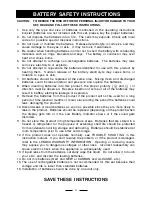
Page 4: ...of time several months or more since during the period the batteries could leak damaging the product 10 Discard weak or dead batteries as soon as possible since they are more likely to leak in the product Batteries should be replaced depending on the product when the display gets dim or if the Low Battery Indicator shows or if the sound gets distorted 11 Do not store this product in high temperatu...

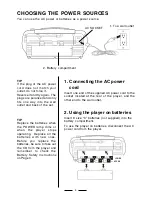
Page 5: ...atteries with new ones Before you replace the batteries be sure to take out the CD from the player and remember to check the Battery Safety Instructions on Page 3 1 Connecting the AC power cord Insert one end of the supplied AC power cord to the socket located at the rear of the player and the other end to the wall outlet 2 Using the player on batteries Insert 8 size C batteries not supplied into ...

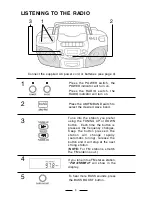
Page 6: ...ange rapidly automatic tuning release the button and it will stop at the next strong station NOTE For FM stations stretch the FM antenna out 5 3 If you tune into a FM stereo station FM STEREO will show in the display Press the AM FM BAND switch to select the desired wave band 1 Press the POWER switch the POWER indicator will turn on Press the RADIO switch the RADIO indicator will turn on BAND 4 3 ...
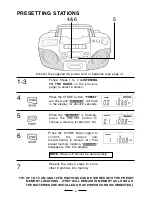
Page 7: ...shing press the PRESET button to choose a memory location 01 10 1 3 Follow Steps 1 to 3 LISTENING TO THE RADIO on the previous page to select a station 4 Press the STORE button PRESET will show and PROGRAM will flash in the display for about 6 seconds 7 4 6 5 NOTE Steps 4 6 should be done quickly TIP UP TO 10 AM AND 10 FM STATIONS CAN BE STORED INTO THE PRESET MEMORY LOCATIONS THEY WILL REMAIN IN ...
Page 8: ... the set itself for AM 7 1 2 LISTENING TO THE PRESET STATIONS after you programmed them Connect the supplied AC power cord or batteries see page 4 2 Press the AM FM BAND switch to select the desired wave band 1 Make sure both POWER and RADIO indicator lamps are on 3 Press the PRESET button several times to choose a memory location 01 10 You will receive the station you stored into that preset memo...

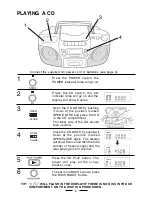
Page 9: ...CD indicator lamp will go on and the display will show 6 zeros 2 Close the CD DOOR by pushing it down at the position marked OPEN CLOSE again The display will show 6 zeros and then the total number of tracks songs and the total playing time of the disc 5 Press the CD PLAY button The player will play all the songs tracks once TRACK TRACK TRACK TRACK OPEN CLOSE OPEN CLOSE TIP WILL FLASH IN THE DISPL...

Page 10: ...ou find the point TIP When CD play is paused the elapsed playing time will flash and no music will play Remove the CD Open the CD DOOR by pushing it down at the position marked OPEN CLOSE press STOP first 9 VOLUME CONTROL Turn off the power Press the POWER switch the POWER indicator lamp will be off To resume play press the PAUSE button again the elapsed play time will stop flashing and music will...

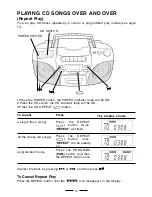
Page 11: ...ll be steady on 2 Press the CD switch the CD indicator lamp will be ON 1 Press the POWER switch the POWER indicator lamp will be ON programmed tracks Press the PROGRAM PGM button and then the REPEAT button once To Cancel Repeat Play Press the REPEAT button until the REPEAT icon disappears in the display 4 Select the track by pressing or and then press 10 The display shows POWER SWITCH CD SWITCH TR...

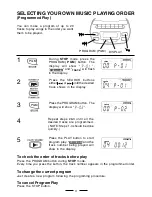
Page 12: ... are programmed NOTE Steps 1 4 should be done quickly Press the PLAY button to start program play PROGRAM and the track number being played will show in the display To check the order of tracks before play Press the PROGRAM button during STOP mode Every time you press the button the track number appears in the programmed order To change the current program Just create a new program following the p...

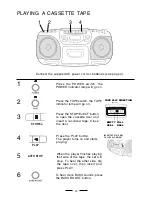
Page 13: ...aying 12 4 When the player finishes playing that side of the tape the set will stop To hear the other side flip the tape over then insert and press PLAY AUTO STOP FULL REEL EMPTY REEL TAPE PLAY DIRECTION 1 4 5 1 Press the POWER switch the POWER indicator lamp will go on 2 Press the TAPE switch the TAPE indicator lamp will go on 3 INSERT TAPE THIS WAY FULL REEL ON RIGHT STOP EJ PLAY 6 To hear more ...

Page 14: ...forward or rewind the tape FAST FORWARD button or REWIND button Pause playback PAUSE button Press again to resume play after pause STOP EJECT button 13 BASS BOOST To enjoy the music without disturbing others Insert your headphone plug into the PHONES JACK on the top of the set VOLUME CONTROL PAUSE STOP EJ FAST F REWIND PLAY PHONES JACK STOP EJECT button once or twice L NOTE Headphone is not includ...

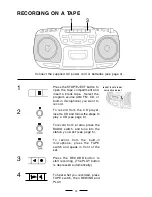
Page 15: ... the CD player insert a CD and follow the steps to play a CD see page 8 To record from a radio press the RADIO switch and tune into the station you want see page 5 To record from the built in microphone press the TAPE switch and speak in front of the set 3 14 Press the RECORD button to start recording The PLAY button is depressed automatically INSERT TAPE THIS WAY FULL REEL ON RIGHT 1 3 4 To hear ...

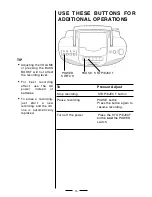
Page 16: ...e BASS BOOST will not affect the recording level Press or Adjust Stop recording STOP EJECT button PAUSE button Press the button again to resume recording Pause recording For best recording effect use the AC power instead of batteries To erase a recording just start a new recording and the old one is automatically replaced 15 POWER SWITCH PAUSE STOP EJECT ...

Page 17: ...up for a few minutes before inserting a cassette This CD player is designed to be played on a stable no vibration position If you bump the set during CD play the music will stop or skip for a few seconds This is normal for this type of player If you have any questions or problems concerning your player please contact our customer service department at 1 800 315 5885 MONDAY THURSDAY 09 00 AM 05 00 ...

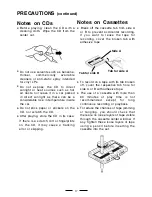
Page 18: ...rprints on the CD it may cause a tracking error or skipping To record on a tape with its tab broken off cover the respective tab hole for side A or B with adhesive tape The use of a cassette with more than 90 minutes of play time is not recommended except for long continuous recording or playback To reduce the chances of tape jamming or tangling you should check that there are no loose layers of t...

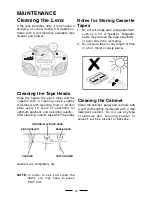
Page 19: ... cleaned are completely dry Cleaning the Cabinet Clean the cabinet panel and controls with a soft cloth slightly moistened with a mild detergent solution Do not use any type of abrasive pad scouring powder or solvent such as alcohol or benzene RECORD PLAY BACK HEAD PINCH ROLLER CAPSTAN COTTON SWAB ERASE HEAD 18 Notes for Storing Cassette Tapes 1 Do not put a tape near a magnetic field such as a TV...

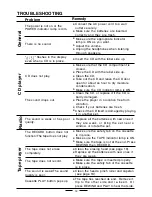
Page 20: ...your batteries are fresh Check if the CD itself is damaged by playing it in another set The sound is weak or has poor quality Replace all the batteries with new ones if they are weak or bring the set near a window or rotate the set The RECORD button does not function The tape does not play Make sure the safety tab on the cassette is in place Make sure the TAPE indicator lamp is ON Make sure the ta...

Page 21: ... response Standard normal bias cassette tape 70 10 KHz Radio Section Frequency range FM 87 5 108 MHz AM 520 1710 KHz LENOXX reserves the right to make design and specification changes for product improvement PROTECT YOUR FINE FURNITURE WE RECOMMEND A CLOTH OR OTHER PROTECTIVE MATERIAL BE PLACED UNDER THE SET WHEN PLACING IT ON SURFACE WITH A NATURAL OR LACQUER FINISH 2000 LENOXX ELECTRONICS CORP 2...

Reviews: