background image

SAFETY PRECAUTIONS

Do not take the set apart. The laser beam used in the set may harm your eyes. Refer

servicing to qualified service personnel only.

Do not insert pins or coins, clips, or any objects inside the set.

This set is equipped with a safety device which automatically turns the laser beam off

when the disc door is opened.

Do not drop the set or subject it to strong shocks. Doing so could result in damage.

Do not place the set in locations where the temperature is high, or in humid or dusty

locations, or locations with long heavy vibrations, or tilted surfaces.

The set’s cabinet may warp or the set may otherwise be damaged if it is placed in direct

sunlight, near heaters (where the temperature is 140

0

F/60

0

C or higher) or in cars with

the windows closed.

In the summer, the temperature may get as high as 212

0

F /100

0

C or more.

Use the set within a temperature range of 41

0

F/ 5

0

C to 95

0

F / 35

0

C.

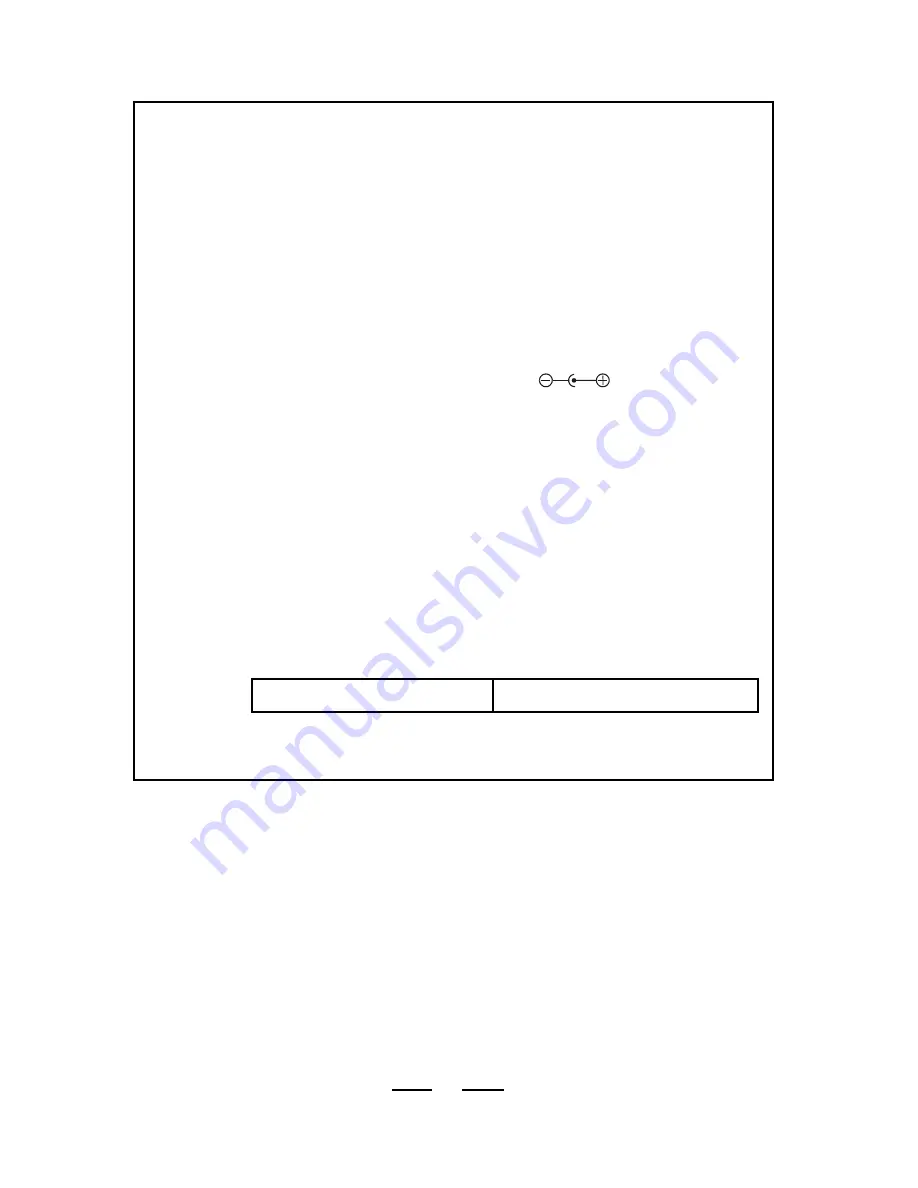
Use ONLY the DC 4.5V 600mA AC Adaptor with polarity 

, others may damage

your set. Disconnect the Adaptor from the wall outlet when the set is not to be used for

an extended period of time (3 days or more).

When cleaning your set, use a soft dry cloth. Do not use solvents or commercially

available cleaners, as they may damage or discolor the finish.

Do not wear headphones while operating a motor vehicle. This could create a traffic

hazard and is illegal in many areas. Do not use this set when bicycling or running.

The headphones supplied with your set provide superb stereo listening while allowing

you to hear some outside sounds when listening at normally low volume levels. Listening

at extremely high volume levels minimizes the intrusion of outside noise/sounds. In the

interest of safety, it is strongly advised against the use while engaging in activities

where the exclusion of external sounds (whistles, horns, sirens, traffic, etc.) could be

hazardous. Also loud volume can hurt your ears. If you notice that the sound has

become weak or distorted or if tracks do not change, this is an indication that your

batteries are low. Replace both batteries at the same time (see BATTERY OPERATION).

Your CD-50 is identified by a serial number located in the Battery Compartment. Record

this number in the space provided below.

Model CD-50 Serial No.

Date Purchased:

This booklet contains detailed information on its safety and use. Please read it carefully

so that you may take full advantage of its many features, and ensure a safe reliable

operation. Keep this booklet for future reference.

CONDENSATION

If cold water is poured into a glass, water droplets form on the outside of the glass.

This is called condensation. Condensation may occur on internal operating parts of the

lens.

Condensation occurs:

When the set is brought from the cold outdoors into a warm room, or if it is in a cold

room to a room which is heated, or in the summer, if the set is moved from an air-

conditioned room or car to a hot or humid location.

Should condensation occur, the set may not operate properly. Open the CD Door and

wait for about 20 minutes (to allow the internal parts to adjust to the surrounding

temperature) before using the set.

8

Summary of Contents for CD-50

Page 1: ... 50 OPERATING INSTRUCTIONS PLEASE READ CAREFULLY BEFORE USE PLAYS ALL MUSIC COMPACT DISCS 6 DIGIT LCD VISUAL DISPLAY TRACK REPEAT DISC REPEAT DELUXE STEREO HEADPHONES INCLUDED USES 4 SIZE AA BATTERIES NOT INCLUDED CD 50 70A 0A9 121000 NL v 1 E ...

Page 2: ...PEAT BUTTON 6 BACKWARD SKIP SEARCH BUTTON 7 FORWARD SKIP SEARCH BUTTON 8 LCD VISUAL DISPLAY 9 PLAY PAUSE AND POWER ON BUTTON 10 STOP AND POWER OFF BUTTON POWER OFF IS AUTOMATIC AFTER 30 SECONDS 11 PROGRAM BUTTON 12 CD DOOR 13 BATTERY DOOR 14 AC ADAPTOR JACK AC ADAPTOR not included 1 2 12 11 10 9 8 13 1 14 3 4 5 6 7 ...

Page 3: ... If the alkaline batteries are weak and discharged this symbol shows or flashes in the display then the power automatically turns off If this occurs replace the alkaline batteries also if display does not show anything the batteries are dead Alkaline battery life Bear in mind that battery life expectancy is based upon volume listening levels Maximum battery power consumption happens at maximum set...

Page 4: ... the headphones 3 Press the PLAY PAUSE button 1234 1234 1234 1234 Push here Disc Label side up Press to open To PHONES Stereo headphones PLAY PAUSE Button VOLUME CONTROL TRACK NUMBER CURRENTLY PLAYING ELAPSED PLAYING TIME OF THE CURRENT TRACK 3 MAXIMUM MINIMUM ...

Page 5: ...d and release when the desired music section of the disc is found If you press and hold the SKIP button while the last track is playing and the end of the track is reached the music stops and the display will show the next track number then power will shut off after 30 seconds Auto power off function The power turns off automatically 30 seconds after all tracks on the disc have been played or afte...

Page 6: ... playing in sequence 1 2 3 etc and when finished will start all over again until you press the STOP button REPEAT PLAY To resume normal play press the REPEAT button again REPEAT PROGRAMMED PLAY After you have programmed your own sequence as instructed on page 6 you may play the songs repeatedly in your programmed sequence 1 Follow the instructions on page 6 and press the PLAY button to start progr...

Page 7: ...r 3 Press the PROGRAM button Track 3 is now programmed Program 2 will now show in the display ready for your next selection of track X 1 PGM 4 Repeat steps 2 and 3 to program other tracks till you finish up to 21 selections 5 After programming is finished press PLAY to begin programmed play shows in the display together with PGM and music begins NOTE The player will stop automatically after all pr...

Page 8: ... conventional records compact discs have no grooves to collect dust and microscopic dirt so gently wiping them with a soft cloth should remove most particles Wipe in a straight motion from the center to the edge Handling Compact Discs Dirty scratched or warped discs may cause skipping or noise Handle the disc only by the edges To keep clean do not touch its surface Never use thinner benzine record...

Page 9: ...provide superb stereo listening while allowing you to hear some outside sounds when listening at normally low volume levels Listening at extremely high volume levels minimizes the intrusion of outside noise sounds In the interest of safety it is strongly advised against the use while engaging in activities where the exclusion of external sounds whistles horns sirens traffic etc could be hazardous ...

Page 10: ...owing measures Reorient or relocate the receiving antenna Increase the separation between the equipment and receiver Connect the equipment into an outlet on a circuit different from that to which the receiver is connected Consult the dealer or an experienced radio TV technician for help SAFETY CERTIFICATION This Compact Disc Player is made and tested to meet safety standards of the FCC requirement...

Page 11: ...ake out the CD and leave the CD Door open for about 20 minutes to dry the moisture condensation No sound from headphones Re insert headphone plug into PHONES jack Increase the volume Sound is skipping or sound stops The compact disc or lens is dirty or CD is scratched Strong vibrations Clean or replace the compact disc or clean the lens Weak batteries Music is too loud Sound is distorted Buttons d...

Page 12: ... set that is returned to LENOXX ELECTRONICS CORP LENOXX will pay the shipping back to you After the initial 90 day period expires and for a period of 12 months from original purchase we will repair the unit covering any part s that need to be replaced at no charge but will charge for the cost of labor return postage paid by Lenoxx This warranty does not apply to any products which have been subjec...

Page 13: ...he display your batteries are weak and need replacement PLUGGING IN Plug the headphones into the PHONES JACK on the left side of the player and put on the headphones TO PHONES JACK VOLUME CONTROL Adjust this VOLUME CONTROL to your preference 1 CD 50 70A 0A9 QI121000 NL v 1 E GET INTO STOP MODE For Programming TOTAL TRACKS TOTAL PLAYING TIME Press the PLAY PAUSE button the set begins to play then p...

Page 14: ... the disc is playing to search backward or forward through a particular track or song Press several times to skip to a later or earlier song or to get back to the beginning of the song PROGRAMMING To arrange the songs to play in a special sequence 1 5 2 3 etc you can program the set to your taste During stop mode press the PROGRAM button then press either SKIP button or to select the track you wan...

Reviews: