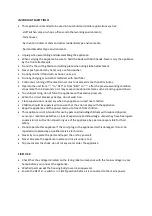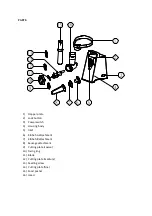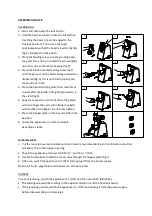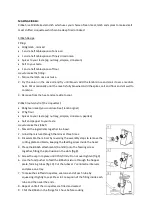
ASSEMBLY AND USE:
ASSEMBLING
1.
Press and hold down the lock button.
2.
Hold the head and insert it into the inlet (when
inserting the head, it must be angled to the
3’oclock position). Then move the head
anticlockwise so that the head is inserted tightly
(fig.2). Release the lock button.
3.
Place the feeding screw into the grinding head,
long end first, and turn to feed the screw slightly
until it is set into the motor housing (fig.3).
4.
Place the blade onto the feeding screw shaft
with the grooves on the blade facing outwards as
illustrated (fig.4). If it is not fitted properly, the
meat will not mince.
5.
Place the desired cutting plate (fine, medium or
coarse) after the blade, fitting the protrusions in
the slots (fig.5).
6.
Support or press the centre of the cutting plate
with one finger then screw the fixing ring tight
with another hand (fig.6). Do not over tighten.
7.
Place the hopper plate on the head and fix it into
position.
8.
Locate the appliance on a firm and stable
benchtop or table.
MINCING MEAT
1.
Cut the meat (sinew-less, boneless and lean meat is recommended) into 2 centimetre cubes that
will easily fit into the hopper opening.
2.
Plug in the appliance and press the REV/•/ switch to (ON).
3.
Use the food pusher to feed the meat cubes through the hopper plate (fig.7).
4.
After use, switch the appliance to • (OFF) and unplug it from the power supply.
Note: Firm fruits, vegetables and cheeses can also be minced.
REVERSE
In case of jamming, switch the appliance to • (OFF) and then press REV (REVERSE).
•
The feeding screw will be rotating in the opposite direction, and the head will empty.
•
If the jamming persists, switch the appliance to • (OFF) and unplug it from the power supply
before disassembling and cleaning it.


