background image


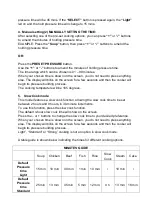
pressure time will be 45 mins. If the 

“SELECT”

 button is pressed again, the 

“Light” 

led on and the hold pressure time will change to 15 mins. 


4. Manual setting (2) MANUALLY SETTING THE TIME:


After selecting one of the pre-set cooking options, you can press 

“+”

 or 

“-” 

buttons 

to amend the minutes of holding pressure time. 
EXAMPLE: Press the 

“Soup”

 button, then press 

“+”

 or 

“-”

 buttons to amend the 

holding pressure time. 
 

OR: 

 
Press the 

PRESET PRESSURE 

button. 

Use the 

“+” 

or

 “-”

 buttons to amend the minutes of holding pressure time. 

The time range which can be chosen is 01 – 99 minutes. 
When your chosen time is shown on the screen, you do not need to press anything 
else. The display will blink on the screen for a few seconds and then the cooker will 
begin its pressure building process. 
The cooking temperature will be 165 degrees. 
 

5.  Slow Cook mode: 

This model features a slow cook function, allowing the slow cook time to be set 
between 2 hours and 9 hours, in 30-minute increments.   
To use this function, press the slow cook function.   
The default 4-hour slow cook time will show on the screen. 
Press the – or + buttons to change the slow cook time to your desired preference. 
When your chosen time is shown on the screen, you do not need to press anything 
else. The display will blink on the screen for a few seconds and then the cooker will 
begin its pressure building process. 
Light”, “Standard” or “Strong” cooking is not an option in slow cook mode. 
 

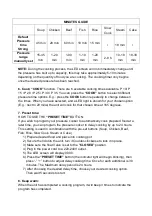
A table guide is shown below indicating the times for different cooking options. 


MINUTES GUIDE 


Soup 

Chicken 

Beef 

Fish 

Rice 

Slow 

Cook 

Steam 

Cake 

Default 

Pressure 

time   

Light 

15 min 

10 min 

40 min 

1 min 

10 min 

10 min 

Default 

Pressure 

time 

Standard 

25 min 

13 min 

45 min 

5 min 

12 min 

4 h 

13 min  18 min   

Summary of Contents for Healthy Choice PC8000

Page 1: ...Model no PC8000 Batch no PR3774 PLEASE READ AND RETAIN INSTRUCTIONS FOR FUTURE REFERENCE THIS APPLIANCE IS INTENDED FOR HOUSEHOLD USE ONLY ...

Page 2: ...cooking program 2 Fast Cooking Saving Energy 1 It saves about 20 of time and more than 25 of power when cooking meals It will save about 40 of the time and more than 50 of power when cooking soups 2 The appliance features a high pressure and elevated temperature cooking system to cook food with less energy and a faster timeframe 3 Safety Features 1 Safety lock the cover cannot be closed if it is n...

Page 3: ...e store where the unit was purchased or call Lenoxx customer service for further assistance on 1300 666 848 Do not let the cord hang off the edge of a bench table or touch a hot surface Do not pull the cord Always take the plug Do not reel the cord around the device housing Never attempt to disassemble and repair the appliance by yourself If you encounter problems please contact customer service U...

Page 4: ...similar applications such as staff kitchen areas in shops offices and other working environments farm houses by clients in hotels motels and other residential type environments bed and breakfast type environments This appliance is not intended to be operated by means of an external timer or separate remote control system Caution hot surface The surface is liable to get hot during use Do not move t...

Page 5: ...eam relief valve and float valve Do not press on the float valve while the appliance is working Do not use the appliance if the sealing ring is absent or damaged Use the sealing ring from this appliance only Before pressure cooking ensure that the inner pot contains water or broth Pressure cooking needs liquid for producing steam Ensure that steam does not come out where the lid meets the applianc...

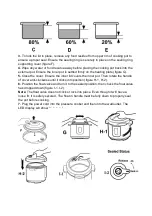
Page 6: ...od and liquids as the recipe directs Note The total volume of food and liquid must not exceed 80 of the capacity of the cooking pot figure C For foods such as dried vegetables and beans or rice and grains the total volume must not exceed 60 capacity figure D Always use at least 1 2 cup liquid when pressure cooking The total volume of food and liquid must not be less than 20 of the capacity of the ...

Page 7: ...Close the cover Ensure the inner lid covers the inner pot Then rotate the handle of cover anti clockwise until it clicks into position figure H 1 H 2 6 Position the float valve and turn it to the sealed position then check the float valve has dropped down figure I 1 I 2 Note The float valve does not click or lock into place Even though it will have a loose fit it is safely secured The float in han...

Page 8: ...e cooking liquids such as porridge or soups the unit must be cooled down before you release the pressure Operating Instructions 1 When the unit is turned on there will be a BEEP sound and LED will show 00 00 the unit is now in stand by mode and you may choose your desired cooking option by pressing one of the pre set buttons Soup Chicken Beef Fish Rice Slow Cook Steam or Cake 2 When you have selec...

Page 9: ...s The cooking temperature will be 165 degrees 5 Slow Cook mode This model features a slow cook function allowing the slow cook time to be set between 2 hours and 9 hours in 30 minute increments To use this function press the slow cook function The default 4 hour slow cook time will show on the screen Press the or buttons to change the slow cook time to your desired preference When your chosen time...

Page 10: ...ill cook for that chosen time at 165 degrees 7 Preset time HOW TO USE THE PRESET TIME BUTTON If you wish to program your pressure cooker to automatically cook prepared food at a later time you can program the pressure cooker to delay cooking by up to 24 hours This setting is used in combination with the pre set buttons Soup Chicken Beef Fish Rice Slow Cook Steam or Cake 1 Prepare desired food and ...

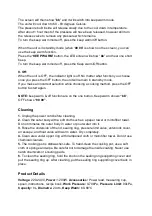
Page 11: ...art again NOTE keep warm off function are on the one button Keep warm shows bb OFF shows 00 00 Cleaning 1 Unplug the power cord before cleaning 2 Clean the outer body with a soft cloth such as a paper towel or microfiber towel Do not immerse the outer body in water or pour water into it 3 Rinse the underside of the lid sealing ring pressure limit valve anti block cover air escape and float valve w...

Page 12: ...pes from the float valve Food stuck on the sealing ring of the float valve Clean the sealing ring The sealing ring on the float wore out Replace the sealing ring The float will not rise The pressure limit valve is not placed properly Place the device to Pressure Not enough food and water Check recipe for proper quantity Air escaping from the rim of the lid and the pressure limit valve Call our Con...

Reviews: