background image


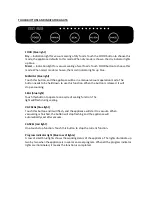
TOUCH BUTTONS AND INDICATOR LIGHTS: 


FOOD (blue light) 

Dry 

—Indication light for vacuum sealing of dry foods. Touch the FOOD button to choose this 

mode, the appliance defaults to this mode. When dry mode is chosen, the dry indicator lights 
up blue. 

Moist 

— Indication light for vacuum sealing of wet foods. Touch FOOD button to choose this 

mode. When moist mode is chosen, the moist indicator lights up blue. 


MANUAL (blue light) 

Touch this button, and the appliance will be in a manual vacuum operation mode. The 

button needs to be held down to use this function. When the button is released, it will 

stop vacuuming. 


SEAL (blue light) 

Touch this button to operate one cycle of sealing function. The 

light will flash during sealing. 


VAC SEAL (blue light) 

Touch this button and it will flash, and the appliance will start to vacuum. When 

vacuuming is finished, the button will stop flashing and the appliance will 

automatically seal after vacuum. 


CANCEL (red light) 

One-touch stop function. Touch this button to stop the current function. 


Progress indicator light (blue row of lights) 

A row of small blue lights shows the working status of the appliance. The lights illuminate up 

two by two when the appliance is in seal or vac seal program. When all the progress indicator 

lights are illuminated, it means the function is completed. 


Summary of Contents for Healthy Choice VS110

Page 1: ...Model VS110 Batch PR4092 This appliance is intended for household use only Please read and retain these instructions for future reference ...

Page 2: ...hine is the perfect solution to storing your game and enjoying trail mix and snacks on the go Vacuum sealed bags are also perfect for sous vide cooking This vacuum sealer comes pre packaged with two external vacuum sealing pumps and one 28cm x 300cm vacuum sealing bag roll to get you started The vacuum sealing pumps will perfectly seal bags and canisters from both other brands and our very own Vac...

Page 3: ...place as required 9 To protect against electric shock do not immerse the cord plug or appliance in water or any other liquid Do not expose the appliance to dripping or splashing and ensure that no objects filled with liquids such as vases are placed on the appliance Do not put any water or other liquid into the main housing of the appliance through the vents Do not rinse it under the tap 10 Do not...

Page 4: ...wledge or experience unless they are supervised or given prior instructions concerning the use of the appliance by someone responsible for their safety Children must be supervised to ensure that they do not play with the appliance 23 Do not leave the appliance operating while unattended 24 It is not recommended to use non designated sealing bags or accessories 25 Do not touch the sealing tape on t...

Page 5: ...sories 1 Dry indication light 2 Food button 3 Moist indicator light 4 Manual button 5 Progress indicator light 6 Seal button 7 Vac seal button 8 Cancel button 9 Cutter 10 Open button 11 Vacuum sealing strip 12 Vacuum room 13 Heat sealing strip 14 Silicone sealing strip 15 Buckle 16 Bag storage slot 17 Vacuum heal 18 Vacuum hole switch 19 Cable storage slot ...

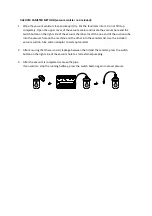
Page 6: ...When the button is released it will stop vacuuming SEAL blue light Touch this button to operate one cycle of sealing function The light will flash during sealing VAC SEAL blue light Touch this button and it will flash and the appliance will start to vacuum When vacuuming is finished the button will stop flashing and the appliance will automatically seal after vacuum CANCEL red light One touch stop...

Page 7: ...acuum canister and bags as well as wine bottles on the market Vacuum hole and switch After inserting matching end of the outer suction tube to the vacuum hole connect it to the container to be evacuated Press the outer pumping button on the right side of the hole to start the vacuum After the vacuum is completed it can be automatically stopped or pressed again to manually stop the evacuation COVER...

Page 8: ...est use experience place the curled face of roll bag downwards CABLE STORAGE Cable storage slot When the appliance is not in use place the power cord to the cable slot in the back of the appliance Do not twist the power cord around the appliance It is recommended that you first wrap the thread in your hand for several rounds and then place it in the storage slot which is convenient and quick ...

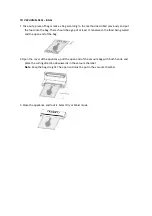
Page 9: ... to flash the progress indicator light will start to light up two by two and the appliance starts sealing When the progress indicator lights are all ON the SEAL button will stop flashing The sealing progress is completed with a beep beep sound You can also cut the bag after sealing Unlock the cover and open the appliance Take out the vacuum bag that with one end sealed Note the heating element of ...

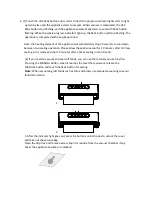
Page 10: ... of at least 7cm between the food being sealed and the open end of the bag 2 Open the cover of the appliance pull the open end of the vacuum bag with both hands and place the curling direction downwards in the vacuum chamber Note Keep the bag straight The open end must be put in the vacuum chamber 3 Close the appliance and lock it Select Dry or Moist mode ...

Page 11: ...ng operation Please allow the appliance cool for 10 minutes after 10 times sealing in dry mode and cool 10 minutes after 3 times sealing in moist mode 2 If you need to vacuum and seal soft foods you can use the manual vacuum function Pressing the MANUAL button when it reaches the level that you want release the MANUAL button and touch the SEAL button for sealing Note When vacuuming soft foods such...

Page 12: ... Insert the one end of the suction tube into the vacuum hole on the machine and the other into the canisters lid Use the included vacuum suction tube and an adaptor to suit your canister 2 After ensuring that there is no air leakage between the lid and the canister press the switch button on the right side of the vacuum hole to start external pumping 3 After the vacuum is completed remove the pipe...

Page 13: ...cuum sealing process if a small amount of liquid or debris in the packaging bag is accidentally pumped into the vacuum chamber this may cause problems of plugging the vacuum pump or damaging the appliance To avoid this fold some paper towels or put one filter in the vacuum chamber 8 Fresh fruits and vegetables are not suitable for vacuum preservation at room temperature Because fresh fruits and ve...

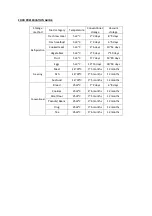
Page 14: ...days Vegetables 5 3 3 5 days 7 10 days Fruit 5 3 5 7 days 14 20 days Eggs 5 3 10 15 days 30 50 days Freezing Meat 16 20 3 5 months 12 months Fish 16 20 3 5 months 12 months Seafood 16 20 3 5 months 12 months Conventional Bread 25 2 1 2 days 6 8 days Cookies 25 2 4 6 months 12 months Rice Flour 25 2 3 5 months 12 months Peanuts Beans 25 2 3 6 months 12 months Drug 25 2 3 6 months 12 months Tea 25 2...

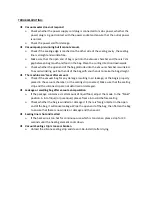
Page 15: ... t seal after vacuum Ø Check if the vacuum bag for any damage resulting in air leakage or the bag is properly placed in the vacuum chamber or the sealing strip covered Make sure that the sealing strip and the silicone strip are not deformed or damaged u Leakage or swelling bag after vacuum encapsulation Ø If the package contains a small amount of liquid food adjust the mode to the Moist position A...

Page 16: ...d used again Ø Turn the inner of the bag out and wash it on the top of the dishwasher u Vacuum canister not included Ø The used vacuum canister can be cleaned with warm water and proper amount of detergent rinsed with clean water dried and used again Ø For safety reasons the container should be placed on the top rack of the dishwasher but the lid should be wiped with a rag The lid is not dishwashe...

Reviews: