background image

16 

Trouble Shooting 

 
● 

Verify you have the right power cord or adapter. Never use a power supply or adapter with a 

non-compliant DC output voltage or it will burn the equipment.


● 

Select  the  proper  UTP  or  STP  cable  in  order  to  construct  the  network.  Use  an  unshielded 

twisted-pair  (UTP)  or  shield  twisted-pair  (STP)  cable  for  RJ-45  connections:  100Ω  Category  5e 

for  10/100/1000Mbps.  Also  be  sure  that  the  length  of  any  twisted-pair  connection  does  not 

exceed 100 meters (328 feet).


● 

Diagnosing LED Indicators: To assist in identifying problems, the switch can be easily monitored 

with the LED indicators which help to identity if any problems exist.


Please refer to the LED Indicators section for LED light indication.


● 

If the power indicator LED does not turn on when the power cord is plugged in, the user may 

have  a  problem  with  the  power  cord.  Check  for  loose  power  connections,  power  losses  or 

surges at the power outlet.


Please  contact  Leonton  for  technical  support  service,  if  the  problem  still  cannot  be 

resolved.


● 

If the industrial switch LED indicators are normal and the connected cables are correct but the 

packets  still  cannot  transmit,  please  check  the  system’s  Ethernet  devices’  configuration  or 

status.


Summary of Contents for PG5-1002-10GSFP Series

Page 1: ...LEONTON PG5 1002 10GSFP Series User Manual...

Page 2: ...t not limited to the implied warranties of merchantability and fitness for a particular purpose Leonton Technologies Co Ltd may make improvements and or changes to the product and or specifications of...

Page 3: ...equipment D claration FCC Cet quipement a t test et reconnu conforme aux limites de la classe A pour les quipements num riques conform ment la section 15 des R glementations FCC Ces limites sont con u...

Page 4: ...equired to take adequate measures CE Mark AVERTISSEMENT Ceci est un produit de classe A Dans un environnement domestique ce produit peut tre utilis en pr sence d interf rences radio This document is t...

Page 5: ...Physical Dimensions 3 Front Panel 4 Top View 4 LED Indicators 5 Ethernet Ports 6 Cabling 7 Wiring the Power Inputs 9 Wiring the Fault Alarm Contact 9 Grounding Note 10 Mounting Installation 11 DIN Rai...

Page 6: ...put design with reverse polarity protection Key Features Interface Performance All Copper ports support auto MDI MDI X function PG5 1002 10GSFP Embedded 8 10 100 1000Tx PSE 30W port 2 1G 10GbE SFP Sto...

Page 7: ...strial use power The industrial Ethernet switch s hardware specs ports cabling information and wiring installation will be described within this user manual ATTETNION Si la tension CC est fournie par...

Page 8: ...3 Hardware Description Physical Dimensions Figure 2 1 below shows the physical dimensions 54mm W x 142mm H x 99mm D Figure 2 1 Physical Dimensions...

Page 9: ...aged Ethernet switch is shown below in Figure 2 2 Figure 2 2 The Front Panel Top View Figure 2 3 below shows the top panel of the PG5 1002 10GSFP series switches that is equipped with one 6 pin remova...

Page 10: ...appens MASTER Green On ERPS Owner Mode Ring Master is ready Off ERPS Owner Mode is not active RING Green On ERPS Ring Network is active and works well Flashing ERPS Ring works abnormally or misconfigu...

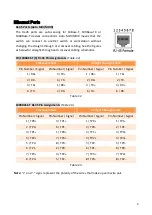
Page 11: ...raight Through Cable Pin Number Signal Pin Number Signal Pin Number Signal Pin Number Signal 1 RX 3 TX 1 RX 1 TX 2 RX 6 TX 2 RX 2 TX 3 TX 1 RX 3 TX 3 RX 6 TX 2 RX 6 TX 6 RX Table 2 2 1000BASE T RJ 45...

Page 12: ...se employ optional optical transceiver SFP that complies with IEC 60825 1 and classified as Class 1 laser product Attention Veuillez utiliser un metteur r cepteur optique SFP conforme la norme CEI 608...

Page 13: ...ctor from the transceiver please follow the steps shown below Step 1 Press the upper side of the LC connector from the transceiver and pull it out to release as shown below in Figure 2 7 Figure 2 7 Re...

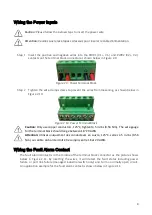
Page 14: ...nal Block Caution Only use copper conductors 125 C tighten to 5 in lbs 0 56 Nm The wire gauge for the terminal block should range between 18 20 AWG Attention Utilisez uniquement des conducteurs en cui...

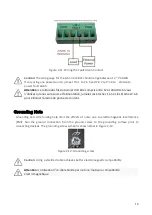
Page 15: ...n jumelez les broches 1 5 et les broches 2 6 pour liminer l alarme de panne de courant Grounding Note Grounding and wire routing help limit the effects of noise due to electromagnetic interference EMI...

Page 16: ...ure 3 1 The Rear Side of the Switch and DIN Rail Bracket Follow the steps below to learn how to hang the industrial Ethernet switch Step 1 Use the screws to install the DIN Rail bracket on the rear si...

Page 17: ...ull down the bracket on to the rail as shown below in Figure 3 3 Figure 3 3 Stable the Switch on DIN Rail Step 5 Check if the bracket is mounted tightly on the rail Step 6 To remove the industrial Eth...

Page 18: ...wall mounting brackets on the top and bottom of the industrial Ethernet switch Step 3 Use the screws to screw the wall mounting bracket on the industrial Ethernet switch Step 4 Use the hook holes at t...

Page 19: ...14 Below in Figure 3 5 are the dimensions of the wall mounting bracket Figure 3 5 Wall Mounting Bracket Dimensions...

Page 20: ...to the Mounting Installation section Step 4 Power on the industrial Ethernet switch and then the power LED light will turn on If you need help on how to wire power please refer to the Wiring the Powe...

Page 21: ...assist in identifying problems the switch can be easily monitored with the LED indicators which help to identity if any problems exist Please refer to the LED Indicators section for LED light indicat...

Reviews: