7
6 Installing the Ceiling Fan
WARNING:
Follow the safety instructions (see
Section 1) to avoid injuries or damage as a result of
installation errors. Do not use the fan if it is damaged.
NOTE:
The letters in parentheses refer to the figure
in Section 3 "Product Overview".
Required Tools
Phillips head screwdriver
Open-jawed spanner 8 mm
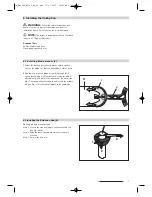
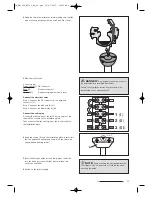
6.1 Installing Blade mounts (J)
1 Select the desired decor: wood grain or white surface.
Lay out the blades so that the desired decor faces down.
2 Run the lock pins of a blade mount (J) through the 3
openings of a blade (H) from below. Position the blade
attachment (I) and push in the direction of the arrow (see
Fig.). The spring clip must snap in and secure the middle
pin (see Fig.: circle). Mount all blades in the same way.
6.2 Installing the Extension Rod (B)
1a Long rod with plastic mount:
Step 1: Loosen the side locking pin on the extension rod
(see Fig.: circle).
Step 2: Slide the mount downward until the lock pin is
exposed.
Step 3: Pull out the lock pin.
H
I
J
1
2
3
IB_KH1150_E2731_UK_V1.qxd 15.01.2007 14:47 Uhr Seite 7
Summary of Contents for LERVIA KH 1150
Page 2: ... Ceiling Fan KH 1150 Operating Manual IB_KH1150_E2731_UK_V1 qxd 15 01 2007 14 46 Uhr Seite 2 ...
Page 3: ...IB_KH1150_E2731_UK_V1 qxd 15 01 2007 14 47 Uhr Seite 3 ...
Page 4: ...A G F D E C B H I J K L IB_KH1150_E2731_UK_V1 qxd 15 01 2007 14 47 Uhr Seite 4 ...
Page 17: ... 15 IB_KH1150_E2731_UK_V1 qxd 15 01 2007 14 47 Uhr Seite 15 ...


