background image

21

Note: In order to extend the life of the battery and ensure the best performance of the machine, the

battery must be used for at least 30 minutes before the battery can be charged. Do not leave the

battery uncharged for a long time. The following charging instructions apply to the charger

supplied with this machine. Be sure to use the charger of the following specifications to avoid

damage to the battery. Battery charger specifications:

● Charger type: - Charger for lead-acid battery

● Output voltage - 24 volts

● Output current -15 amps

● Automatic power off circuit

● Suitable for deep cycle battery charging

1. Move the machine to a well ventilated area for charging.

WARNING: Fire or explosion hazard. The battery releases hydrogen. Keep away from sparks or

open fire sources. Keep the battery compartment open while charging.

2. Park the machine on a level surface and turn the key to the off position.

3. Check the electrolyte level in each battery unit before charging.

For safety reasons: Wear protective gloves and eye protection when handling the battery and

battery wiring when servicing the machine. Avoid contact with battery liquid acid.

4. When charging, please open the sewage tank side to facilitate ventilation

5. Plug the charger's AC (AC) power cord into a well-grounded electrical outlet.

6. Plug the charger's DC (direct current) cable into the battery charging socket at the rear of the

recovery tank.

7. The charger will automatically start charging and will automatically turn off when fully

charged.

Note: The machine will not operate when the charger is connected. Note: Do not pull the charger's

DC cable while the charger is charging.

Pull out the socket on the machine. In order to avoid arc discharge. If you must suspend charging

during charging, first remove the AC power cord.

WARNING: Fire or explosion hazard. The battery releases hydrogen. Keep away from sparks or

open fire sources. Keep the battery compartment open while charging.

8. After charging is complete, check the electrolyte level again.

Summary of Contents for SJ860

Page 1: ...1 SJ860 Driving floor scrubber User s manual ...

Page 2: ...ed service center or distributor by phone or post This machine can provide excellent service If you can do the following you will get the best results at the lowest cost Operate the machine carefully and carefully Regularly maintain the machine in accordance with the maintenance instructions provided in the operator s manual Use original factory or parts of the same grade for repairs Machine data ...

Page 3: ...llation brush scouring pad 9 Machine operation 9 Check before operation 10 Operating machine 10 During the operation of the machine 10 Battery Electricity Meter 11 Water tank drainage 11 Emission of sewage tanks 11 Discharged water tanks 11 Battery Charging 11 Machine Maintenance 12 Daily maintenance 12 Monthly maintenance 12 Quarterly maintenance 13 Transportation machine 13 Storage Machine 13 Tr...

Page 4: ...onal injury electric shock fire or explosion WARNING Fire or explosion hazard Do not use flammable liquids do not operate the machine near or in a location with flammable liquids gases or flammable dust This machine is not equipped with an explosion proof motor If the machine is used in a place with flammable gases liquids or flammable dust the electric motor will generate sparks during start up a...

Page 5: ...achine immediately if it is damaged or malfunctions Do not let children play on or near the machine Observe the mixing ratio and handling instructions on the chemical container 4 Before leaving or repairing the machine Park the machine on a stable floor Turn off the machine 5 When servicing the machine Avoid moving parts Do not wear loose tops shirts or sleeves Disconnect the battery before operat...

Page 6: ... machine when it is equipped with a battery Please carry the machine with the assistance of others Use the recommended loading dock when loading or unloading the machine from a truck or trailer Use a rope to secure the machine to a truck or trailer Lower the brush head to the lowered position Machine operation indication ...

Page 7: ...7 ...
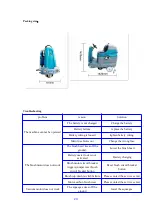
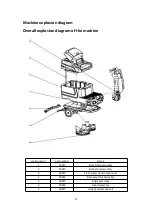
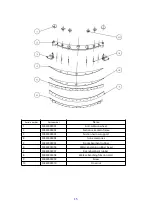
Page 8: ...agram of the machine serial number part number Name 1 PART1 Base frame assembly 2 PART2 Bead stand assembly 3 PART3 Clean water tank components 4 PART4 Recovery Tank Assembly 5 PART5 Bogie assembly 6 PART6 Head assembly 7 PART7 Lying head components ...

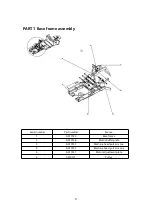
Page 9: ...rame assembly Serial number Part number Name 1 A010140 Base frame 2 A010148 Motor buffer plate 3 A010153 Machine head pull arm two 4 A010152 Machine head pull arm one 5 A010147 Motor adjustment plate 6 C010121 Pulley ...

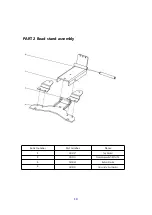
Page 10: ...10 PART 2 Bead stand assembly Serial number Part number Name 1 A010167 Top bracket 2 C010131 Transmission shaft Φ15x124 3 A010168 Bottom bracket 4 A010191 Universal wheel bracket ...

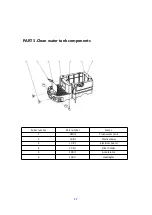
Page 11: ...T 3 Clean water tank components Serial number Part number Name 1 B010140 Clean water tank 2 G010114 Plastic elbow 3 A010174 Electrical board 4 A010162 Filter holder 5 E010138 Accelerator 6 E010141 Headlights ...

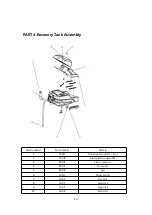
Page 12: ... E010142 Water absorption motor 24V 3 layers 2 A010188 RecoverytankcoversupportPlate 3 B010142 Recovery tank cover 4 B010141 Sewage tank 5 B010149 Seat 6 E010134 Warning light 24V 7 A010170 Side stand 8 A010171 Support rod 9 A010171 Support rod 10 G010105 Hinge 65x65 ...

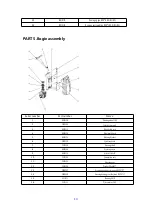
Page 13: ...1 Electrical cabin cover 4 A010174 Electrical board 5 A010173 Steering bracket 6 E010129 Speed control knob 7 C010139 Steering shaft 8 B010143 Steering cover 9 G010174 Gimbal 18x30x80 10 C010140 Orientation axis 11 C010135 Steering gear 12 C010136 Washer 20x60x27 13 C010137 Steering bearing seat upper Ф128 27 14 C010138 Steering bearing seat bottom Ф128 17 15 G010171 Bearing 6010 16 E010135 Drive ...

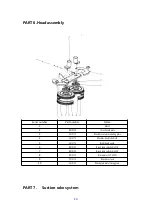
Page 14: ...178 Brush disc motor mounting plate 4 A010175 Machine head left shield 5 A010176 Right hand guard 6 B010145 Brush plate splash strip 870 7 B010144 Brush plate splash strip 800 8 E010139 Brush motor 24V 450W 9 C010116 Brush disc lock 10 A010180 Brush plate motor fixing plate PART 7 Suction rake system ...

Page 15: ...n rake main frame 3 SJ860005003 Suction harrow support 4 SJ860005004 Iron accessories 5 SJ860005005 Front absorbent rubber 6 SJ860005006 Water absorbing rubber bead 7 SJ860005007 Rear absorbent rubber 8 SJ860005008 Water absorbing film iron card 9 SJ860005009 Screw 10 SJ860005010 Cross nut ...

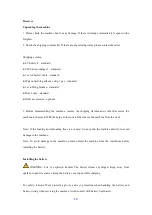
Page 16: ...hipping fixtures and cords that secure the machine to the stack With the help of others carefully remove the machine from the stack Note If the loading and unloading floor is not used do not push the machine directly to avoid damage to the machine Note To avoid damage to the machine please unload the machine from the warehouse before installing the battery Installing the battery WARNING Fire or ex...

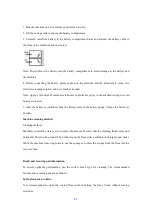
Page 17: ...he attached wiring to avoid battery corrosion 5 After the battery is installed check the battery scale of the battery gauge Charge the battery as needed Machine cleaning method Cleaning method Manually control the water valve to adjust the amount of water that the cleaning fluid water and detergent flows to the ground The brush cleans the floor with a solution of detergent and water While the mach...

Page 18: ...e strip and make appropriate adjustments Installation brush scouring pad Note For recommended brushes and scouring pads please refer to the Brush and scouring pad information section of this manual or contact your local authorized dealer 1 Park the machine on a level surface and remove the key 2 Press the brush lift pedal to lift the brush head off the ground 3 Place the scouring pad on the needle...

Page 19: ...he brush motor switch and then push the suction motor switch 6 Motor drive model adjust the speed control knob to the cleaning speed you want Note A cleaning speed of 45 60 meters per minute is recommended During operation of the machine WARNING Fire or explosion hazard Do not pick up flammable materials or reactive metals 1 Each cleaning path overlaps 5 cm 2 Keep the machine running to avoid dama...

Page 20: ...rge When the battery is fully charged all the lights are on As the power is consumed the indicators turn off from right to left To extend battery life do not let the indicator light go out below the power consumption described below Note In order to extend the life of the battery please charge the battery after the machine has been in use for more than 30 minutes Water tank drainage The sewage tan...

Page 21: ...ck the electrolyte level in each battery unit before charging For safety reasons Wear protective gloves and eye protection when handling the battery and battery wiring when servicing the machine Avoid contact with battery liquid acid 4 When charging please open the sewage tank side to facilitate ventilation 5 Plug the charger s AC AC power cord into a well grounded electrical outlet 6 Plug the cha...

Page 22: ...e If there is any loss reverse the two ends of the strip 7 Wipe the machine with a multi purpose cleaner and a damp cloth For safety reasons do not spray or water with high pressure when cleaning the machine Tube flushing machine So as not to cause electronic parts failure 8 Check the wear condition of the brush skirt and replace it if it is worn or damaged 9 Charge the battery In order to extend ...

Page 23: ... Load the machine using the recommended loading and unloading deck 3 Hold the front of the machine against the front of the truck or trailer Once the machine is in place lower the brush head and turn the key to the closed position 4 Place an obstacle behind each drive wheel to prevent the machine from slipping 5 Secure the top of the machine with a rope to prevent tilting You must install a bracke...

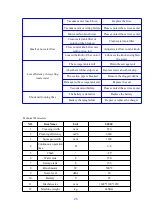
Page 24: ...se The brush motor does not work The brush head rises off the ground Lower the brush head Battery meter lock is not activated Battery charging Brush motor circuit breaker triggers jumper reset brush circuit breaker button Reset brush circuit breaker button Brush up down switch failure Please contact the service center Motor carbon brush wear Please contact the service center Vacuum motor does not ...

Page 25: ...in the sewage tank Absorbent rubber strip wear Replace water absorbent strip The suction pipe is blocked Remove the clogged debris Damage to the sewage tank seal Replace the seal Vacuum motor failure Please contact the service center Shortened running time The battery is defective Replace the battery Battery charging failure Repair or replace the charger Technical Parameters NO Item Name Unit SJ86...

Page 26: ...26 Manufacturer Shanghai Jianghuai Environmental Equipment Co LTD Address NO 505 Huagao Road Huating town Jiading District Shanghai Tel 86 02159970661 ...

Reviews: