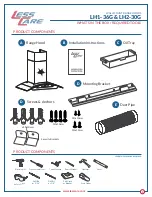
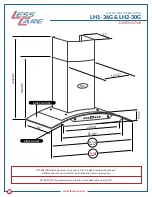
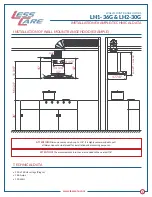
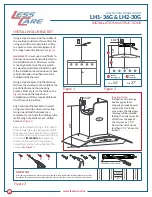
background image

www.lesscare.com

LH1-36G &  LH2-30G

WALL MOUNT RANGE HOODS

IMPORTANT INFORMATION

2

BEFORE INSTALLATION AND/OR OPERATING LESSCARE RANGE HOOD
YOU MUST READ AND UNDERSTAND ALL INSTRUCTIONS, SAFETY RULES,
WARNINGS, AND OTHER NOTES OF THIS OWNER’S MANUAL

• Turn off electric main power at fuse box with circuit breaker before installation
• Keep children in a distance when operating appliance
• Do not put fingers or hands into any moving parts of the range hood
• Do not turn on or operate the range hood if any of the parts are missing or disassembled
• Using a range hood for unintened purpose may and will cause personal injury and/or property damage
• Turn off electric main power at fuse box or circuit breaker before removing grease filter for cleaning

• Turn off electric main power at fuse box or circuit breaker before installation or servicing range hood
• This range hood must be connected to a grounded power outlet
• Improper connection of equipment-grounding conductor may and will result in a risk of electric shock and/or fire
• For plug-in installation an outlet must be properly installed and grounded in accordance with all local codes

FIRE HAZARD!

Do not store any flammable materials near range hood!

PERSONAL INJURY WARING! 

Do not position  your head or body under

range hood when installing or removing range hood.

ELECTRICAL SHOCK WARNING! 

All wiring must comply with local electrical codes.

This unit must be properly grounded, consult a licensed electrician with concerns.

IMPORTANT!

Shut off main power supply prior to installation!
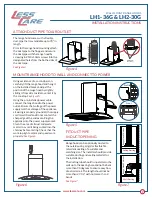
SAFETY RULES

GROUNDING INSTRUCTIONS

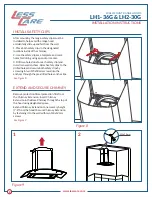
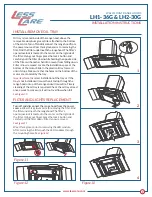
READ ALL INSTRUCTIONS BEFORE UNPACKING THE PRODUCT

2 PEOPLE ARE REQUIRED TO LIFT AND DURING
ENTIRE INSTALLATION OF THIS PRODUCT

INSTRUCTIONS THAT, IF IGNORED COULD RESULT IN DEATH OR SERIOUS INJURY CAUSED BY INCORRECT HANDLING

OR INSTALLATION OF THE PRODUCT. THESE INSTRUCTIONS MUST BE OBSERVED FOR SAFE INSTALLATION.

LessCare reserves the right to change, update, modify, alter, redesign this manual/product or its policies without prior notice!

It is your responsibility to visit website to download or contact customer service for the most updated version of the installation instructions.

LessCare shall not be liable for any injuries or property damages in connection with this product during installation or use of this product!

Summary of Contents for LH1-36G

Page 1: ...LH1 36G RANGE HOOD WALL MOUNT 36 Wide Glass Canopy 30 Wide Glass Canopy LH2 30G RANGE HOOD WALL MOUNT www lesscare com INSTALLATION INSTRUCTIONS Version 1 0 ...

Page 2: ...n an outlet must be properly installed and grounded in accordance with all local codes FIRE HAZARD Do not store any flammable materials near range hood PERSONAL INJURY WARING Do not position your head or body under range hood when installing or removing range hood ELECTRICAL SHOCK WARNING All wiring must comply with local electrical codes This unit must be properly grounded consult a licensed elec...

Page 3: ... A Mounting Bracket D Screws Anchors D Duct Pipe E Installation Instructions B Oil Tray C ø10x40mm M5x50mm Security Brackets M4x12mm M3x10mm PRODUCT COMPONENTS PRODUCT COMPONENTS Electric drill Cross screwdriver Tape Measure Pencil Marker Hammer Level Safety Glass Drill Bit ø 5 16 Drill Bit ø 1 8 Soft Cloth or Blanket Stud Finder ...

Page 4: ...panel glass canopy 12 1 2 3 3 4 11 min 20 max 36 35 7 8 LH1 36G 29 7 8 LH2 30G ATTENTION Dimensions may vary by up to 3 8 It is highly recommended to pull all dimensions of actual model for installation and measuring purposes ATTENTION The measurements in inches are rounded to the nearest 1 8 ...

Page 5: ...TECHNICAL DATA ATTENTION Dimensions may vary by up to 3 8 It is highly recommended to pull all dimensions of actual model for installation and measuring purposes ATTENTION The measurements in inches are rounded to the nearest 1 8 Min 24 11 3 4 11 1 4 12 13 15 4 1 2 1 1 2 36 17 7 8 min 20 max 36 120 V 60 Hz voltage Plug in 1 58 Amps 190 Watt ...

Page 6: ...Figure 2 Remove the bracket Using a drill make 4 holes through the wall Apply silicone into the holes and insert 4 wall anchors Attach the bracket and using a screwdriver screw in 4 screws M5x50mm to secure the bracket on the wall Use only manual screwdriver and do not overtighten the screws See Figure 3 www lesscare com LH1 36G LH2 30G WALL MOUNT RANGE HOODS INSTALLATION INSTRUCTIONS 6 INSTALL WA...

Page 7: ...cting of a suitable and matching size The installer should provide suitable ducting and sealing material for the installation The ducting tube should run parallel to the wall up to the ducting hole and not be bent more than 90 degrees to ensure easy flow of extracted air The length should not be more than 29 1 2 with not more than 2 bends See Figure 7 Figure 4 Figure 5 Figure 7 Figure 6 www lessca...

Page 8: ...encil or marker 3 Drill two holes one for each safety clip and insert two wall anchors Attach safety clips to the drilled holes and secure both safety clips by screwing in two M5x50mm screws into the anchors through the pre drilled holes on the clips See Figure 8 Remove protection film al protection film from the Chimney Extension Insert Chimney Extension in the Base Chimney through the top of the...

Page 9: ...t the bottom of the motor Slide in the plastic oil tray forward until it stops Make sure that the holes on the bottom of the motor are centered by the tray Important Note Incorrect installation of the tray or if the tray is not installed will cause the oil to drip through the range hood on top of the range and will cause fire Timely cleaning of the oil tray is required Check the oil tray at least ...

Page 10: ...utton again the range hood will turn off While the range hood is on press K2 button to activate the fan On top of the display you will see a speed indicator in form of 3 fan icons and a number 3 on the right side You have 3 speed to choose from By default the fan s motor will start in the fastest speed To slow down the fan press K2 button every time you need to switch to a slower speed If you pres...

Page 11: ...en Module LED Light Module Left Fan Right Fan Fan Cover Screw Grease Filter Oil Tray Motor Cover Motor Chimney Extension Power Outlet Plug Vent Pipe Power Line Box Cover Power Line Box Air Outlet Light Power Hood Body Smoke Collector Fan Cover Power Board L BROWN N BLUE E YELLOW GREEN LIGHT 110V 60 Hz 16µF 250V YELLOW STRONG BLACK STRONG BLACK SWITCH MIDDLE WHITE SLOW GREEN BLUE RED V VOLT W WATT ...

Page 12: ...2 30G WALL MOUNT RANGE HOODS MAINTENANCE CARE For better performance appearance and sanitary level of the range hood s grease filter fan and other surfaces that may be covered in grease must be regulary cleaned using soft cloth with mild detergent Aluminum grease filter must be cleaned in a dishwasher with detergent solutions that does not contain phosphate Phosphate detergents may cause discolora...

Reviews: