

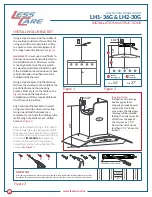
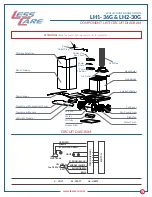

Using a tape measure find the middle of
the cooktop and draw a thin vertical line
using a pencil from cooktop to a ceiling
to ensure correct vertical alignment of
the range hood installation.
See Figure 1
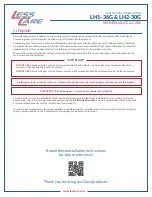
Important:
You must use a stud finder to
find location of wooden studs located in
the installation area. All screws on the
mounting bracket must be screwed in
the wooden stud located inside the wall.
If the installation loacation does not have
required wooden stud than it must be
installed inside the wall
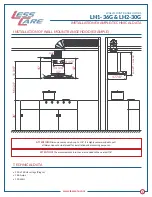
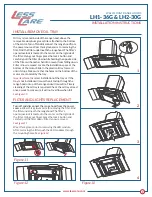
Using a tape measure find the distance
(B) from the cooktop to the middle of the
pre-drilled holes on the mounting
bracket. Please refer to the table on the
Figure 2
to keep the range hood
installation within the required distance
from the cooktop surface.
Align and level the bracket to the wall
using a level and the drawn center line.
Using a pencil and the bracket as a
template, mark 4 holes for drilling on the
wall through the bracket's pre-drilled
holes.
See Figure 2
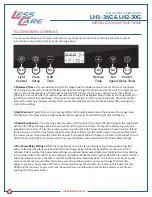
Remove the bracket. Using a drill, make 4
holes through the wall. Apply silicone into
the holes and insert 4 wall anchors. Attach
the bracket and using a screwdriver screw
in 4 screws
(M5x50mm)
to secure the
bracket on the wall. Use only manual
screwdriver and do not overtighten the
screws.
See Figure 3
www.lesscare.com
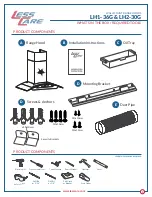
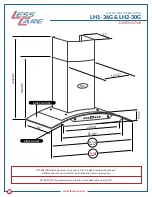
LH1-36G & LH2-30G
WALL MOUNT RANGE HOODS
INSTALLATION INSTRUCTIONS
6
INSTALL WALL BRACKET
Cooktop
Figure 1
Figure 2
Figure 3
B
A
A
B
Cooktop
to Range Hood
Min:
24"
Min:
37"
Cooktop
to Bracket
Cooktop
Range Hood
1 1/2"
13"
15"
1 1/2"
2"
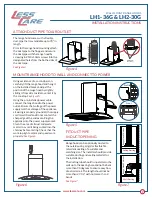
Important Note:
Installation of the range
hood requires that a
properly grounded power
outlet is located in the
area where the telescopic
chimney will be installed.
Ideally, the outlet must be
offset from the edge of
the chimney by 1 1/2"
from either side and not
less than 1 1/2" above the
bracket.
1
2
3
4
M5x50mm (4 screws)
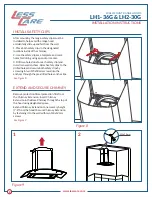
IMPORTANT
All screws on the mounting bracket must be screwed in the wooden stud located inside the wall. If the
installation loacation does not have the required wooden stud than it must be installed inside the wall.
INSTALLATION
AREA
INSTALLED
WOODEN STUD
WO
OD
EN STUD
WO
OD
EN STUD
WO
OD
EN STUD
WO
OD
EN STUD


