background image

7

Levenhuk 500 Series Microscopes

General Information

Read the user manual carefully before you start working with a microscope. Levenhuk 500 Series biological microscopes are 

safe for health, life and property of the consumer and the environment when properly used, and meets the requirements of 

international standards. These microscopes are designed for observing transparent objects in the transmitted light using the 

bright field method. They perform well in clinical research and tests; teaching demonstrations; bacterioscopy and cytology 

in medical and health establishments, laboratories, universities; and may be used for scientific research in agriculture and 

microbiology.

Microscope assembly

• 

Unpack the microscope carefully and place it on a flat surface.

•  Remove the plastic bags and dustproof cover of the eyepiece head.

•  Install the monocular, binocular or trinocular head and tighten the locking screw.

• 

Inspect all the items included in the kit and define their purpose.

•  Connect the power cord to the microscope and plug it in.

Use

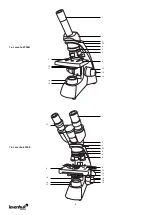
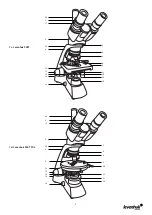
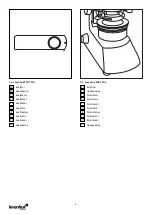
Please refer to the fig. 1а (monocular model), fig. 1b (binocular model), fig. 1c and 1d (trinocular model).

•  Turn on the power and the illumination will turn on. Set the brightness at approximately 70%. Place the specimen on the 

stage. Make sure the clips hold the specimen firmly in place.

•  Iris diaphragm should be adjusted in accordance with numerical aperture of a lens. The best practice is to make the iris 

diaphragm slightly smaller than the aperture of the selected lens. Open or close the iris diaphragm using the adjustment 

screws. If the adjustment screw is turned to the right, the iris diaphragm is fully open. Note: the diaphragm is not intended 

for adjusting the brightness of the illumination. To adjust the brightness, use the brightness adjustment knob.

• 

Slide the filter holder, place the filter in it and then return the holder to its initial position.

• 

To change the objective magnification, turn the revolving nosepiece until it clicks.

•  Make sure that the lens does not touch the sample when adjusting the focus: rotate the coarse focus knob until the 

specimen is about 3.175mm (1/8") away from the lens.

•  Looking into the eyepiece, slowly turn the coarse focusing knob until you can see the image of the observed specimen. Turn 

the fine focusing knob to make the image clear. The fine focusing mechanism allows you to focus on the observed specimen 

while using high magnifications.

• 

When you use an oil immersion objective, the space between the specimen and the lens should be filled with immersion oil. 

Raise the condenser to the upper position and put a drop of oil on the lens and on the cover glass of the specimen. Move the 

revolving nosepiece back and forth to get rid of air bubbles in the oil. Then, fix the objective lens in its working position. 

Make sure that oil fills the entire space between the objective lens and the specimen. After use, wipe the lens dry.

• 

To adjust the position of the mechanical scale (except for 500M and 500T POL), turn the coarse focusing knob in a clockwise 

direction if you want to fix the position of the mechanical scale, or in a counterclockwise direction if you want to loosen it.

• 

To place the specimen in the field of view, move the stage horizontally back and forth or left and right using the stage 

moving knobs (except for 500M and 500T POL).

• 

Look through the right eyepiece with your right eye and adjust the image sharpness with the coarse and fine focusing knobs. 

Binocular and trinocular models: Then, look through the left eyepiece with your left eye and rotate the diopter adjustment 

ring to equalize the difference between your left and right eyes vision. Remember the setting for future use. Adjust the 

distance between the eyepiece tubes of the binocular head so that the image merges into a single circle. 

•  Trinocular models: you can install the digital camera to the third eyepiece tube.

Observation in polarized light

The Levenhuk 500T POL microscope is equipped with an analyzer (Fig. 2a) and is equipped with an integrated polarizer (Fig. 2b). 

They allow you to reduce glare and spurious reflections when studying shiny objects. Insert the analyzer into a special slot 

on the back of the microscope to start observing in polarized light. Set the polarizer to "0" — the polarizer and analyzer will 

be positioned orthogonally. Rotate the polarizer ring to change the polarization angle. The Levenhuk 500T POL microscope is 

equipped with a round stage. By using the rotation of the stage, you can change the angle of polarization and observe changes in 

the refraction of light. Loosen the retainer in order to rotate the stage and tighten the retainer to secure the stage.

Halogen bulb replacement

Unplug the microscope from a power source. Loosen the knurled screw on the underside of microscope and open the panel 

to expose the bulb. Make sure the lamp has cooled down and then remove it. Do not touch the new lamp with your fingers; 

fingerprints or dirt will reduce the brightness and the lamp’s life. Use gloves to replace the lamp. If necessary, wipe the lamp 

with a clean, soft cloth. Use a lamp of a suitable type. Insert the contacts into the slot vertically. Close the panel and tighten 

the knurled screw with finger.

Fuse replacement

Unplug the microscope from a power source. Open the fuse holder located on the back of the microscope body with a flat head 

screwdriver. Remove the old fuse and install a new one. Only use the appropriate types of fuses. Close the fuse holder.

EN

Summary of Contents for 500 Series

Page 1: ...e y disfrute Kellemes nagyítást Ingrandisci il divertimento Radość przybliżania Dê um zoom na sua emoção Приближает с удовольствием User Manual Ръководство за потребителя Návod k použití Bedienungsanleitung Guía del usuario Használati útmutató Guida all utilizzo Instrukcja obsługi Manual do usuário Инструкция по эксплуатации EN BG CZ DE ES HU IT PT PL RU ...

Page 2: ...2 1a Levenhuk 500M 1 2 22 3 4 5 6 9 12 13 14 16 15 11 10 7 1b Levenhuk 500B 1 2 3 22 4 5 6 8 14 13 11 12 18 19 10 9 17 16 15 ...

Page 3: ...3 1d Levenhuk 500T POL 14 16 12 13 10 2 22 4 9 20 1 17 3 6 5 7 23 11 21 15 1c Levenhuk 500T 3 5 6 8 9 18 11 19 15 14 16 12 13 10 20 1 17 2 22 4 ...

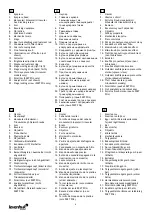
Page 4: ...du dopředu 20 Třetí tubus okuláru pouze trinokulární modely 21 Polarizátor pouze 500T POL 22 Slot analyzátoru nezobrazeno 23 Pojistný šroub stolku pouze 500T POL DE ES HU 1 Okular 2 Okularkopf 3 Monokular Binokular Trinokularkopf Fixierschraube 4 Arm 5 Revolver 6 Objektiv 7 Probenhalter 8 Physische Skala 9 Objekttisch 10 Irisblende Einstellstab 11 Kondensor mit Filterhalter 12 Grobtrieb 13 Feintri...

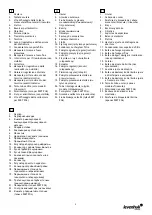
Page 5: ...o modele trójokularowe 21 Polaryzator tylko 500T POL 22 Gniazdo analizatora niewidoczne 23 Śruba blokująca stolik tylko 500T POL 1 Ocular 2 Cabeça da ocular 3 Parafuso de bloqueio da cabeça monocular binocular trinocular 4 Braço 5 Revólver giratório 6 Objetiva 7 Suportes de espécimes 8 Balança mecânica 9 Platina 10 Haste de ajuste do diafragma de abertura 11 Condensador com suporte do filtro 12 Bo...

Page 6: ...Analizador Analizáló Analizzatore Analizator Analisador Анализатор 2b Levenhuk 500T POL Polarizer Поляризатор Polarizátor Polarisator Polarizador Polarizáló Polarizzatore Polaryzator Polarizador Поляризатор EN EN BG BG CZ CZ DE DE ES ES HU HU IT IT PL PL PT PT RU RU ...

Page 7: ... cover glass of the specimen Move the revolving nosepiece back and forth to get rid of air bubbles in the oil Then fix the objective lens in its working position Make sure that oil fills the entire space between the objective lens and the specimen After use wipe the lens dry To adjust the position of the mechanical scale except for 500M and 500T POL turn the coarse focusing knob in a clockwise dir...

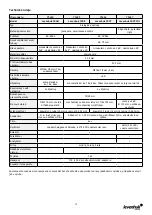
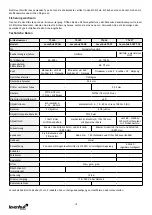
Page 8: ...h a pointer WF10x 18mm 2pcs Eyepiece diopter adjustment 5 D Objectives achromatic 4x 10x 40xs achromatic 4x 10x 40xs 100xs oil Revolving nosepiece 3 objectives 4 objectives Stage moving range 70 30mm Stage 110x110mm with specimen holders double layer mechanical 115x125mm with mechanical scale 360 rotatable Ø135mm with specimen holders Focus system coaxial coarse 30mm and fine 0 002mm coaxial coars...

Page 9: ... protect the device from dust and stains If you are not using your microscope for extended periods of time store the objective lenses and eyepieces separately from the microscope Store the device in a dry cool place away from hazardous acids and other chemicals away from heaters open fire and other sources of high temperatures When using the microscope try not to use it near flammable materials or...

Page 10: ...Механизмът за фино фокусиране дава възможност да фокусирате върху наблюдавания образец като същевременно използвате големи увеличения Когато използвате обектив с маслена имерсия пространството между образеца и лещата трябва да бъде запълнено с имерсионно масло Повдигнете кондензатора в горно положение и поставете капка масло върху лещата и върху покривното стъкло на образеца Движете револверната г...

Page 11: ...от подходящ тип Вкарайте контактите в слота вертикално Затворете панела и затегнете здраво с пръсти набраздения винт Смяна на предпазител Изключете микроскопа от източника на захранване Отворете държача за предпазителя намиращ се отзад на корпуса на микроскопа с отвертка с плоска глава Отстранете стария предпазител и монтирайте нов Използвайте само подходящи типове предпазители Затворете държача з...

Page 12: ...1 бр с показалец WF10x 18 mm 2 бр Регулиране на диоптъра на окуляра 5 D Обективи ахроматични 4x 10x 40xs ахроматични 4x 10x 40xs 100xs с маслена имерсия Револверна глава 3 обектива 4 обектива Диапазон на движение на предметната маса 70 30 mm Предметна маса 110x110 mm с държачи за образец механична двуслойна 115x125 mm с механична скала може да се завърта на 360 Ø135 mm с държачи за образци Система...

Page 13: ...микроскопа Съхранявайте устройството на сухо и хладно място далеч от опасни киселини и други химикали далеч от отоплителни уреди открит огън и други източници на високи температури Когато използвате микроскопа опитайте да не го използвате в близост до запалими материали или вещества бензен хартия картон пластмаса и т н тъй като основата може да се нагрее по време на употреба и може да възникне опа...

Page 14: ...kapku oleje na čočku a krycí sklíčko vzorku Pohybujte revolverovým nosičem objektivů tam a zpět abyste se zbavili vzduchových bublin v oleji Poté objektiv upevněte do pracovní polohy Ujistěte se že olej zaplňuje celý prostor mezi objektivem a vzorkem Po použití objektiv otřete do sucha Pokud chcete upravit polohu mechanického měřítka s výjimkou 500M a 500T POL otáčejte knoflíkem pro hrubé zaostřen...

Page 15: ...em WF10x 18 mm 2 ks Dioptrická korekce okuláru 5 D Objektivy achromatické 4x 10x 40xs achromatické 4x 10x 40xs 100xs pro pozorování s olejovou imerzí Revolverový nosič objektivů 3 objektivy 4 objektivy Rozsah posuvu pracovního stolku 70 30 mm Pracovní stolek 110x110 mm včetně držáků preparátů mechanický se dvěma vrstvami 115x125 mm s mechanickým měřítkem otočný o 360 Ø 135 mm s držákem na vzorky S...

Page 16: ...ch kyselin nebo jiných chemikálií topných těles otevřeného ohně a jiných zdrojů vysokých teplot Mikroskop nepoužívejte v blízkosti hořlavých materiálů nebo látek benzín papír lepenka plast apod neboť stativ se může při práci zahřívat a vyvolávat riziko požáru Před otevřením stativu nebo výměnou žárovky osvětlení vždy mikroskop odpojte od zdroje napájení Bez ohledu na typ žárovky halogenová nebo ob...

Page 17: ...ie obere Position geben Sie einen Tropfen Öl auf die Objektivlinse und auf das Deckglas der Probe Bewegen Sie den Revolver zum Entfernen von Luftblasen im Öl leicht vor und zurück Anschließend fixieren Sie das Objektiv in seiner Arbeitsposition Achten Sie darauf dass das Öl den gesamten Raum zwischen Objektiv und Objekt ausfüllt Wischen Sie die Objektivlinse nach der Untersuchung wieder trocken Zu...

Page 18: ...f Monokular um 360 drehbar 45 Neigung Binokular um 360 drehbar 30 Neigung Trinokular um 360 drehbar 30 Neigung Optisches Material Optikglas Okulardurchmesser 23 2 mm Dritter vertikaler Tubus 23 2 mm Okulare WF10x 18 mm 1 Stck mit Zeiger WF10x 18 mm 2 Stck Dioptrien Einstellbereich 5 D Objektivlinsen achromatisch 4 10 40 fach achromatisch 4 10 40 fach xs 100 fach Öl Revolver 3 Objektive 4 Objektive...

Page 19: ...rockenen kühlen Ort der frei von Staub gefährlichen Säuren und anderen Chemikalien ist und in ausreichendem Abstand zu Heizgeräten offenem Feuer und anderen Hochtemperaturquellen Setzen Sie das Mikroskop nach Möglichkeit nicht in der Nähe brennbarer Materialien oder Substanzen Benzen Papier Karton Plastik usw ein da sich der Sockel bei der Verwendung erhitzen kann und dies bei Anwesenheit brennbar...

Page 20: ...ebe llenar con aceite de inmersión Coloque el condensador en la posición alta y coloque una gota de aceite en la lente y en el cubreobjetos de la muestra Mueva el revólver giratorio hacia adelante y hacia atrás para eliminar las burbujas de aire presentes en el aceite Luego fije la lente objetivo en su posición de trabajo Asegúrese de que el aceite llene todo el espacio entre la lente objetivo y l...

Page 21: ...ico Diámetro del tubo ocular 23 2 mm Tercer tubo ocular vertical 23 2 mm Oculares WF10x 18 mm 1 unidad con puntero WF10x 18 mm 2 unidades Ajuste de dioptrías del ocular 5 D Objetivos acromático 4x 10x 40xs acromático 4x 10x 40xs 100xs inmersión en aceite Revólver giratorio 3 objetivos 4 objetivos Rango de desplazamiento de la platina 70 30 mm Platina 110x110 mm con portamuestras mecánica de doble ...

Page 22: ...tivo y los oculares por separado del microscopio Guarde el instrumento en un lugar seco y fresco alejado de ácidos peligrosos y otros productos químicos radiadores de fuego y de otras fuentes de altas temperaturas Cuando uses el microscopio intenta no hacerlo cerca de materiales o sustancias inflamables benceno papel cartón plástico etc ya que la base puede calentarse con el uso y suponer un riesg...

Page 23: ...ső helyzetbe a kondenzort és tegyen az objektívre és a mintát fedő üvegre egy csepp olajat Mozgassa a revolverfejet előre és hátra hogy eltávolítsa az olajban lévő levegőbuborékokat Ezután rögzítse a tárgylencsét a munkapozíciójában Győződjön meg arról hogy az olaj kitölti e a tárgylencse és a minta közötti teljes teret Használat után törölje szárazra az objektívet A mechanikus skála helyzetének m...

Page 24: ...60 ban elforgatható 30 os szögben döntött Optika anyaga optikai üveg A szemlencsecső átmérője 23 2 mm Harmadik függőleges szemlencsecső 23 2 mm Szemlencsék WF10x 18 mm 1 db irányzóval WF10x 18 mm 2 db A szemlencse dioptriája állítható 5 D Objektívek akromatikus 4x 10x 40xs akromatikus 4x 10x 40xs 100xs olaj Revolverfej 3 objektív 4 objektív Tárgyasztal elmozdulási tartomány 70 30 mm Tárgyasztal 11...

Page 25: ...gas hőmérsékletet leadni képes forrásoktól távol Lehetőség szerint ne használja a mikroszkópot gyúlékony anyagok közelében benzol papír kartonlap műanyag stb mivel a megfigyelés során a mikroszkóp talpazata felmelegedhet és így tűzveszélyessé válhat A talpazat kinyitása vagy a megvilágítást biztosító izzó kicserélése előtt minden esetben áramtalanítsa a mikroszkópot Csere előtt az izzó típusától f...

Page 26: ...io tra il campione e la lente deve essere riempito con olio da immersione Sollevare il condensatore il più in alto possibile e posizionare una goccia di olio sulla lente e sul coprivetrino del campione Spostare il revolver portaobiettivi avanti e indietro per eliminare le bolle d aria nell olio Quindi fissare la lente obiettivo in posizione di lavoro Assicurarsi che l olio riempia tutto lo spazio ...

Page 27: ...n traslatore meccanico girevole a 360 Ø 135 mm con porta campioni Sistema di messa a fuoco coassiale grossolana 30 mm e fine 0 002 mm coassiale grossolana 16 mm e fine 0 002 mm Condensatore N A 0 65 con diaframma a iride e portafiltro Abbe N A 1 25 con diaframma a iride e portafiltro ad altezza regolabile Corpo metallo Illuminazione inferiore alogena 6 V 20 W con regolazione della luminosità infer...

Page 28: ... e gli oculari separatamente dal microscopio Conservare l apparecchio in un posto fresco e asciutto al riparo da acidi pericolosi e altri prodotti chimici da apparecchi di riscaldamento da fiamme libere e da altre fonti di calore Cercare di non utilizzare il microscopio in prossimità di materiali o sostanze infiammabili benzene carta cartone ecc poiché la base potrebbe riscaldarsi durante l utiliz...

Page 29: ...estrzeń między preparatem a soczewką należy wypełnić olejkiem immersyjnym Podnieś kondensor do górnego położenia i nałożyć kroplę olejku na soczewkę oraz na szklaną osłonę preparatu Przesuń miskę rewolwerową do tyłu i do przodu aby usunąć pęcherzyki powietrza z olejku Następnie zamocuj soczewkę obiektywową w położeniu roboczym Sprawdź czy olejek pokrywa całą przestrzeń między soczewką obiektywową ...

Page 30: ...23 2 mm Trzecia pionowa tuba okularu 23 2 mm Okulary WF10x 18 mm 1 szt ze wskaźnikiem WF10x 18 mm 2 szt Okular z regulacją dioptrii 5 D Obiektywy achromatyczne 4x 10x 40xs achromatyczne 4x 10x 40x 100x olejek immersyjny Miska rewolwerowa 3 obiektywy 4 obiektywy Zakres ruchu stolika 70 30 mm Stolik 110x110 mm z zaczepami do preparatów dwuwarstwowy mechaniczny 115x125 mm ze skalą mechaniczną obrotow...

Page 31: ...echowywać osobno Przyrząd powinien być przechowywany w suchym chłodnym miejscu z dala od kurzu niebezpiecznych kwasów oraz innych substancji chemicznych grzejników otwartego ognia i innych źródeł wysokiej temperatury Staraj się nie korzystać z mikroskopu w pobliżu łatwopalnych materiałów lub substancji benzenu papieru kartonu tworzywa sztucznego itp ponieważ nagrzewająca się podczas użytkowania po...

Page 32: ...e ser preenchido com óleo de imersão Levante o condensador para a posição superior e coloque uma gota de óleo na lente e no vidro de cobertura do espécime Mova o revólver giratório para trás e para a frente para remover bolhas de ar no óleo Em seguida fixe a lente da objetiva na posição de trabalho Certifique se de que o óleo preenche todo o espaço entre a lente da objetiva e o espécime Após a uti...

Page 33: ...115x125mm com balança mecânica 360 de rotação Ø135 mm com suportes de espécimes Foco coaxial grosso 30 mm e fino 0 002 mm coaxial grosso 16 mm e fino 0 002 mm Kondensor diafragma da íris e suporte do filtro de 0 65 Abbe N A 1 25 diafragma de íris e porta filtro com altura ajustável Corpo metal Iluminação inferior halogénio 6 V 20 W com ajuste de brilho inferior LED de 3 W com ajuste de brilho Cole...

Page 34: ...as e os oculares separadamente do microscópio Guarde o dispositivo em um local seco e fresco longe de ácidos perigosos e outros produtos químicos de aquecedores de fogo e de outras fontes de altas temperaturas Ao utilizar o microscópio não o faça próximo de materiais ou substâncias inflamáveis benzeno papel cartão plástico etc uma vez que a base pode aquecer durante o uso e provocar um incêndio De...

Page 35: ...юдаемого препарата Поверните ручку тонкой фокусировки так чтобы изображение стало четким При работе с высокими увеличениями механизм тонкой фокусировки позволит четко сфокусироваться на наблюдаемом препарате При использовании масляного объектива следует заполнить пространство между поверхностью исследуемого образца и лицевой поверхностью объектива иммерсионным маслом Поднимите конденсор в верхнее ...

Page 36: ...ужбы лампы Воспользуйтесь перчатками чтобы заменить лампу Протрите лампу чистой мягкой тканью если необходимо Используйте лампу подходящего типа Вставьте контакты в гнездо вертикально Установите крышку на прежнее место и затяните винт Замена предохранителя Отключите микроскоп от сети Откройте держатель предохранителя в задней части микроскопа при помощи отвертки с прямым шлицем Выньте старый предо...

Page 37: ...м 1 шт с указателем центра поля WF10x 18 мм 2 шт Диоптрийная коррекция окуляров 5 D Объективы ахроматические 4х 10х 40xs ахроматические 4х 10х 40xs 100хs масляный Револьверное устройство на 3 объектива на 4 объектива Диапазон перемещения предметного столика 70 30 mm Предметный столик 110x110 мм с зажимами механический двухслойный 115x125 мм с препаратоводителем Ø135 мм вращающийся на 360 с зажимам...

Page 38: ...олгое время храните их упакованными в сухую коробку отдельно от микроскопа Храните прибор в сухом прохладном месте недоступном для пыли влияния кислот или других активных химических веществ вдали от отопителей бытовых автомобильных открытого огня и других источников высоких температур Не используйте микроскоп рядом с воспламеняемыми материалами так как основание микроскопа может нагреться во время...

Page 39: ...ll as blank slides and cover glasses for you to make your own specimens Prepared slides blank slides and cover slips can be used with any microscope model Levenhuk Inc 924 D East 124th Ave Tampa FL 33612 USA Levenhuk is a registered trademark of Levenhuk Inc 2006 2020 Levenhuk Inc All rights reserved www levenhuk com 20200630 ...

Reviews: