background image


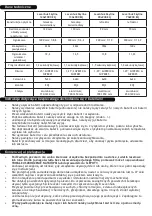
Levenhuk Skyline 

120 1000 EQ

Levenhuk Skyline 

130 900 EQ

Levenhuk Skyline 

90 900 EQ

Levenhuk Skyline 

70 900 EQ


120 

130 

90 

70 


1000 

; f/8,8

900 

; f/6,9

900 

; f/10

900 

; f/12,9


230x

260x

180x

140x


12,2

12,5

11,8

11,23


1,2 

.

1,1 

.

1,5 

.

1,9 

.

1,25"; SUPER10 & 

SUPER25

1,25"; SUPER10 & 

SUPER25

1,25"; SUPER10 & 

SUPER25

1,25"; SUPER10 & 

SUPER25

5x24

6x24

6x30

6x24

EQ1

EQ2

EQ2

EQ1

710-1230 

700-1250 

700-1250 

650-1200 


• 


.

• 


    , 


.

• 


.

• 


 (+   -).

• 


.

• 


.

• 


.

• 


.

• 


.

• 


.

• 


.


• 

,     


,   


,     


.

• 


.

• 


-


-


,  ’


.

• 


.

• 


 Levenhuk.

• 


.

• 


.     


.

• 


.

Summary of Contents for Skyline 120x1000 EQ

Page 1: ...dost zaost it Mit Vergnügen näher dran Rado przybli ania Levenhuk Skyline 70 900 EQ Levenhuk Skyline 90 900 EQ Levenhuk Skyline 130 900 EQ Levenhuk Skyline 120 1000 EQ User Manual Návod k použití Bedienungsanleitung Instrukcja obsługi ...

Page 2: ......

Page 3: ...ák J Optický tubus K Primární zrcátko 1 Stupnice osy rektascenze 2 Ovládání jemného nastavení deklinace 3 Šroub nastavení zem pisné ší ky 4 Areta ní šroub zem pisné ší ky 5 Ovládání jemného nastavení rektascenze 6 Protiváha 7 Areta ní šroub protiváhy 8 Ty protiváhy 9 Areta ní šroub osy rektascenze 10 Stupnice osy deklinace 11 Areta ní šroub osy deklinace 12 Objímky a Odkládací p ihrádka pro p íslu...

Page 4: ...w w osi deklinacji 3 ruba młoteczkowa regulacji w poziomie 4 Pokr tło blokuj ce teleskop w poziomie 5 Pokr tło mikroruchów w osi rektascensji 6 Przeciwwaga 7 ruba blokuj ca przeciwwagi 8 Pr t przeciwwagi 9 Pokr tło blokuj ce w osi rektascensji 10 Skala osi deklinacji 11 Pokr tło blokuj ce w osi deklinacji 12 Zaciski pier cieni a Tacka na akcesoria b Noga statywu A B C D E F G H I J K 1 2 3 4 5 6 7...

Page 5: ...t ovací šroub 1 Ovládání jemného nastavení deklinace 2 Šroub nastavení zem pisné ší ky 3 Areta ní šroub zem pisné ší ky 4 Protiváha 5 Areta ní šroub protiváhy 6 Ty protiváhy 7 Ovládání jemného nastavení rektascenze 8 Stupnice osy rektascenze 9 Areta ní šroub osy rektascenze 10 Stupnice osy deklinace 11 Areta ní šroub osy deklinace 12 Objímky a Odkládací p ihrádka pro p íslušenství b Noha stativu c...

Page 6: ...teczkowa regulacji w poziomie 3 Pokr tło blokuj ce teleskop w poziomie 4 Przeciwwaga 5 ruba blokuj ca przeciwwagi 6 Pr t przeciwwagi 7 Pokr tło mikroruchów w osi rektascensji 8 Skala osi rektascensji 9 Pokr tło blokuj ce w osi rektascensji 10 Skala osi deklinacji 11 Pokr tło blokuj ce w osi deklinacji 12 Zaciski pier cieni a Tacka na akcesoria b Noga statywu c ruba blokuj ca A B C D E F G H I J K ...

Page 7: ...1 2 3 3 5 4 1 2 long dlouhý lange długi 1 EN Z DE PL RU UA shot krátký kurz krótki 2 EN Z DE PL RU UA ...

Page 8: ...L RU UA 3 R A scale Stupnice rektascenze Rektaszensionsskala Dokładna regulacja w osi deklinacji EN Z DE PL RU UA 4 Dec adjustment Nastavení deklinace Deklinationseinstellung Regulacja w osi deklinacji EN Z DE PL RU UA 5 R A ine adjustment Jemné nastavení rektascenze Rektaszensions Feineinstellung Dokładna regulacja w osi rektascensji EN Z DE PL RU UA 6 R A ine adjustment Jemné nastavení rektascen...

Page 9: ...U UA Polaris Polárka Polarstern Gwiazd Polarn EN Z DE PL RU UA NCP NCP NHP NCP NCP EN Z DE PL RU UA Cassiopeia Kasiopeja Kassiopeia Kasjopeja EN Z DE PL RU UA EN Z DE PL RU UA Crucis Crucis Crucis Crucis Crucis R A lock knob Areta ní šroub osy rektascenze Rektaszensions Arretierung Pokr tło blokuj ce w osi rektascenji EN Z DE PL RU UA R A settling circle Kruh pro nastavení osy rektascenze Rektasze...

Page 10: ...ony na północny biegun niebieski 13 EN Z DE PL RU UA Apparent movement of stars Zdánlivý pohyb hv zd Scheinbare Sternbewegung Pozorny ruch gwiazd EN Z DE PL RU UA 12 Object you are viewing Pozorovaný objekt Betrachtetes Objekt Obserwowany obiekt 11 EN Z DE PL RU UA Polaris Polárka Polarstern Gwiazd Polarn EN Z DE PL RU UA 9 N E S W S V J Z N O S W N E S W 5 EN Z DE PL RU UA Nadir Nadir Nadir Nadir...

Page 11: ...leg until the tripod head is properly leveled Note that the tripod legs may not be the same length when the equatorial mount is leveled Place the accessory tray on top of the bracket and secure it with thumbscrews from underneath Attach the equatorial mount to the tripod head Turn the azimuth adjustment knob up and tighten the knurled knob underneath the tripod head to secure mount to tripod Orien...

Page 12: ...ns station ary when released Tighten the counterweight screws to secure the counterweights Dec Balancing All accessories should be attached to the telescope before balancing around the declination axis The R A balancing should be done before proceeding with Dec balancing For best results adjust the altitude of the mount to between 60º and 75º if possible Release the R A lock knob and rotate around...

Page 13: ...ma Octantis which is about one degree away Two sets of pointers which help to locate the SCP are and Crucis in the Southern Cross and a pointer running at a right angle to a line connecting and Centauri Tracking celestial objects When observing through a telescope astronomical objects appear to move slowly through the telescope s ield of view When the mount is correctly polar aligned you only need...

Page 14: ... briely go to a new area Finally there are a few things to consider to ensure that you are comfortable during the viewing session First is setting the height of the mount above the ground by adjusting the tripod legs You must consider the height that you want your eyepiece to be and if possible plan on sitting on a comfortable chair or stool Very long optical tubes need to be mounted higher or you...

Page 15: ...tion by Levenhuk is found to be defective in materials or workmanship As a condition to the obligation of Levenhuk to repair or replace such product the product must be returned to Levenhuk together with proof of purchase satisfactory to Levenhuk A Return Authorization RA Number must be obtained in advance of return Contact the local Levenhuk branch to receive the RA number to be displayed on the ...

Page 16: ...or international distributor Please contact them for any warranty service If warranty problems arise or if you need assistance in using your product contact the local Levenhuk branch Levenhuk Worldwide USA www levenhuk com Canada www levenhuk ca Czech Republic www levenhuk cz Poland www levenhukoptics pl Russia www levenhuk ru Ukraine www levenhuk ua EU www levenhuk eu Purchase date ______________...

Page 17: ...y byla jeho hlava správn horizontáln vyvážená Nohy stativu nemusí mít p i správn vyrovnané montáži stejnou délku Odkládací p ihrádku na p íslušenství položte nahoru na konzolu a zespod ji upevn te pomocí k ídlatého šroubu Uložte paralaktickou montáž na hlavici stativu Oto te stav cí šroub azimutu nahoru a utažením vroubkovaného knolíku pod hlavicí stativu upevn te montáž na stativu Prove te svislo...

Page 18: ...d není teleskop vyvážený tj když jej pustíte z stane v klidu Utáhn te k ídlatý šroub protiváhy Nyní je váš teleskop dokonale vyvážený Vyvažování podle deklina ní osy Ve chvíli kdy je ty protiváhy v horizontální poloze v i zemi utáhn te areta ní šroub osy rektascen ze Jednou rukou p idržte teleskop a druhou uvoln te areta ní šroub osy deklinace Uvoln te kroužky tubusu dalekohledu a posu te jej dop ...

Page 19: ... teleskopu Je li montáž správn polárn ustavená sta í ke sledování dráhy objekt p i jejich pohybu otá et šroubem jemného nastavení rektascenze Lze p idat i motorový pohon osy rektascenze a sledovat pohyb nebeských t les automatickým vyrovnáváním rotace Zem Je li objekt p íliš slabý m žete použít kruhové stupnice na paralaktické montáži Kruhové stupnice vám umožní lokalizovat objekty na obloze jejic...

Page 20: ...ení výšky montáže nad zemí pomocí se ízení délky ramen stativu Musíte posoudit výšku do níž chcete umístit okulár a pokud možno zvážit možnost sezení na pohodlné židli nebo stoli ce Velmi dlouhé optické tubusy musejí být ve vyšší poloze jinak p i pozorování objekt poblíž zenitu skon íte v p ikr ené poloze nebo si budete muset lehnout na zem Kratší optický tubus ale lze instalovat níže takže není v...

Page 21: ...o provedení kontroly spole ností Levenhuk prokáže výskyt vad materiálu nebo provedení Nezbytnou podmínkou toho aby spole nost Levenhuk splnila sv j závazek provést opravu nebo vým nu takového výrobku je p edání výrobku spole n s dokladem o nákupu vystaveným ve form uspokojivé pro Levenhuk Tato záruka se nevztahuje na spot ební sou ásti jako jsou nap íklad baterie Ke všem vráceným výrobk m musí být...

Page 22: ...obo ku spole nosti Levenhuk Levenhuk ve sv t USA www levenhuk com Kanada www levenhuk ca eská republika www levenhuk cz Polsko www levenhukoptics pl Rusko www levenhuk ru Ukrajina www levenhuk ua EU www levenhuk eu Datum nákupu ______________________________________Podpis ___________________________________________Razítko ...

Page 23: ... die Beine des Stativs und stellen Sie das Stativ auf Justieren Sie die Höhe der einzelnen Stativbeine um den Stativkopf korrekt zu nivellieren Es kann sein dass bei nivellierter Äquatorialmontierung nicht alle Stativbeine gleich lang sind Platzieren Sie die Zubehörablage auf den Konsolen zwischen den Stativbeinen und schrauben Sie sie von unten mit Flügelschrauben fest Setzen Sie die Äquatorialmo...

Page 24: ...kel zwischen 15 und 30 ein Lösen Sie langsam die Rektaszensions und Deklinations Arretierungen Schwenken Sie das Teleskop bis sowohl der optische Tubus als auch die Gegengewichtsstange parallel zum Boden verlaufen und der Teleskoptubus sich seitlich von der Montierung beindet Ziehen Sie die Deklinations Arretierung fest Finden Sie diejenige Position der Gegengewichte längs der Stange an der sich d...

Page 25: ...sen Sie die Montierung am Him melspol ausrichten Sie müssen das Gelenk ankippen so dass die Montierung zum nördlichen oder südlichen Himmelspol weist In der nördlichen Hemisphäre ist dies einfach da der helle Polarstern sehr nahe am nördlichen Himmelspol steht Für die meisten visuellen Beobachtungen reicht eine einfache Ausrichtung am Polarstern ausreichend Vergewissern Sie sich zunächst davon das...

Page 26: ...s ist jetzt der Horizont des Teleskops aber ein Teil dieses neuen Horizonts wird in der Regel von der Erde verdeckt Diese Drehung in diesem Horizont ist analog zum Azimut bei einer Azimutalmontierung und heißt Rek taszension R A Außerdem kann die Montierung aus dem Himmelsäquator heraus nach Norden und Süden auf die Himmelspole zu gedreht werden Diese positive oder negative Höhen Winkelabweichung ...

Page 27: ...satz am besten geeignete Batteriegröße und art erwer ben Stets alle Batterien gleichzeitig ersetzen Alte und neue Batterien oder Batterien verschiedenen Typs nicht mischen Batteriekontakte und Kontakte am Instrument vor Installation der Batterien reinigen Beim Einlegen der Batterien auf korrekte Polung und achten Batterien entnehmen wenn das Instrument für einen längeren Zeitraum nicht benutzt wer...

Page 28: ...Levenhuk bemüht sich jedes Produkt für das Garantieansprüche bestehen innerhalb von 30 Tagen nach Erhalt zu reparieren oder auszutauschen Wenn eine Reparatur länger als 30 Tage dauert setzt Levenhuk den Kunden hiervon in Kenntnis Levenhuk behält sich das Recht vor ein Produkt das nicht mehr im Sortiment ist durch ein neues Produkt mit vergleichbarem Wert und vergleichbaren Funktionen zu ersetzen D...

Page 29: ...blokuj ce statyw i delikatnie wysun dolne cz ci nóg statywu Dokr ci zaciski aby ustawi okre lon wysoko nóg Rozstawi nogi statywu tak aby stał on prosto Wyregulowa wysoko ka dej z nóg a do odpowiedniego wyrównania głowicy statywu Nale y pami ta e po wyrównaniu monta u paralaktycznego wysoko nóg statywu mo e by ró na Umie ci tac na akcesoria na górze wspornika i zabezpieczy j przykr caj c ruby radeł...

Page 30: ...censji i deklinacji Obróci teleskop a tuba op tyczna i przeciwwaga b d uło one równolegle do podło a a tubus teleskopu b dzie znajdował si z boku monta u Dokr ci pokr tło blokuj ce w osi deklinacji Przesun przeciwwag wzdłu pr ta do momentu w którym po zwolnieniu chwytu teleskop b dzie wywa ony i stabilny Zabezpieczy przeciwwagi dokr caj c ich ruby Wywa anie w osi deklinacji Przed przyst pieniem do...

Page 31: ... u nale y zlokalizowa skal o zakresie 0 90 Poluzowa zaczep monta u lekko obracaj c uchwyt blokady w lewo ruba radełkowana znajduj ca si pod głowic monta u sprawia e nast puje przesuni cie płytki zaczepowej i zmiana k ta Obraca pokr tło a do momentu w którym wskazówka na skali szeroko ci geograicznej wska e bie c szeroko geograiczn Poluzowa pokr tło blokuj ce w osi deklinacji i obróci teleskop a do...

Page 32: ...róci od jednego horyzontu w stron drugiego wokół osi deklinacji po łuku przechodz cym przez niebieski biegun północny je eli monta ustawiony jest na Gwiazd Polarn ka dy łuk deklinacji przechodzi przez północny biegun niebieski Je eli konieczne jest skierowanie tuby optycznej na obiekt znajduj cy si na północ lub południe od łuku nale y równie obróci j wokół osi rektascensji Ustawienie teleskopu w ...

Page 33: ... Nie doprowadza do zwarcia baterii poniewa wi e si to z ryzykiem powstania wysokich temperatur wycieku lub wybuchu Nie ogrzewa baterii w celu przedłu enia czasu ich działania Nale y pami ta o wył czeniu urz dzenia po zako czeniu u ytkowania Baterie przechowywa w miejscu niedost pnym dla dzieci aby unikn ryzyka połkni cia uduszenia lub zatrucia Konserwacja i piel gnacja Pod adnym pozorem nie wolno ...

Page 34: ... obejmuje wad i uszkodze wynikaj cych z wprowadzenia zmian modyikacji zaniedbania nieprawidłowego korzystania u ycia nieodpowiednich ródeł zasilania uszkodze powstałych w wyniku transportu nadu ycia lub innych przyczyn zwi zanych z u ytkowaniem produktu niezgodnie z zaleceniami b d z nieprawidłowego działania lub spadku jako ci wynikaj cego ze zu ycia produktu Levenhuk nie udziela gwarancji wyra n...

Page 35: ...Levenhuk Skyline EQ RU Levenhuk 180 180 180 1 2 3 4 ...

Page 36: ...5 6 500 5 24 6 24 6 30 500 5 24 6 24 6 30 7 8 15 30 60 75 ...

Page 37: ... EQ2 2 10 11 0 90 90 5 5 12 13 9 ...

Page 38: ... 1 24 10 0 0 18 36 18 36 14 15 ...

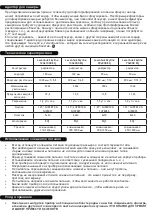
Page 39: ...Levenhuk Skyline 70 900 EQ 120 130 90 70 1000 f 8 8 900 f 6 9 900 f 10 900 f 12 9 230x 260x 180x 140x 12 2 12 5 11 8 11 23 1 2 1 1 1 5 1 9 1 25 SUPER10 SUPER25 1 25 SUPER10 SUPER25 1 25 SUPER10 SUPER25 1 25 SUPER10 SUPER25 5x24 6x24 6x30 6x24 EQ1 EQ2 EQ2 EQ1 710 1230 700 1250 700 1250 650 1200 ...

Page 40: ...Levenhuk Levenhuk 6 3 Levenhuk Levenhuk www levenhuk com www levenhuk ca www levenhuk cz www levenhukoptics pl www levenhuk ru www levenhuk ua www levenhuk eu _______________________________________ ________________________________________ ...

Page 41: ...Levenhuk Skyline EQ UA Levenhuk 180 180 180 1 2 3 4 5 ...

Page 42: ...6 500 5x24 6x24 6x30 500 5x24 6x24 6x30 7 8 15º 30º 60º 75º EQ2 ...

Page 43: ... 10 11 0 90 90 N 5 5 12 13 9 ...

Page 44: ...1 24 10 0 0 18 36 18 36 14 15 16 ...

Page 45: ...Skyline 70 900 EQ 120 130 90 70 1000 f 8 8 900 f 6 9 900 f 10 900 f 12 9 230x 260x 180x 140x 12 2 12 5 11 8 11 23 1 2 1 1 1 5 1 9 1 25 SUPER10 SUPER25 1 25 SUPER10 SUPER25 1 25 SUPER10 SUPER25 1 25 SUPER10 SUPER25 5x24 6x24 6x30 6x24 EQ1 EQ2 EQ2 EQ1 710 1230 700 1250 700 1250 650 1200 Levenhuk ...

Page 46: ...nhuk Levenhuk Levenhuk Levenhuk Levenhuk Levenhuk Levenhuk Levenhuk Levenhuk Levenhuk Levenhuk Levenhuk Levenhuk www levenhuk com www levenhuk ca www levenhuk cz www levenhukoptics pl www levenhuk ru www levenhuk ua www levenhuk eu _______________________________________ ________________________________________ ...

Page 47: ......

Page 48: ...tik Reinigungszubehör Zur Reinigung der Optik Ihres Fernglases empfehlen wir Original Reinigungszubehör von Levenhuk Narz dzia do czyszczenia optyki Levenhuk Do czyszczenia elementów optycznych lornetki zaleca si stosowanie oryginal nych akcesoriów Levenhuk Levenhuk Levenhuk Levenhuk Levenhuk Levenhuk Inc 1935 Brandon Court Suite A 1 Chicago IL 60139 USA Levenhuk is a registered trademark of Leven...

Reviews: