background image

CABLE INSTALLATION - PREPARATION

Page 6 of 30

DI-007-5RXUH-20A

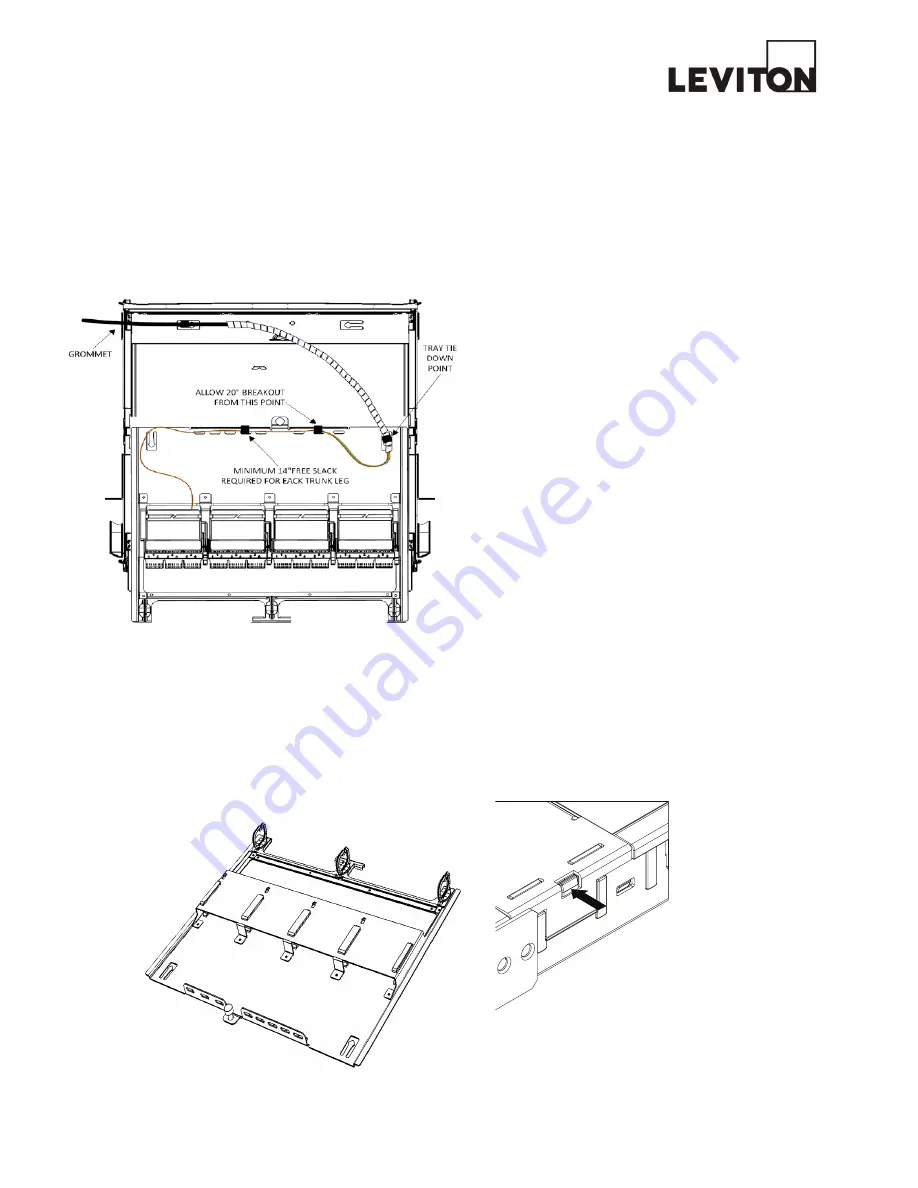
Top View: Tray to Front

NOTE:


Tray in forward position, covers 

and center bar removed for clarity.

COMMENTS:

•   Route cable to tray through grommet on the opposite 


   side of slide tray tie down point

•   Assure cable slack for tray movement.

•   Recommended trunk breakout length is 36 inches.

•   20 inches of breakout is required from the first tray lacing 

     point to provide adequate slack for individual cassette     

   travel.

•   A minimum of 14 inches of free slack is required to each  

   cassette for bend radius compliant accessibility from the  

   front side.

To remove tray from enclosure, slide tray fully forward

(Warning: No front pin/rear stop point is provided with this 

enclosure.)

Pictured: Removable tray to facilitate field 

termination

NOTE:

Pictured: Center bar removal - detail view

To remove center steel support bar, depress latch as 

shown per arrow in diagram below.

 NOTE:

•  Do not remove bar 


  before installing  

  enclosure in rack.

•  Center bar is required 


  for operation of the  


  removable covers.

•  Replace center bar when  

  service is complete.

Summary of Contents for 5R1UH-S08

Page 1: ... division of Leviton Mfg Co Inc 2222 222nd St SE Bothell WA 98021 Tech Line 1 800 722 2082 Fax 1 425 485 9170 www leviton com Copyright 2008 Leviton Manufacturing Co Inc All rights reserved Subject to change without notice Page 1 of 30 DI 007 5RXUH 20A 5R1UH S08 5R2UH S16 5R1UH S08 5R2UH S16 ...

Page 2: ...or left in work area and dispose of properly TIPS AND RECOMMENDATIONS 1 Using isopropyl alcohol thoroughly clean exposed fiber and buffer ensuring both are free from dust oil and debris 2 Do not lay ferrule dust covers on a dirty or dusty surface 3 Always use proper tools and or accessories to terminate fibers and clean connector tips TABLE OF CONTENTS The following instructions will help you quic...

Page 3: ...T2 Universal Opt X Cable Clamp Kit for rack post mounting 5RCMR KIT 1RU Mounting Ear for 23 Rack 5R1RU 023 1RU Replacement Door 5D000 1UN 1RU Replacement Door w Lock 5D000 1UL Replacement Covers 5C000 RPL Grounding Kit DPGRD KIT 2RU Replacement Door 5D000 2UN 2RU Replacement Door w Lock 5D000 2UL OPTIONAL ACCESSORIES Description Image Quantity in 1RU Kit Quantity in 2RU Kit Paper Label Kit 2 Sets ...

Page 4: ...IEW Interior NOTE Cover removed for clarity Exterior Description The Leviton HD System Enclosure is available in 1RU and 2RU versions and provides for the mounting of HD System Evolve cassettes adapter plates and blank plates 1RU Enclosures can receive up to 8 system components 2RU Enclosures can receive up to 16 system components Provided Parts 1 1 1RU or 2RU Opt X Ultra HD System enclosure 2 2 R...

Page 5: ...l 23 RM kit also available for 1RU See Optional Part Number list see page 4 Slide bend radius bracket into opening Page 5 of 30 DI 007 5RXUH 20A To remove door press tabs as shown BEND RADIUS INSTALLATION 1 2 2 3 DETAIL I SCALE 2 1 Lift tab Remove cover To remove cover lift tabs and then slide out Press tab COVER REMOVAL DOOR REMOVAL CABLE GROMMET ...

Page 6: ...for individual cassette travel A minimum of 14 inches of free slack is required to each cassette for bend radius compliant accessibility from the front side To remove tray from enclosure slide tray fully forward Warning No front pin rear stop point is provided with this enclosure Pictured Removable tray to facilitate field termination NOTE Pictured Center bar removal detail view To remove center s...

Page 7: ...ge 7 of 30 DI 007 5RXUH 20A Insert HD Evolve Cassettes Adapter Plates or Blank Plates from the front into the receiving guide of the target location HD Evolve Cassette HD Evolve MTP Cassette Blank Plate HD Evolve Adapter Plate ...

Page 8: ...Page 8 of 30 DI 007 5RXUH 20A CABLE INSTALLATION APPLICATIONS ...

Page 9: ...ber Scheme Port Spacing No of Ports Duplex SC 3 pack 60 6 1 2 3 4 5 6 Quad LC 3 pack 60 12 1 2 3 4 5 6 7 8 9 10 11 12 MTP 3 port 1 20 3 1 Space 2 Space 3 MTP 6 port 60 6 1 2 3 4 5 6 Universal Labeling Devices 1RU Use 1 4 label tape Total label length 4 Each panel section is 1 4 H x 3 4 L Leviton has provided the labeling model requirements to Rhino Labeling Rhino has established product standards ...

Page 10: ...Leviton Manufacturing Co Inc 2222 222nd ST SE Bothell WA 98021 USA Technical Support 800 824 3005 DI 007 5RXUH 20A Page 10 of 30 DI 007 5RXUH 20A ...

Page 11: ... solutions de réseaux Leviton une division de Leviton Mfg Co Inc 2222 222nd St SE Bothell WA 98021 Soutien technique 1 800 722 2082 en anglais seulement Télécopieur 1 425 485 9170 www leviton com 2012 Leviton Manufacturing Co Inc Tous droits réservés Sous réserve de modifications sans préavis Page 11 of 30 DI 007 5RXUH 20A ...

Page 12: ...neusement retirer tous les débris de fibre accrochés aux vêtements ou laissés dans l aire de travail en les éliminant de la manière prescrite CONSEILS ET RECOMMANDATIONS 1 Au moyen d isopropanol nettoyer en profondeur les fibres et la gaine afin d en retirer toute trace de poussière d huile ou de débris 2 Ne jamais déposer les capuchons de virole sur une surface sale ou poussiéreuse 3 Toujours emp...

Page 13: ...10 9 4 8 7 6 2 3 2 4 5 3 5 6 9 5 10 11 6 12 1 1 2 4 5 3 6 7 4 8 10 11 6 12 1 1 2 3 5 3 6 7 4 8 9 5 D C 1 1 2 3 2 4 4 8 9 5 10 11 6 12 2 4 A 5 3 6 B 7 1 2 1 1 2 3 Panel Serving FedFrom ACCESSOIRES OPTIONNELS Description No de pièce Anneau passe câble universel Opt X un câble installations sur logement 5RCMP KIT Anneau passe câbles universel Opt X plusieurs câbles installations sur logement 5RCMP KT...

Page 14: ...câble en caoutchouc 2 7 Supports de fixation 2 8 Trousse d accessoires attaches en velcro spirales d enrobage étiquettes et porte étiquettes 1 9 Ensemble de vis 12 24 de 0 5 po Intérieur REMARQUE illustration sans couvercle pour plus de clarté 2 3 4 6 7 5 1 1 Points d attache 2 Tige de rétention arrière du plateau soulever pour glisser ce dernier vers l arrière 3 Point d attache du câblage de liai...

Page 15: ...o Se reporter à la liste des accessoires optionnels page XX ANNEAU PASSE CÂBLE INSTALLATION DES PROTÈGE RAYON DE COURBURE RETRAIT DES COUVERCLES RETRAIT DES PORTES DETAIL I SCALE 2 1 Lift tab Remove cover Press tab Glisser le protège rayon de courbure dans l ouverture Pour retirer un couvercle soulever les pattes et le glisser vers l extérieur Pour retirer une porte appuyer sur les pattes de la ma...

Page 16: ...mou à chaque cassette pour assurer la conformité des rayons de courbure quand on accède au logement par l avant Pour retirer le plateau du logement le glisser complètement vers l avant Avertissement ce modèle de logement n est doté ni de tiges avant ni de butées arrière Illustration du plateau amovible pour faciliter les terminaisons REMARQUE Illustration du retrait de la barre centrale Pour retir...

Page 17: ... Obturateur APPUYER DÉLICATEMENT POUR LIBÉRER PUIS RETIRER LA CASSETTE ÉTAPE 1 ÉTAPE 2 REMARQUE ILLUSTRATION SANS LOGEMENT NI ÉTRIERS DE GESTION POUR PLUS DE CLARTÉ EXEMPLE DE TAQUET ENCLENCHÉ GLISSER LA CASSETTE LA PLAQUE D ADAPTATION OU L OBTURATEUR VERS L ARRIÈRE JUSQU À CE QUE LE TAQUET S ENCLENCHE ÉTAPE 2 INSÉRER LA CASSETTE LA PLAQUE D ADAPTATION OU L OBTURATEUR DANS LES RAILS ÉTAPE 1 Page 1...

Page 18: ...XATION AU PLATEAU FIXATION AU PLATEAU FIXATION AU LOGEMENT DONNER DU MOU POUR PERMETTRE LES DÉPLACEMENTS DE PLATEAU CÂBLAGE DE LIAISON SPIRALE D ENROBAGE RECOMMANDÉE Acheminement par l arrière vers la droite CÂBLAGE DE LIAISON FIXATION AU PLATEAU FIXATION AU LOGEMENT Acheminement par l arrière répartition DONNER DU MOU POUR PERMETTRE LES DÉPLACEMENTS DE PLATEAU PLAQUE 1 PLAQUE 2 PLAQUE 3 PLAQUE 4 ...

Page 19: ... 7 8 9 10 11 12 MTP 3 ports 1 20 3 1 Espace 2 Espace 3 MTP 6 ports 60 6 1 2 3 4 5 6 Normes d étiquetage Modèles de 1UB Ruban d étiquetage de 1 4 po 6 35 mm Longueur totale d environ 4 po 10 cm Chaque section de panneau mesure 1 4 po ou 6 35 mm haut sur 3 4 po ou 19 05 mm long Leviton a fourni ses normes d étiquetage à la société Rhino Labeling On peut voir les produits de cette entreprise au www r...

Page 20: ...Leviton Manufacturing Co Inc 2222 222nd ST SE Bothell WA 98021 USA Soutien technique 800 824 3005 Solutions de réseautique DI 007 5RXUH 20A Page 20 of 30 ...

Page 21: ... 5R2UH S16 DI 007 5RXUH 20A Leviton Network Solutions a division of Leviton Mfg Co Inc 2222 222nd St SE Bothell WA 98021 Tech Line 1 800 722 2082 Fax 1 425 485 9170 www leviton com Copyright 2012 Leviton Manufacturing Co Inc All rights reserved Subject to change without notice Page 21 of 30 DI 007 5RXUH 20A ...

Page 22: ...a ropa o en el área de trabajo y deséchelas apropiadamente CONSEJOS Y RECOMENDACIONES 1 Usando alcohol propanol limpie a fondo la fibra expuesta y tampón garantizando que ambos estén libres de polvo aceite y suciedad 2 No deje el casquillo protector de polvo en una superficie sucia o con polvo 3 Siempre use herramientas y o accesorios apropiados para terminar las fibras y puntas limpias de conecto...

Page 23: ...ntaje 5RCMP KT2 Juego de abrazadera de cable para montaje en bastidor poste 5RCMR KIT Orejas de Montaje 1RU para bastidor de 58 cm 23 5R1RU 023 Reemplazo de puerta de 1RU 5D000 1UN Reemplazo de puertas c seguro 1RU 5D000 1UL Reemplazo de cubiertas 5C000 RPL Juego de puesta a tierra DPGRD KIT ACCESORIOS OPCIONALES Descripción Imagen Cantidad en 1 RU Cantidad en 2 RU Juego de etiquetas de papel 2 Ju...

Page 24: ...xión VISTA GENERAL Interior NOTA Cubierta removible para mayor claridad Exterior Descripción La caja del sistema HD de Leviton está disponible en versiones de 1RU y 2RU y para montar proporciona casetes del sistema HD Evolve placas adaptadoras y las placas en blanco Las cajas 1RU pueden recibir hasta 8 compo nentes del sistema Las cajas 2RU pueden recibir hasta 16 componentes del sistema Partes pr...

Page 25: ...le para 1RU Vea la lista opcional de número de partes ver página 4 Deslice el soporte de curva de radio en la abertura Page 25 of 30 DI 007 5RXUH 20A Para retirar la puerta presione la pestaña s hacia abajo y deslícela hacia fuera INSTALACION DEL SOPORTE DE CURVA DE RADIO 1 2 2 3 DETAIL I SCALE 2 1 Lift tab Remove cover Para retirar la cubierta presione las pestañas hacia abajo y deslícela hacia f...

Page 26: ...sete para cumplir con la curva de radio y poder tener acceso por la parte frontal Para retirar la bandeja de la caja deslice la bandeja completamente hacia adelante Advertencia No se proporciona tope frontal posterior con esta caja Se muestra Bandeja removible para facili tar la terminación NOTA Se muestra Barra del Centro removida vista detallada Para quitar la barra de soporte central de acero p...

Page 27: ... Casete MTP Evolve HD Placa en blanco Placas Adaptadoras Evolve HD NOTA CAJA Y ANILLOS ORGANIZADORES DEL CORDON SACADOS PARA CLARIDAD PASO 1 INSERTE EL CASETE LA PLACAADAPTADORA O EN BLANCO EN LAS RIELES GUIA PASO 2 DESLICE EL CASETE LA PLACA ADAPTADORA O EN BLANCO HACIAATRAS HASTA QUE QUEDE BIEN ASEGURADA EJEMPLO ASEGURADO APROPIADO PASO 1 PASO 2 PRESIONE HACIAABAJO SUAVEMENTE PARA SOLTAR LUEGO R...

Page 28: ... A LA BANDEJA ENVOLTURA ESPIRAL RECOMENDADA TRONCAL DE CABLEADO ASEGURE A LA CAJA PERMITIR HOLGURA PARA EL MOVIMIENTO DE LA BANDEJA ENVOLTURA ESPIRAL RECOMENDADA ASEGURE A LA BANDEJA ASEGURE A LA BANDEJA TRONCAL DE CABLEADO Guía de ruta posterior Derecha ASEGURE A LA CAJA PERMITIR HOLGURA PARA EL MOVIMIENTO DE LA BANDEJA ASEGURE A LA BANDEJA TRONCAL DE CABLEADO Guía de ruta posterior del corte ...

Page 29: ...ipo de Panel Adaptador Por Columna Número de Esquemas por Entrada Entradas Duplex SC 3 pack 60 6 1 2 3 4 5 6 Quad LC 3 pack 60 12 1 2 3 4 5 6 7 8 9 10 11 12 MTP 3 port 1 20 3 1 Espacio 2 Espacio 3 MTP 6 port 60 6 1 2 3 4 5 6 PRODUCTOS DE ETIQUETADO UNIVERSAL 1RU Use cinta de etiquetas 0 64 cm Largo total de la etiqueta 10 cm 4 Sección del panel 0 64 cm A x 1 9 cm L 1 4 A x 3 4 L Leviton ha proporc...

Page 30: ...Leviton Manufacturing Co Inc 2222 222nd ST SE Bothell WA 98021 USA Technical Support 800 824 3005 Page 30 of 30 DI 007 5RXUH 20A ...

Reviews: