background image


User Manual for BPS-4H (High Temp.) 

www.levitronix.com 


PL-2009-05, Rev04, DCO# 21-101 


34/39 


6.4  Impeller Replacement Procedure for Pump Head CP-4.34/36 

6.4.1  Preparation 


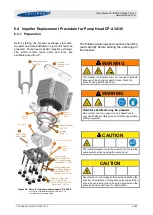
Before  starting  the  impeller  exchange  procedure, 
the parts and tools illustrated i

Figure 34

 should be 

prepared.  Pump  head  specific  impeller  exchange 
kits,  which  contain  these  parts  and  tools,  are 
available at 

Levitronix

®


Figure 34:  Parts for impeller of pump head CP-4.34/36


A-H: Parts of impeller exchange kit is IEK-4.10. 
a-d: Other parts of pump head.


The following warnings and cautions should be 
read carefully before starting the exchange of 
the impeller. 


WARNING


The impeller could splash toxic or corrosive chemicals 
because of the strong magnetic forces. Flush the 
pump housing before opening it.


WARNING


Harmful chemicals may be present. 

Skin contact and toxic gases may be hazardous to 
your health. Wear safety gloves and other appropriate 
safety equipment.


CAUTION


The rotating impeller could cause injury. Do not run the 
pump system when opening the pump head.


CAUTION 


Pay attention to the magnetic forces when handling the 
impeller. The attraction of magnetic parts and particles 
should be avoided in order to keep the impeller and the 
pump head clean and free of contamination.


Housing 
Removal Tool 
HRT-4.1 

Impeller Exchange 
Tool IET-3.1 

Impeller 
IMP-4.7 

Back-Up Gasket 
(ePTFE) 

Screw Protection Cup 
incl. O-Ring (FKM) 
12 pcs. M18x1.5 (PE-HD) 
Torque Spec.: 1.5 Nm 

Pump Head Screws 
incl. Spring Washers 
8 pcs. M8x45 (SS) 
Torque Spec.: 3.5 Nm 

Motor Screws 
4 pcs. M8x80 (SS) 
incl. Spring Washers 
Torque Spec.: 17 Nm 

Pipe O-Ring 
4 pcs. (FKM) 

Radial 
Support 
Ring 

Axial 
Support 
Plate 

Casing Lid 

Casing 
Bottom 

Screw Protection Pipe 

Summary of Contents for 100-90688

Page 1: ...nstructions regarding its use installation operation adjustment inspection and maintenance For special configurations of the pump system refer to accompanying information If the system must be configured for other parameter settings then the Levitronix Service Software with according manual Levitronix Doc PL 4046 00 is necessary Familiarize yourself with the contents of the manual to ensure the sa...

Page 2: ...Interface Module 24 4 2 1 Overview 24 4 2 2 Installation Instructions 25 4 3 Mechanical Installation of the Pump Head with Motor 26 4 4 Mechanical Installation of the LC325P Controller 26 4 5 Mechanical Installation of Adaptor Cables 27 5 OPERATION 28 5 1 Overview of Main Operation Modes 28 5 2 System Operation with the LUI A Levitronix User Interface 28 5 3 System Operation with PLC A PLC Interfa...

Page 3: ...p or power failure it has to be assured that water cooling is still active until the hot liquid in the pump has cooled down WARNING Hazardous voltage may be present The controller must be grounded and placed in a spill protected environment Do not under any circumstances open the powered controller WARNING High magnetic field strength of pump impeller The pump system contains a rotor magnet with h...

Page 4: ... Specifications of Components Figure 1 shows the main system components motor controllers and pump head and Figure 2 illustrates the accessories Figure 1 Pump system with standard components Figure 2 Pump system accessories 6 D A B E B A B C C C 3 2a 1a 2b 1b 4a 4b 8 5a 5b 10 A G 9 B 7 C D E F H I J 1c ...

Page 5: ... Value Feature Article Name Article Article Name Article 4 a b Extension Adaptor Cables FEP MCAS 3 2 05 0 5m MCAS 3 2 30 3m MCAS 3 2 50 5m MCAS 3 2 70 7m MCAS 3 2 100 10m 190 10244 190 10094 190 10026 190 10245 190 10246 MCAP 4 4 05 MCAP 4 4 30 MCAP 4 4 50 MCAP 4 4 70 MCAP 4 4 100 190 10247 190 10095 190 10096 190 10248 190 10249 Jacket Material Connectors Sensor Connectors Power FEP Circular Meta...

Page 6: ...ction the Levitronix control firmware comes with several condition monitoring features to monitor the integrity of the fluid circuit Levitronix flow control systems can generate alarms for preventive filter exchange no flow conditions or line clogging Dynamic Condition Trending DCT enables failure prediction and scheduling of preventive maintenance Figure 4 System configuration for process flow or...

Page 7: ... to 50 percent relative humidity at 40 C Storage relative humidity range Extremes for transportation 15 95 non condensing Normal storage conditions Ambient temp 20 to 30 C Relative humidity 50 non condensing Mains supply fluctuations 10 of nominal voltage Transient over voltages typically present on the mains supply UL overvoltage category II Surge immunity according to EN 61000 4 5 Pollution degr...

Page 8: ... Value Analog In2 Actual Speed Analog Out1 Actual Process Control Value Analog Out2 Reset Digital In1 Process Mode Digital In2 Enable Digital In3 Status Digital Out1 Error Digital Out2 Warning Digital Out3 Ground Analog In1 Ground Analog In2 Common Ground Digital In Common Relay Contact Digital Out Common Ground Analog Out Shield 450 Ω 4 20mA 0 5V 10 24V 10mA 1A 30VDC 0 3A 125VAC TX RX GND 5V 1x A...

Page 9: ... pump head CP 4 25 0 10 20 30 40 50 0 2 4 6 8 10 12 14 0 0 0 5 1 0 1 5 2 0 2 5 3 0 3 5 0 5 10 15 20 25 30 35 40 45 50 55 psi gallons min bar liters min Specific gravity 1 8 g cm3 Viscosity 5 cP Liquid Temp 150 0C Liquid Sulfuric Acid 96 3000 rpm 2000 rpm 4000 rpm 4500 rpm 3500 rpm 4200 rpm 0 10 20 30 40 50 0 2 4 6 8 10 12 14 0 0 0 5 1 0 1 5 2 0 2 5 3 0 3 5 0 5 10 15 20 25 30 35 40 45 50 55 psi gal...

Page 10: ... 5 1 0 1 5 2 0 2 5 3 0 3 5 4 0 4 5 0 5 10 15 20 25 30 35 40 45 50 55 60 65 70 psi gallons min bar liters min Specific gravity 1 g cm3 Viscosity 0 7 cP Liquid Temp 40 C Liquid H2O 4000 rpm 3000 rpm 5000 rpm 5500 rpm 6000 rpm 6500 rpm 0 20 40 60 80 100 120 77 107 137 167 197 227 257 287 317 347 377 407 437 0 1 2 3 4 5 6 7 8 9 25 45 65 85 105 125 145 165 185 205 225 psi F bar Liquid Temperature in C ...

Page 11: ...sions without motor housing coating of 0 4 mm Pump Head Screws Stainless Steel PTFE 8 pcs M8x40 mm Torque Spec 1 2 Nm Pump Motor Screws Stainless Steel PTFE 4 pcs M8x30 mm Torque Spec 1 2 Nm Twisting protection to prevent unscrewing of cooling connections Inlet Outlet Fittings Pillar Super 300 1 Suction Port Pillar Super 300 Cooling Circuit OUTLET Pillar Super 300 Cooling Circuit INLET Pillar Supe...

Page 12: ...Stainless Steel PTFE 8 pcs M8x40 mm Torque Spec 3 5 Nm Inlet Outlet Fittings Pillar Super 300 1 Suction Port Pillar Super 300 Cooling Circuit OUTLET Pillar Super 300 Pump Motor Screws Stainless Steel 4 pcs M8x80 mm Torque Spec 17 Nm Twisting protection to prevent unscrewing of cooling connections Cooling Circuit INLET Pillar Super 300 Screw Protection Cup 12 pcs PE HD Torque Spec 1 5 Nm Pump head ...

Page 13: ...ble 6 Specifications for min bending radius of motor and adaptor cables for BSM 4 Note If not mentioned explicitly all the cables are not suited for constant dynamic bending and movement Figure 13 Basic dimensions mm inch of the LC325P controller Figure 14 Basic dimensions mm inch of the PLC A interface module Dimensions 85 45 22 mm 3 3x1 8x0 9 Cable length 400 mm 15 7 Standard cable length 4000 m...

Page 14: ...7 PTFE 5 Rotor magnet Rare earth material Samarium Cobalt 6 Pump motor screws 4 pcs M8x30 mm Stainless steel Inox A4 with PTFE coating Motor BSM 4 10 7 Sealing for motor housing FPM 8 Cooling circuit fittings PVDF PFA 9 Cable bushing PVDF casing with FPM sealing ring FEP cable jacket 10 Motor housing ETFE coating waterproof Coils and electromagnetic circuit potted with an epoxy compound UL94 V0 Sw...

Page 15: ...otor screws 4 pcs M8x80 mm O ring for pump motor screws 4 pcs Screw protection cup with O ring 12 pcs Screw protection pipe Stainless steel Inox A4 spring washers Inox A4 Stainless steel Inox A4 spring washers Inox A4 FKM PE HD and FKM PTFE 5 Impeller IMP 4 7 PTFE 6 Rotor magnet Rare earth material Samarium Cobalt Motor BSM 4 11 7 Sealing for motor housing FPM 8 Cooling circuit fittings PVDF PFA 9...

Page 16: ...d the pump stops At 80 C 176 F controller temperature or 100 C 212 F motor temperature the system stops immediately Start Temperature Monitoring WARNING YES Temperature 70 C Temperature 80 C YES YES ERROR Temperature higher than 70 C for more than 10 minutes NO ERROR YES NO NO Start Temperature Monitoring WARNING YES Temperature 90 C Temperature 100 C YES YES ERROR Temperature higher than 90 C for...

Page 17: ...ed with CP 4 25 and motor BSM 4 10 with cooling flow of 0 5 l min and 17 C Note 2 Data is representative for CP 4 34 36 with motor BSM 4 11 Note 3 Temperature measured inside the motor and can be up to 20 C higher at the surface 0 0 1 0 2 0 3 0 4 0 10 20 30 40 50 60 0 0 0 5 1 0 1 5 2 0 2 5 3 0 3 5 4 0 4 5 0 0 25 0 5 0 75 1 1 25 1 5 1 75 gallons min psi bar liters min Cooling Water Temperature Rang...

Page 18: ...deline values and are suitable for a first layout of the basic thermal concept It is recommended to check the thermal values with the motor placed on the final location and under worst case performance conditions of the application In order to account for thermal variations like ambient temperature closed chemical cabinets or corners without ventilations and to not significantly reduce the MTBF of...

Page 19: ... sufficient ventilation Figure 22 Temperature curves of LC325P controller vs flow and speed Typical curves for pumping pure sulfuric acid at 150 C with CP 4 25 and motor BSM 4 10 The above curves are measurements of the controller temperature at 25 C ambient Equation Eq 2 shows how to calculate the controller temperature for at other ambient temperatures based on this curve 𝑇𝐶 𝑇𝐴 𝑇𝐶 𝑇𝐴 25 𝐶 𝑠𝑒𝑒 𝐹𝑖...

Page 20: ... in the reservoir tank or bag as high as possible which increases the inlet pressure of the pump head and minimized heat up of the liquid 6 In general the pump system placement and circuit shall be designed in a way that gas bubbles can leave the pump housing and that the pump head remains primed 7 To minimize heat up of the liquid the overall pressure drop in the hydraulic circuit shall be reduce...

Page 21: ...nnector Serial communication for service and operation purposes Interface to the control panel LUI A or to the PC 4 POWER OUTPUT connector Drive and bearing currents of the motor 1 Torque spec for tightening of connector screws on motor side Min 0 5 Nm Max 0 6 Nm 5 POWER INPUT connector AC power Input 1 Torque spec for tightening of connector screws on motor side Min 0 5 Nm Max 0 6 Nm 6 Green LED ...

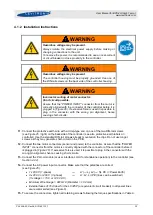
Page 22: ... 25 right on the backside of the controller see also protective earth labels on controller Use the standard DIN rail screws already mounted on the clips Do not use longer screws as they may generate short circuit on the PCB 12 Connect the two motor connectors sensor and power to the controller Assure that the POWER INPUT connector from the motor is correctly aligned with the connector of the contr...

Page 23: ... 23 Figure 25 AC power input and protective earth of LC325 controller left pins of power input connector right protective earth connection on DIN rail screws Figure 26 Correct left and incorrect right alignment of POWER OUTPUT connector Slots Aligned and visible Slots not visible ...

Page 24: ...30 VDC 0 3 A 125 VAC Table 10 Electrical specifications of the PLC A 1 interface module Figure 27 Standard configuration of the PLC A 1 interface module with firmware S4 48 For other configuration refer to corresponding firmware documentation Levitronix Controller PLC Interface Module Analog and Digital Signals from User violet brown blue yellow red white red blue red blue red blue green brown pin...

Page 25: ...e 0 5 V 0 100 Direct connection no protection Galvanic isolation on the user side is required Common Ground Analog Out Black Digital In1 Signal Blue Reset 24 V active 0 V not active Resets fault state Digital In2 Signal Yellow Red Process mode 24 V active 0 V not active Switches between process mode and speed mode Digital In3 Signal White Enable 24 V active system on 0 V not active system off The ...

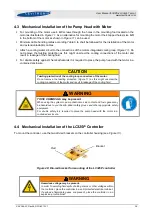
Page 26: ...he motor in a contained enclosure CAUTION Twisting protection of the cooling loop connectors of the motor Do not remove the twisting protection Figure 11 as this might unscrew the cooling connectors of the motor and result in leakage of the cooling fluid WARNING TOXIC CHEMICALS may be present When using the system to pump chemicals skin contact and toxic gases may be hazardous to your health Wear ...

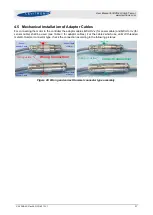
Page 27: ...sensor cable shall be used see Table 3 for adaptor cables For the cables which use an M23 threaded metallic Hummel connector type check the connection according to the following pictures Figure 29 Wrong and correct Hummel connector type assembly O Ring visible Wrong Connection O Ring not visible Correct Connection Gap 2 mm Sensor Cable of Motor Power Cable of Motor Gap 1 mm Gap 1 mm Gap 2 mm Senso...

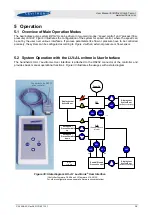
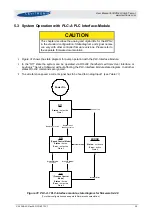
Page 28: ...n with the LUI A Levitronix User Interface The handheld LUI A 1 Levitronix User Interface is attached to the RS232 connector of the controller and provides basic manual operational functions Figure 30 illustrates the usages with a state diagram Connector to the RS232 of the controller Figure 30 State diagram LUI A 1 Levitronix User Interface Controller firmware S4 48 and LUI firmware L1 60 R00 For...

Page 29: ...vitronix User Interface or Levitronix Service Software without affecting the PLC Interface Module state diagram In all other states RS 232 commands are ignored To set reference speed a current signal has to be feed to Analog Input 1 see Table 11 Off Status not active State 1 Power On ON Speed Control Mode Status Active Error not active State 5 ERROR Status not active Error active State 4 Enable ac...

Page 30: ...gets back to the Off state Error source Errors Effect on designated digital output of the PLC A 1 Motor No rotor Error relay open Motor Temperature 100 C 212 F Error relay open Motor Temperature 90 C 194 F for more than 10 minutes Error relay open Motor Temperature 90 C 194 F Warning relay open Motor No motor temperature signal Warning relay open Motor Motor power cable not connected to the contro...

Page 31: ... 150 180 C Thermal cycling at least 1 cycle per week 2 bar A periodic retightening of the screws is strongly recommended every month No retightening of the screws necessary 150 180 C Thermal cycling at least 1 cycle per week 2 bar A periodic retightening of the screws is necessary every week A retightening of the screws after the first thermal cycle is recommended 180 220 C Continuous 2 bar Not re...

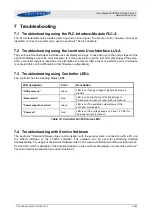
Page 32: ...t IEK 4 6 a d Other parts of pump head The following warnings and cautions should be read carefully before starting the exchange of the impeller WARNING The impeller could splash toxic or corrosive chemicals because of the strong magnetic forces Flush the pump housing before opening it WARNING Harmful chemicals may be present Skin contact and toxic gases may be hazardous to your health Wear safety...

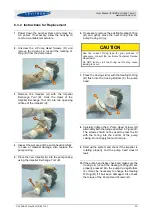
Page 33: ... gently press the new O ring into the pump Casing Lid a CAUTION Use the correct O ring type for your process If necessary consult the Levitronix Technical Service Department Do NOT twist or roll the O ring as this may cause leaking to occur 7 Press the Casing Lid a with the Sealing O Ring B flush into the Casing Bottom b the pump head 8 Carefully tighten the 8 Pump Head Screws D alternately with t...

Page 34: ...efore opening it WARNING Harmful chemicals may be present Skin contact and toxic gases may be hazardous to your health Wear safety gloves and other appropriate safety equipment CAUTION The rotating impeller could cause injury Do not run the pump system when opening the pump head CAUTION Pay attention to the magnetic forces when handling the impeller The attraction of magnetic parts and particles s...

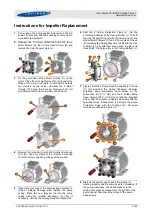
Page 35: ...ng the Impeller Exchange Tool G If necessary remove the existing Back Up Gasket B 6 Add the 4 Screw Protection Pipes e into the according sinkholes of the Casing Bottom c Then fit the Axial Support Ring a with the Casing Lid b and add all Motor Screws C and 8 Pump Head Screws D including the Spring Washers C D and the Pipe O Rings F Pay attention during align the Back Up Gasket B Then place this t...

Page 36: ...using Controller LEDs The controller has the following Status LEDs LED designator Color Description DSP power on Green LED is on if supply voltage of signal electronics is present Reset active Red LED is on during startup of the Digital Signal Processor and when the reset button is pressed Power output not active Green LED is on if the switched output stages of the controller are disabled Power on...

Page 37: ...Support For troubleshooting support and detailed technical information contact Levitronix Technical Service Department Levitronix Technical Service Department Technoparkstr 1 CH 8005 Zurich Switzerland Phone for US 888 569 07 18 Phone for outside US 1 888 569 07 18 E Mail TechSupport levitronix com ...

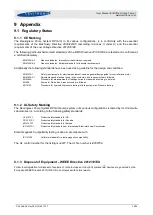
Page 38: ...ive systems basic requirements are followed EN60990 Procedure for measurements of leakage currents measured according to picture 4 EN809 Pumps for Fluids basic requirements are followed EN12162 Procedure for hydrostatic pressure testing in fluid pumps max Pressure testing 9 1 2 UL Safety Marking The Bearingless Pump System BPS 4H pump system in its various configurations is tested by UL Underwrite...

Page 39: ...ous situation which if not avoided could result in property damage Signal word SEMI S1 0701 Safety alert for Warning and Caution Safety alert SEMI S1 0701 Safety alert for Danger Safety alert SEMI S1 0701 Caution refer to accompanying documents Refer to manual ISO 3864 Toxic material poison Hazard identification IEC 61310 Corrosive material corrosion Hazard identification IEC 61310 Cut sever hand ...

Reviews: