background image

25

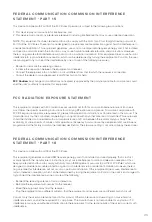
FEDERAL COMMUNICATION COMMISSION INTERFERENCE 

STATEMENT - PART 15

FEDERAL COMMUNICATION COMMISSION INTERFERENCE 

STATEMENT - PART 18 

FCC RADIATION EXPOSURE STATEMENT 

This device complies with Part 15 of the FCC Rules. Operation is subject to the following two conditions: 

1.  This device may not cause harmful interference, and 

2. This device must accept any interference received, including interference that may cause undesired operation.

NOTE: This equipment has been tested and found to comply with the limits for a Class B digital device, pursuant to 

Part 15 of the FCC Rules. These limits are designed to provide reasonable protection against harmful interference in 

a residential installation. This equipment generates, uses and can radiate radio frequency energy and, if not installed 

and used in accordance with the instructions, may cause harmful interference to radio communications. However, 

there is no guarantee that interference will not occur in a particular installation. If this equipment does cause harmful 

interference to radio or television reception, which can be determined by turning the equipment off and on, the user 

is encouraged to try to correct the interference by one or more of the following measures: 

•  Reorient or relocate the receiving antenna. 

•  Increase the separation between the equipment and receiver.  

•  Connect the equipment into an outlet on a circuit different from that to which the receiver is connected.  

•  Consult the dealer or an experienced radio/TV technician for help. 

FCC Caution:

 Any changes or modifications not expressly approved by the party responsible for compliance could 

void the user’s authority to operate this equipment.

This device complies with part 18 of the FCC Rules. 

This equipment generates and uses ISM frequency energy and if not installed and used properly, that is in strict 

accordance with the manufacturer’s instructions, may cause interference to radio and television reception. It has 

been type tested and found to comply with limits for an ISM Equipment pursuant to part 18 of FCC Rules, which are 

designed to provide reasonable protection against such interference in a residential installation. However, there is 

no guarantee that interference will not occur in a particular installation. If this equipment does cause interference to 

radio or television reception, which can be determined by tuning the equipment off and on, the user is encouraged to 

try to correct the interference by one or more of the following: 

•  Reorient the receiving antenna of radio or television. 

•  Relocate the equipment with respect to the receiver. 

•  Move the equipment away from the receiver. 

•  Plug the equipment into a different outlet so that the equipment and receiver are on different branch circuits.  

Conduct only the user maintenance found in this manual. Other maintenance and servicing can cause harmful 

interference and can void the required FCC compliance. The manufacturer is not responsible for any radio or TV 

interference cause by unauthorized modification to the equipment. It is the responsibility of the user to correct such 

interference.

This equipment complies with FCC radiation exposure limits set forth for an uncontrolled environment. End users 

must follow the specific operating instructions for satisfying RF exposure compliance. To maintain compliance with 

FCC RF exposure compliance requirements, please follow operation instructions as documented in this manual. This 

transmitter must not be co-located or operating in conjunction with any other antenna or transmitter. This equipment 

should be installed and operated with a minimum distance of 20 cm between the radiator and your body. The 

availability of some specific channels and/or operational frequency bands are country dependent and are firmware 

programmed at the factory to match the intended destination. The firmware setting is not accessible by the end user. 

Summary of Contents for LUH-A602S-WUS

Page 1: ...d Ultrasonic Humidifier LV600S Product Series Model Line LUH A602S Model LUH A602S WUS Questions or Concerns Please contact us Mon Fri 9 00 am 5 00 pm PST PDT at support levoit com or at 888 726 8520...

Page 2: ...led Cleaning Brush User Manual Quick Start Guide Specifications Power Supply AC 120V 60Hz Rated Power 280W Water Tank Capacity 1 58 gal 6 L Max Cool Mist Output 300 mL h Max Warm Mist Output 550 mL h...

Page 3: ...e electric shock or other injury follow all instructions and safety guidelines General Safety Do not use other items as replacement parts for this product Do not cover the nozzles while the humidifier...

Page 4: ...ons in order to avoid an electric or fire hazard Please contact Customer Support see page 27 Unplugging the power cord will disable remote control of the humidifier and temporarily disconnect the humi...

Page 5: ...Box K Aroma Pad L Humidity Sensor In Aroma Box Underside of water tank Top view of inner chamber Front Back Compartment M Mist Tube N Mist Channel O Noise Silencer P Absorption Pad Q Air Outlet R Flo...

Page 6: ...ator C Wi Fi Indicator D No Water Indicator E Relative Humidity RH Percentage F Warm Mist Setting Indicator G Mist Level Indicator H M I L J G F A C B D E K Indicators Buttons GETTING TO KNOW YOUR SMA...

Page 7: ...vel Button Sets the relative humidity RH percentage The humidifier will automatically stop misting when the room reaches the target humidity level see page 12 Press and hold for 2 seconds to cancel yo...

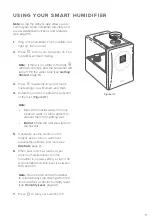
Page 8: ...r away from walls will also ensure that the inlet and sensor function properly Figure 1 1 3 Choose a hard flat location for the humidifier at least 12 inches 30 cm away from any walls The surface must...

Page 9: ...directly into the base chamber Figure 2 2 Do not add essential oils into the humidifier Only add essential oils to the aroma pad Figure 2 4 Do not use water treatment liquids or third party water filt...

Page 10: ...ed on while your phone is connecting to your smart humidifier This is required to establish the Bluetooth connection You can turn Location off after your smart humidifier is finished connecting to the...

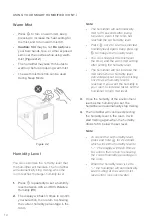
Page 11: ...tank will flash 10 times and the humidifier will turn off Fill the water tank see Getting Started page 8 Note You can also set the humidifier to automatically stop misting when the room reaches a spec...

Page 12: ...has reached the set humidity level Press once to see the selected humidity level again Keep pressing to change the humidity level You can still adjust the mist level the timer and the warm mist setti...

Page 13: ...s the humidity sensor to detect the relative humidity in the room and automatically adjusts the mist level to maintain 50 60 relative humidity When Sleep Mode is on you can press any button to wake up...

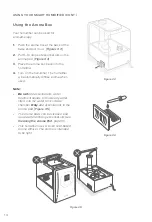
Page 14: ...difier will automatically diffuse aroma when used Note Do not add essential oils water treatment liquids or third party water filters into the water tank or base chamber Only add essential oils to the...

Page 15: ...on the base The mineral absorption pads help reduce mineral buildup scale inside the humidifier especially on the heating element Memory Function Automatic Shutoff Absorption Pads Note For informatio...

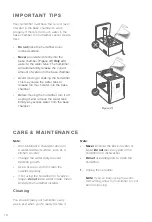
Page 16: ...difier turn it off unplug it and remove the water tank Empty any excess water from the base chamber Note If you ve been using the warm mist setting allow the humidifier to cool before cleaning CARE MA...

Page 17: ...pouring out water hold down the float to ensure that it does not fall out of the base chamber 4 Remove the water filter from the tank by rotating it counterclockwise and lifting it out Figure 5 2 5 R...

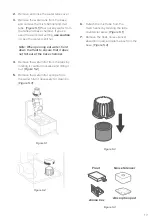
Page 18: ...mineral buildup in the tank and in the base chamber including the transducer and float e Remove the tank remove the tank cover and pour out any vinegar f Remove the float from the base chamber by pul...

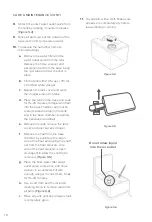
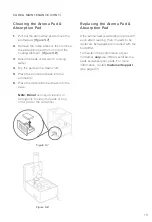
Page 19: ...ing element Figure 5 8 3 Rinse the pads under warm running water 4 Dry the pads with a clean cloth 5 Place the aroma pad back into the aroma box 6 Place the absorption pad back into the base Replacing...

Page 20: ...ting the tube clockwise Place securely into place back over the base chamber Figure 5 10 4 Place the outer water outlet valve back onto the tank by rotating it Figure 5 11 5 Make sure the water filter...

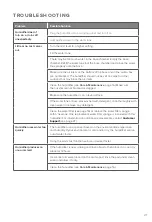
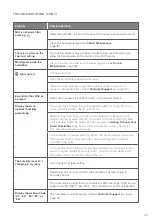
Page 21: ...difier is on a level surface If the water tank or base was washed with detergent rinse thoroughly with clean water to remove any detergent Clean the water filter see page 16 or replace the water filte...

Page 22: ...ified to fill the humidifier Avoid using water with high mineral content such as tap water Clean the humidifier see Care Maintenance page 16 Water visibly leaks from the humidifier Avoid running the h...

Page 23: ...ler than 430 753 ft 40 70 m Moisture may have built up inside the humidity sensor Make sure the nozzles are facing away from the aroma box so that mist does not settle on the sensor inside the aroma b...

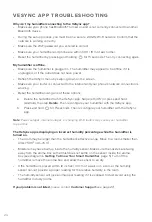
Page 24: ...e internet and your phone s network connection is working Reset the humidifier using one of these options a Delete the humidifier from the VeSync app Swipe left iOS or press and hold Android then tap...

Page 25: ...e with the manufacturer s instructions may cause interference to radio and television reception It has been type tested and found to comply with limits for an ISM Equipment pursuant to part 18 of FCC...

Page 26: ...roduct and is not transferable to any subsequent owner of the product regardless of whether the product is transferred during the specified term of the warranty This warranty does not extend to produc...

Page 27: ...re is a trademark of Apple Inc Google Android and Google Play are trademarks of Google LLC Wi Fi is a registered trademark of Wi Fi Alliance Amazon Alexa and all related logos are trademarks of Amazon...

Page 28: ...JJ081721AL M1_0621LUH A602 WUS LEVOITLIFESTYLE LEVOIT LEVOIT LEVOITLIFESTYLE LEVOITLIFESTYLE LEVOIT COM...

Reviews: