background image

24

FEDERAL COMMUNICATION COMMISSION INTERFERENCE STATEMENT - PART 15

FEDERAL COMMUNICATION COMMISSION INTERFERENCE STATEMENT - PART 18 

FCC SDOC SUPPLIER'S DECLARATION OF CONFORMITY

ATTRIBUTIONS

This device complies with Part 15 of the FCC Rules. Operation is subject to the following two conditions:  

(1) This device may not cause harmful interference, and 

(2) This device must accept any interference received, including interference that may cause undesired operation. 

NOTE: This equipment has been tested and found to comply with the limits for a Class B digital device, pursuant to Part 15 

of the FCC Rules. These limits are designed to provide reasonable protection against harmful interference in a residential 

installation. This equipment generates, uses and can radiate radio frequency energy and, if not installed and used in 

accordance with the instructions, may cause harmful interference to radio communications. However, there is no guarantee 

that interference will not occur in a particular installation. If this equipment does cause harmful interference to radio or 

television reception, which can be determined by turning the equipment off and on, the user is encouraged to try to correct the 

interference by one or more of the following measures: 

• 

Reorient or relocate the receiving antenna. 

• 

Increase the separation between the equipment and receiver.  

• 

Connect the equipment into an outlet on a circuit different from that to which the receiver is connected.  

• 

Consult the dealer or an experienced radio/TV technician for help. 

FCC Caution:

 Any changes or modifications not expressly approved by the party responsible for compliance could void the 

user’s authority to operate this equipment. 

FCC Radiation Exposure Statement 

This equipment complies with FCC radiation exposure limits set forth for an uncontrolled environment. End users must follow 

the specific operating instructions for satisfying RF exposure compliance. To maintain compliance with FCC RF exposure 

compliance requirements, please follow operation instructions as documented in this manual. This transmitter must not be 

co-located or operating in conjunction with any other antenna or transmitter. This equipment should be installed and operated 

with a minimum distance of 20 cm between the radiator and your body. The availability of some specific channels and/or 

operational frequency bands are country dependent and are firmware programmed at the factory to match the intended 

destination. The firmware setting is not accessible by the end user. 

This device complies with part 18 of the FCC Rules. 

This equipment generates and uses ISM frequency energy and if not installed and used properly, that is in strict accordance 

with the manufacturer’s instructions, may cause interference to radio and television reception. It has been type tested and 

found to comply with limits for an ISM Equipment pursuant to part 18 of FCC Rules, which are designed to provide reasonable 

protection against such interference in a residential installation. However, there is no guarantee that interference will not occur 

in a particular installation. If this equipment does cause interference to radio or television reception, which can be determined 

by tuning the equipment off and on, the user is encouraged to try to correct the interference by one or more of the following: 

• 

Reorient the receiving antenna of radio or television. 

• 

Relocate the equipment with respect to the receiver. 

• 

Move the equipment away from the receiver. 

• 

Plug the equipment into a different outlet so that the equipment and receiver are on different branch circuits. 

Conduct only the user maintenance found in this manual. Other maintenance and servicing can cause harmful interference 

and can void the required FCC compliance. The manufacturer is not responsible for any radio or TV interference cause by 

unauthorized modification to the equipment. It is the responsibility of the user to correct such interference. 

Arovast Corporation hereby declares that this equipment is in compliance with the FCC Part 18 Subpart B. The declaration of 

conformity may be consulted in the support section of our website, accessible from www.levoit.com  

Apple App Store is a trademark of Apple Inc. 

Google, Android, and Google Play are trademarks of Google LLC.  

Wi-Fi® is a registered trademark of Wi-Fi Alliance®. 

Amazon, Alexa and all related logos are trademarks of Amazon.com, Inc. or its affiliates. 

iOS is a registered trademark of Cisco Systems, Inc. and/or its affiliates in the United States and certain other countries. 

The Bluetooth® word mark and logos are registered trademarks owned by Bluetooth SIG, Inc. and any use of such marks by 

Arovast Corporation is under license. Other trademarks and trade names are those of their respective owners.

Summary of Contents for LV450S

Page 1: ...OasisMist Smart Humidifier Model LUH O451S WUS Questions or Concerns Please contact us Mon Fri 9 00 am 5 00 pm PST PDT at support levoit com or at 888 726 8520 USER MANUAL...

Page 2: ...rt Guide 2 2 3 5 7 8 10 11 15 20 23 25 26 Specifications Package Contents Power Supply AC 120V 60Hz Rated Power 280W Water Tank Capacity 1 19 gal 4 5 L Max Cool Mist Output 300 mL h Max Warm Mist Outp...

Page 3: ...duce the risk of fire electric shock or other injury follow all instructions and safety guidelines General Safety Do not cover the nozzles while the humidifier is on Doing so may damage the humidifier...

Page 4: ...in order to avoid an electric or fire hazard Please contact Customer Support see page 26 Unplugging the power cord will disable remote control of the humidifier and temporarily disconnect the humidif...

Page 5: ...J Water Filter Sponge K Heating Element L Float M Transducer N Float Brackets O Power Cord P Noise Silencer Q Absorption Pad R Air Outlet S Aroma Pad T Aroma Box U Humidity Sensor Air Inlet In Aroma B...

Page 6: ...ton Relative Humidity RH Percentage Warm Mist Indicators Mist Level Button Auto Mode Button Mist Level Indicators Auto Mode Indicator Mist Level Indicators White Low Mist Medium Mist High Mist Heat Of...

Page 7: ...Press to use warm mist while in Auto Mode Press to turn Auto Mode off and resume manual controls Warm Mist Button Cycles through warm mist settings low heat medium heat high heat and heat off see pag...

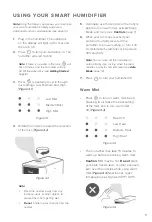
Page 8: ...he filter clockwise to secure it in place Figure 1 1 Note Make sure the water tank is clean before filling 1 Remove the water tank cover Figure 1 4 Figure 1 4 4 Mist should be directed away from walls...

Page 9: ...1 7 CAUTION Do not add water through the mist tube Do not add essential oils into the humidifier Only add essential oils to the aroma pad Figure 1 5 Do not use water treatment liquids or third party w...

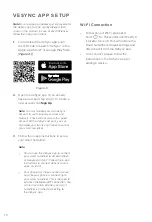
Page 10: ...the Wi Fi indicator turns off This will restore the smart humidifier s default settings and disconnect it from the VeSync app To reconnect please follow the instructions in the VeSync app for adding...

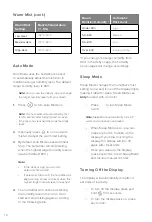
Page 11: ...minutes to warm up before producing warm mist Caution Mist may be hot Do not place your bare hands face or other exposed skin over the nozzles while using warm mist Figure 3 4 Nozzles can reach temper...

Page 12: ...reduce noise levels Note The humidifier will automatically mist for 15 seconds after being turned on even if the room has reached the target humidity level 1 Press to turn Auto Mode on 2 Optionally p...

Page 13: ...to Mode settings and the display will automatically turn back on when the humidifier is turned back on 2 Put 8 10 drops of essential oils on the aroma pad Figure 4 2 3 Insert the aroma box back into t...

Page 14: ...nd Do not place the humidifier on an inclined surface Never pour water directly into the base chamber Figure 5 1 Only add water to the water tank The humidifier will automatically release the correct...

Page 15: ...ry the humidifier instead Note Never immerse the base in water or liquid Do not place any part of the humidifier in a dishwasher Do not use detergents to clean the humidifier Cleaning You should clean...

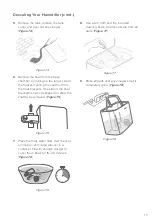
Page 16: ...e 6 5 Figure 6 4 7 Remove the float noise silencer absorption pad and aroma box from the base 8 Rinse all parts except the outside of the base with room temperature water Figure 6 5 To descale the hum...

Page 17: ...ng the shaft out from the float brackets One side of the float brackets is open U shaped to allow the shaft to be removed Figure 7 5 7 Place the float water filter mist channel aroma box and noise sil...

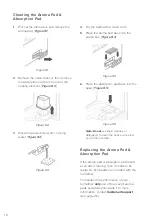
Page 18: ...he Aroma Pad Absorption Pad 1 Pull out the aroma box and remove the aroma pad Figure 8 1 Figure 8 1 Figure 8 4 Figure 8 5 Figure 8 2 Figure 8 3 2 Remove the noise silencer then remove the absorption p...

Page 19: ...dry completely before storing Store in a cool dry location 2 Place the absorption pad and the noise silencer back over the heating element Figure 9 2 Figure 9 1 Figure 9 4 Figure 9 3 Figure 9 2 3 Flip...

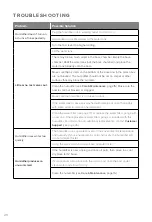
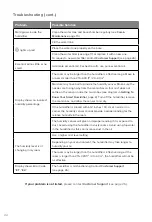
Page 20: ...e humidifier is on a level surface If the water tank or base was washed with detergent rinse thoroughly with clean water to remove any detergent Clean the water filter see page 17 or replace the water...

Page 21: ...fier in a room with over 60 relative humidity Wipe any excess water off the top and bottom of the base Do not shake the humidifier Make sure to place the humidifier on a flat level surface Check the w...

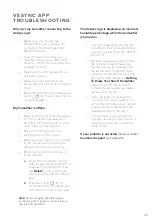
Page 22: ...mart Humidifier page 8 Turn off the humidifier remove the aroma box and allow the sensor to air dry If the humidifier is placed within 12 inches 30 cm of a wall or in a corner the humidity sensor cann...

Page 23: ...s not settle on the sensor inside the aroma box see diagram in Getting To Know Your Smart Humidifier page 8 Turn off the humidifier remove the aroma box and allow the sensor to air dry If the humidifi...

Page 24: ...ur body The availability of some specific channels and or operational frequency bands are country dependent and are firmware programmed at the factory to match the intended destination The firmware se...

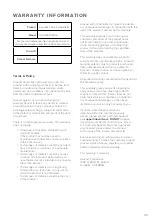
Page 25: ...he product and is not transferable to any subsequent owner of the product regardless of whether the product is transferred during the specified term of the warranty This warranty does not extend to pr...

Page 26: ...se contact our helpful Customer Support Team Arovast Corporation 1202 N Miller St Suite A Anaheim CA 92806 Email support levoit com Toll Free 888 726 8520 Mon Fri 9 00 am 5 00 pm PST PDT Support Hours...

Page 27: ...Notes...

Page 28: ...DL021522RF M1_1121LUH O451S WUS LEVOITLIFESTYLE LEVOIT LEVOIT LEVOIT LEVOIT COM...

Reviews: