background image

INSTALLATION

7

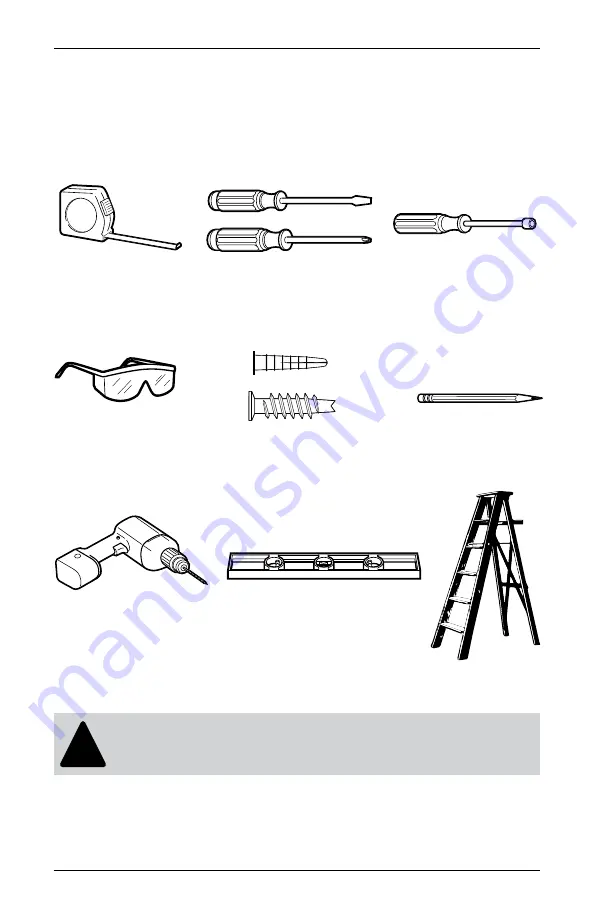
TOOLS AND FASTENERS YOU MAY NEED (not included)

The tools you will need for installing your blind will vary, depending on the installation 
surface and mounting bracket type.

Tools typically used for installation include:

Metal Tape Measure

Safety Glasses

Drill with Bits

Ladder

Screwdrivers  

(both flat and Phillips head)

Drywall Anchors

Level

1

4

" Nutdriver

Pencil

CAUTION: 

Use drywall anchors when mounting into drywall. (Not 

provided.) Failure to properly anchor screws could cause shade to fall 
possibly resulting in injury.

!

Motorized Tilt Operation

Summary of Contents for Faux Wood Blind Series

Page 1: ...da de inclinaci n Inclinaison motoris e Real Wood Faux Wood Blinds Persianas de madera real y madera de imitaci n Stores en bois v ritable et simili bois INSTALLATION OPERATION CARE INSTALACI N MANEJO...

Page 2: ...death Please reference all warning tags and labels in the instructions and on the blind WARNING Window Blind Cord Can STRANGLE Your Child Children can strangle in the loop above the cord bead Children...

Page 3: ...7 Installation Inside Mount 8 9 Outside Mount 10 11 Installation Additional Components Satellite Battery Pack 12 Extension Brackets 12 Spacer Blocks 12 Hold Down Brackets 13 Attach Valance 13 Operati...

Page 4: ...rst step review the mounting types and basic window terminology illustrated below MOUNTING TYPES AND WINDOW TERMINOLOGY Outside Mount Inside Mount Molding Head Jamb Sill Jamb Jamb Inside Mount Blind f...

Page 5: ...s Lay out and organize all parts and components Additional bracket s will be provided to hold battery pack securely in place and to ensure blind is properly anchored INSTALLATION OVERVIEW Installation...

Page 6: ...y Clips Remote Control Kit optional Hex Head Screws 2 per Bracket Extension Cable optional Standard Battery Pack Tube Socket AAA Battery 2 Pack Remote Control Remote Control Holder Remote Guide Remote...

Page 7: ...et type Tools typically used for installation include Metal Tape Measure Safety Glasses Drill with Bits Ladder Screwdrivers both flat and Phillips head Drywall Anchors Level 1 4 Nutdriver Pencil CAUTI...

Page 8: ...location of the desired bracket mounting holes two per bracket making sure they are square and equally spaced STEP 2 INSTALLING THE BRACKETS Drill pilot holes using a 1 16 drill bit using pencil mark...

Page 9: ...d slide the headrail straight back into the brackets If the headrail can slide from side to side in the box brackets use a flat head screwdriver to bend out the tabs on the ends of the headrail until...

Page 10: ...the headrail Use a level to ensure all brackets are even and aligned Mark the bracket mounting hole locations two per bracket making sure they are square and equally spaced STEP 2 INSTALLING THE BRACK...

Page 11: ...bracket s are included hook the front edge of the headrail into the channel on the bracket Lower the front of each box bracket and press until the locking tab clicks into place Attach valance clips t...

Page 12: ...ation INSTALL SATELLITE BATTERY PACK optional Mark position of satellite battery wall mount bracket The satellite battery may be mounted in any orientation Position the battery pack close to the power...

Page 13: ...the end marked TOP arrow is pointing up For returns insert L shaped return clip into the groove on the backside of the valance return Align and insert the other end of the L shaped return clip into t...

Page 14: ...d Lift To raise the blind pull cord in toward the center of the blind to release the lock this allows you to raise and lower the blind Once the blind is at the desired height pull the cord away from t...

Page 15: ...acket and slide the headrail out of the brackets If center support brackets are used lift the front of the headrail up to clear the channel of the bracket and slide out forward Uninstall remaining bra...

Page 16: ...Improper cleaning may void warranty DUSTING Use a feather duster for regular cleaning FORCED AIR Blow away dirt and debris using clean compressed air VACUUMING Use a low suction vacuum with a brush ty...

Page 17: ...LOR Customer Service regarding any questions or concerns you may have about your new shades you may reach us at 1 800 LEVOLOR 8 30 am 6 30 pm EST www LEVOLOR com ADDITIONAL PARTS AND SERVICES Addition...

Page 18: ...2019LEVOLOR Inc 3 Glenlake Parkway NE Atlanta GA 30328 1001677 18 0007 028...

Reviews: